Beachside Reuse

April is the month we visit Grammy on Anna Maria island in Florida. She lives in a sweet little house, one of the originals on the island, now surrounded by large 3-story condos. I feel like we’re in that story, The Little House, by Virginia Lee Burton, about the tiny house that stayed put and a big city was built right around it. This cottage is the epitome of “If it ain’t broke, don’t trash it.” It survives, a cottage-in-the-rough amidst million dollar resort-style rentals, hotels, and Grammy keeps it tidy, functional, and full of simple beachside reuses.

The Little Cottage in the Rough, Anna Maria Island. Photo © Liesl Clark

A low coffee table by the phone holds phone books (Grammy doesn’t use the internet — actually the table doesn’t hold phone books, but a sagging box does just under the coffee table.) But the floor isn’t level so the table wiggles when items are placed on it. Solution? Grammy placed shells under the legs of the table, just like carpenter’s shims, to shore up the legs and prevent any movement.

Shells For Shims. Beachside Reuse at its Best. Photo © Liesl Clark

A plastic soda bottle fish adorns her antique fishnet on the sunroom wall. This fish, spray painted pink on the inside, was simply cut so fins and a tail were articulated, a glue gun was used to seal the fins and tail, and glitter glue was used to create the effect of gills. Done! A cute sparkly pink fish for her household decorations.

Coke Bottle Sunfish © Liesl Clark

An ancient palm tree was cut down on the property years ago. Today the stump is used as a planter for succulents and cacti.

Trunk Planter For Beach Cacti. Photo © Liesl Clark

Shells hung along the wall of Grammy’s potting shed add texture and bright Florida light to any day. These would make interesting downspouts on a gutter.

Potting Shed Shell Adornment. Photo © Liesl Clark

And geraniums in a tree trunk that frames nearby boats inspires the gardeners in us all!

A hole in a trunk makes room for pretty geraniums. Photo © Liesl Clark

In Praise of Simple Machines in the Kitchen

Back to basics with our morning joe. Photo © Liesl Clark

Simple machines in the kitchen and household are one of our secrets to living the pleasures of the simple life, decreasing our dependence upon electricity or fancy gadgets with many parts. The simple machine simply works. They’re the hand tools of old that we fall back on when modern conveniences break down, which they often do. Take the lever, for example. Pull a lever for mechanical advantage and you have the strength of Hercules.

When we arrived at Grammy’s Florida home with a 10-gallon bucket filled to overflowing with valencia oranges we had picked, I looked in her cupboard to find an electric citrus juicer.

Citrus Juicer. The plastic small appliance we can do without. Photo © Liesl Clark

“Great!” I thought, until I plugged the plastic thing in and found it didn’t work. Taking it apart to see if it needed a new fuse, etc. wasn’t something we had time for. So Grammy pulled out another juicer, the hand lever kind you pull down that squishes your halved oranges in seconds, and I knew she had found the better machine.

This beautiful, all stainless, citrus press is a thing of beauty. Photo © Liesl Clark

In minutes, we had lovely glasses of hand-lever-squeezed orange juice, all from the effort of a 10-year-old who wouldn’t relinquish the lever. I’m ready to invest in one now that I’ve discovered the joys of fresh squeezed, self-picked liquid gold. We currently use a ceramic citrus juicer at home which works really well, but the simple machine could cut our hand-rotating out completely, which makes sense for 4 cups of o.j. in the a.m.

Fresh OJ in seconds, and a lesson in simple machines. Photo © Liesl Clark

We’ve been on a mission, lately, to seek out these ingenious machines that provide mechanical advantage, putting force on an object like an orange with little effort. One-by-one, they’re replacing our small appliances.

Take the electric coffee grinder, for example. Nothing wakes up our household more abruptly than the sound of someone whirring coffee beans in an electric grinder. And when the electricity goes out, which it often does in winter on our Northwest island, we can’t have fresh ground coffee. Could we find an adequate coffee grinder that wouldn’t tap resources like electricity or fuel? I searched for months throughout the web and in antique shops for old-fashioned grinders and found some beautiful ones. But none got great reviews that I could trust and most wouldn’t grind the beans to espresso grade. I bought a camp-style one for my husband to take on his mountaineering expeditions. But it wouldn’t grind enough for a house full of groggy adults.

We then purchased a beautiful Persian grinder that also took ages to grind beans. We imagined in the warmth of some semi-arid desert, this grinder would fit nicely on the back of a camel but you’d need an hour or so each morning to get enough ground stuff for a decent cup of joe. It was promptly retired to pepper grinding.

Finally, we found a grinder that was the most simple design (by Stumptown) and can take a mason jar as its reservoir. This simple machine utilizes larger gears than the 2 grinders we had previously bought and it produces a fresh ground coffee perfect for my hubby’s stove-top espresso maker.

The best we could find, a modern version of an antique coffee grinder. Photo © Liesl Clark

Contrary to what Stumptown says on their website, my husband husband claims “it’s effortless” to grind the coffee. No workout, truly. And I can attest to the fact that it’s not too hard to grind your beans and it doesn’t take very long to produce the perfect grind for several cups of coffee and gives us peace-of-mind for power-free days at home. We use hand-grinder daily, in fact, power or no power.

Two minutes of grinding and you've got a fine espresso grind. Photo © Liesl Clark

Our toaster, too, is a simple camp stove version of placing your bread over your burner, because we’re on a mission to reduce our electric appliances so we can sustainably live off the grid. We haven’t owned a toaster for 5 years now and haven’t missed it one bit.

If you want to go caveman-style, you can even forgo your garlic press for a stone. Seriously, for us, the large pestle we brought back from Nepal is the best garlic crusher I’ve ever used.

So try your hand at using simple machines again. You’ll enjoy cutting back on your power dependence and feel like you truly earned that morning fix of java and o.j.

Zero Offset Vacation Days

Zero Offset Your Carbon-Heavy Vacation Travel with Days Spent at Sustainable Organic Farms. Photo © Liesl Clark

Let’s face it: Flying to Florida from Seattle isn’t the most carbon-free activity. But if we want to see Grammy, we have to go to her. She simply doesn’t fly.

Once we arrived in Florida, we dreamed up a few activities to help offset the jet fuel burn our family of 4 incurred. Hitting the beach, only 100 yards away, was easy — just throw a towel around your shoulders. But be sure to bring a bag for collecting plastics.

Plastics Retrieved En Route to the Beach. It's Easy To Do. Photo © Liesl Clark

Before reaching the beach, we filled our bag with lots of straws and straw sleeves found in juice boxes. Interestingly, we didn’t find too many plastics on the beach as I discovered, a day later, that 2 men drive along the beaches in a little golf cart with a trash picker and retrieve all the debris. I wondered why they couldn’t simply walk?

Here's one they missed. Sunglasses part on the beach. Photo © Liesl Clark

Every day, we filled a bag with plastics while walking along the sidewalks or shore. For our children, the incentive was finding something odd and different. A tiny working flashlight in the shape of an alien was the first day’s reward, then a cute plastic fish the next, and all types of plastic beach toys were recovered, too. We needed a shovel and it didn’t take long to find one. No lack of entertainment when you decide to do a bit of daily good and pick up the world’s plastics. And the Earth always gives back to our little scavengers in interesting ways. Plastic “swords” used in tropical drinks to hold fruit together washed ashore daily to the delight of my son, who started collecting them for his Lego characters.

McWashed Ashore. Sliced apples in a bag? Photo © Liesl Clark

The contents of a bag of McDonald’s apple slices found tucked in the dune vegetation became food for eager sea gulls.

Apple snacks. Courtesy of sea-borne McDonald's fare. Photo © Liesl Clark

In between hours of play amidst the waves and digging in the sand with our newly-found beach toys, it didn’t take much effort during our “plastics recovery” walks to fill a bag a day. If we all did this, just bent down and picked up the straws and plastic caps under foot, we’d feel like we did a form of good, helping to extract the plastics from our shorelines before they head back out to sea.

This leaf wasn't plastic, and it's a pleasure to see a stretch of sand that was plastic-free. Photo © Liesl Clark

But the greatest fun we had was visiting a local organic fruit grove. I spent a little time online and discovered a list of pick your own-type farms in our region and many are organic farms. We hopped in the car and drove inland about 16 miles to find an organic orange grove.

Get to know the places you vacation in a little better by picking local organic produce there. Valencia oranges are in season in February in Western Florida. Photo © Liesl Clark

The kids had never picked oranges and this experience is surely one they won’t forget. In the direct sun, the temperatures were in the 90s and we had to watch the ground for fire ants. With some long fruit picker poles in our hands, we ambled several rows of valencia orange trees into the grove and were overwhelmed by the sweet smell of orange blossoms.

Fruit Picking in Manatee County, FL. Photo © Liesl Clark

These fruit-laden trees grew in what loooked like pure sand, but they’re obviously getting the nutrients and water they need because the oranges are delicious and juicy. It took us 15 minutes in the hot sun to fill a 10-gallon bucket. And with the price of $10/bucket we walked away feeling we got the better end of the deal.

Bucket Full of Valencia Oranges. Photo © Liesl Clark

The children needed an ice cream cone to cool off, so we discovered another U-pick organic farm down the road. This one grew hydroponic strawberries — and we picked our fill of delicious sun-sweetened fruit.

Picking Strawberries at O'Brien Family Farm. Photo © Liesl Clark

And the ice cream cones, of course, were the perfect plastic-free end of day snack, a just reward for our zero offset vacation day efforts.

Ice cream cones are the original plastic-free treat. Photo © Liesl Clark

Why I Never Buy Lip Balm In Plastic Tubes

One of the more common items we find along shorelines, nationwide, are Chapstick tubes. Somehow they either fall out of pockets, cars, trash cans or are inadvertently left behind when we’re on outings so they make their way down to the water and float back in on the high tide. I’ve collected hundreds of these buggers from beaches — enough to turn me off plastic tube lip balm forever.

Reduce & Refuse: We try our best, now, to purchase lip balm in tin or wood containers. Or make it ourselves with our own beeswax. There are many non-plastic options on the market, like Earthwise Medicinals’ Wintermint Lip Balm.

Earthwise Medicinals’ Wintermint Lip Balm comes in cute tin containers, Photo © Earthwise Medicinals

The containers are small, attractive, and 100% recyclable. My children use the little wooden boxes of their favorite lip balm over and over again as specimen containers for archaeology outings. But they’d also make great kindling.

Repurpose and Reuse: So, if you have a Chapstick tube, what to do with it when you’re done with the balm?

1) Salt & Pepper Shaker for camping trips – Pour a little salt and pepper into clean empty tubes and toss in your bag for a little salt and pepper at work or whenever you are on the go eating.

2) Perfume refresher- Don’t have a travel size perfume? Soak a cotton ball in your favorite perfume (or essential oil) and stuff inside an empty lip balm tube. When you need a refresher, just remove the cotton ball and swipe on! Also great for tossing in a drawer for freshness, or even coat pockets when they are stored for the summer.

3) Instructables has a tutorial for making a tiny Chapstick tube LED flashlight.

4) Yours Truly, G recommends simply refiling your tube with homemade lip balm. They make excellent gifts, too.


5) Always wishing you had a spare plastic bag when you go grocery shopping? Make a travel plastic bag holder that attaches to your key ring!

6) A 7-year-old trash hacker designed a travel toothpick holder from a used lip balm tube.

7) Send a secret message to a friend inside your lip balm tube or turn it into a secret waterproof treasure map holder:

8) Store an emergency $100 bill inside your tube and put inside your purse, backpack, briefcase, glove compartment. But don’t forget about it.

Recycle: Most lip balm containers are made of #5 plastic, which is also used for things like yogurt and over-the-counter medicine bottles. Whole Foods, along with Organic Valley and Stonyfield Farm, has a Gimme 5 initiative that accepts #5 plastics in some stores. Check to see if there’s one in your area.

balm on the road.jpg

I know there’s a campaign out there, questioning whether any of us have actually fully used up our chapstick (before the chapstick tube somehow disappears). Well I have! And often. I’m one of those people who’ve used up plenty of ’em because lip balm is critical protection against the elements. High in the mountains in remote parts of the planet, lip balm is tantamount to survival. I’ve even attached lip balm to the outside of my pack or to a gizmo that goes around my neck so it’s always available, a lip balm necklace of sorts. Go to the mountains or desert sans lip balm and you quickly end up with blistery bloody lips that crack and ooze with a simple smile. Gross. And painful. So, use up your lip balm, and better yet, skip the plastic tube and bring it to your favorite places in nice metal or wooden containers.


Yurtopia

We’ve fallen in love with a little town in Colorado called Paonia. It’s so small, and not so well known, that the locals keep asking us, “How did you find out about Paonia?” You see, it’s a bit of a secret, this gem of a town, and many here like to keep it that way. Last night, this little oasis with 1500 people had a baroque clarinet and piano concert at The Blue Sage while Miner, an indy folk rock band, played at The Paradise Theater across the street. This ain’t no sleepy little cow town. It boasts about 10 wineries here in the valley, some of the highest fine wine crafted in the U.S., and countless organic farms and ranches with grass-fed livestock.

Riverview.jpg

The view of Mt. Lamborn, sitting outside the yurt along the North Fork of the Gunnison. Photo: Liesl Clark

But this isn’t an article about Paonia. I’m here to gloat about our first experience living in a yurt. On both Air BnB and VRBO, you’ll find a family here has a beautiful getaway property right along the North Fork of the Gunnison. It’s a gorgeous stretch of river right in the heart of farm country, with views of the West Elk mountain range, the Raggeds and Lamborn mountain, which dominates the sky just north of town. George and Devon have two yurts here, and we came to suss out whether one day we might want one on our property.

Yurt1

Yurts were designed and innovated by the people of the high mountain steppes of Central Asia. We don’t know exactly when they first appeared, but archaeology tells us that they were firmly established as homes for nomadic peoples by the 5th century BC. Their circular design mimics symbols of the unity and interconnectedness of all things.

Walk to yurt

One of the yurts here is more rustic than the other, with no electricity or running water, but it’s our favorite because it’s set in an old growth cottonwood forest that feels like a fairy glen one can wander through and marvel at the trees in various states of growth and decay.

Cottonwoods

Both yurts are 30 feet wide and the one in the cottonwood forest has traditional wooden-strut walls covered in poly fabric, a concrete floor covered with carpets and a wood stove for heat.

sitting in glamping yurt

This “glamping” yurt has the coolest composting toilet, out in a little horse trailer.

JPEG image-201CA9A6E5C4-1

There’s a composting toilet in that little horse trailer.

I kid you not, this outfit is worth seeing.

JPEG image-639DBE4D50B3-1

The yurt we’re living in is just like any house, with drywall walls and a propane insert fireplace. There’s a full kitchen and bathroom inside, even a piano.

JPEG image-9E4BD4FA2881-1

We’ve felt what it’s like inside on a breezy morning and this baby is tight. The circular design lends itself to withstanding wind, as there are no corners or straight walls for the wind to buffer against.

JPEG image-3BF8E86F584B-1.jpg

As much as we love the inside of these structures, our energies are spent outside, enjoying all the things we can do here.

BT0C1859.jpg

BT0C1912.jpg

Evenings have been spent by the fire pit or in the hot tub.

BT0C1768

BT0C1817

And during daylight hours, the kids have been enjoying the bikes we have rented from The Cirque Cyclery in town, a cool juice bar and cycle shop combo that’s worth visiting, as the old building renovation is worth a look inside.

BT0C1581.jpg

We’re so impressed with this little town, life in a yurt,  and all the things one can do here.

Trampoline1

Trampoline5

If you’re interested in experiencing yurtopia, we highly recommend this little spot in Paonia. I’d be happy to get you in touch with George and Devon if you’re looking for a getaway dream vacation here. Just let me know in the comments below.

BT0C1876.jpg

Putting Chickens To Work As Compost Sifters

All of our animals have jobs that we feel they have to do to contribute toward the success of our little homestead. Sailor, our dog, keeps the deer and raccoons away. The cat, Willa, is our mouser. The bees pollinate our crops and produce honey. The worms produce beautiful fertilizer. Even the guinea pig, Gusteau, provides pellets that can go directly into our garden.

IMG_1050.jpg

Sailor the water dog works hard to tree coons and send the deer bounding away from our gardens.

But it’s the chickens who are the true workhorses on our property. Of course, their eggs are a staple in our diet. But we use their chicken yard as a closed loop composting system where our weeds go in, the scratch them up, add their own fertilizer, and we excavate the yard throughout the year for the beautiful fertilized compost they provide. But here’s one more thing they do for us: The produce a perfectly-sifted specialty compost that we can scatter around our lawns and gardens that rivals any commercial compost out there.

JPEG image-BEC66CC15E25-1

Here’s how it works. Their yard is penned in by 2-inch chicken wire, and it’s placed up on a hill where the backside of the hen yard has a 3-foot slope behind it. The chickens, daily, dig and scratch near the fence, constructing their dust baths and looking for tasty bits to peck at in the yard materials we throw inside.

JPEG image-CDFE1682BAAF-1

As their scratching activity breaks down the organic matter we throw inside their yard, their scratching serves to sift and push the small composted materials through the wire fence, which acts like a sieve. On the outside of the hen yard, we have a slope of pure black, composted and perfectly-sifted humus fertilizer, ready for the gardens and lawns.

JPEG image-47C9C709D7EE-1

All I have to do is show up with a bucket every few days, and collect the fluffy sifted compost to use around the property. Thank you, girls, for your hard work! We appreciate your efforts and contribution toward making the world’s most beautiful sifted compost there is.

JPEG image-D332AA69AD51-1

My Zero-Work Perennial Vegetables

I love my perennial veggies. My whole food garden, each spring, is designed around the little edibles that emerge, many as new unplanned-for surprises.

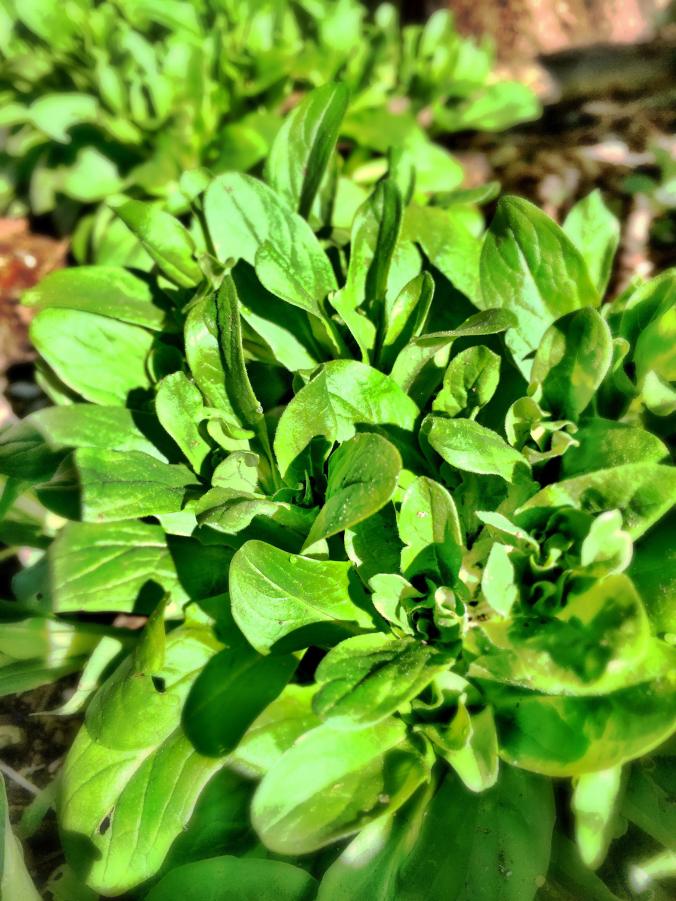
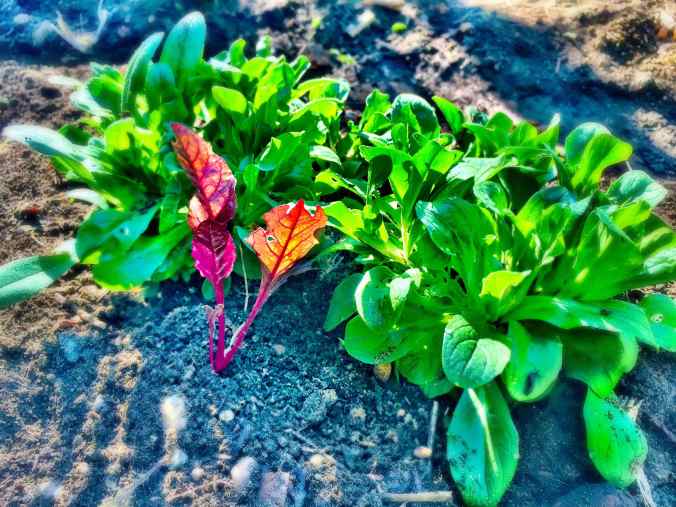
Corn mache is among the first edibles to appear in the garden. I let them go to seed each spring so they can come up around the garden next winter. If you haven’t tried corn mache, it’s a hearty salad green you’ve likely seen in fancy restaurants. It can be eaten as part of your raw salad or you can stir fry it. We also throw it in smoothies for an extra jolt of green veggie vitamins.

corn mache.jpg

Jerusalem artichokes: Plant them once and you’ll get them year after year as you’re sure to miss a few tubers during harvest. These can be harvested all winter long.

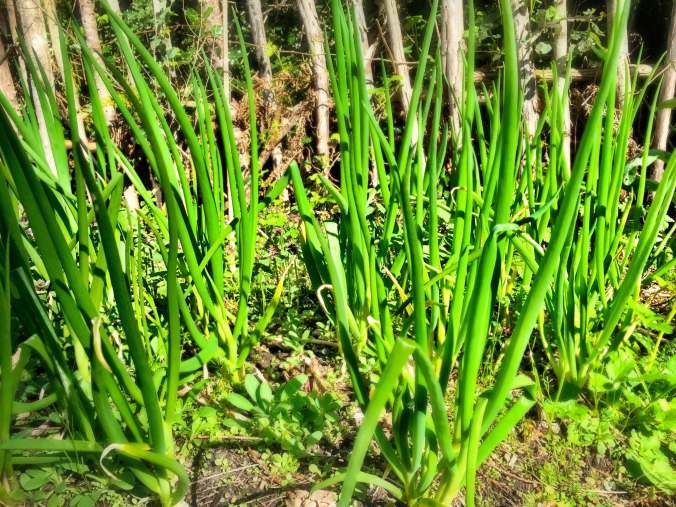
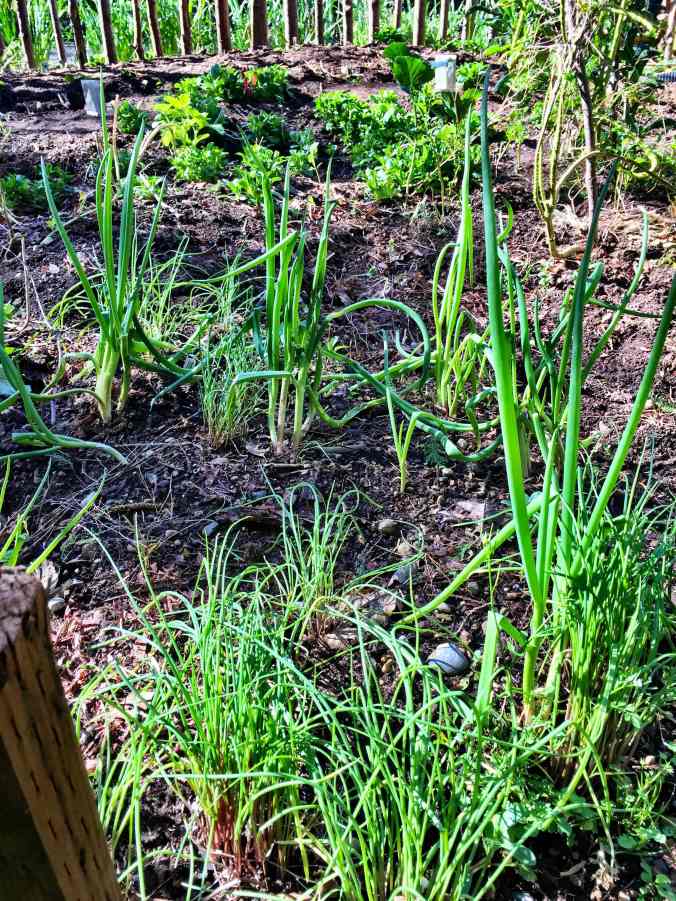
Walking onions: These are one of my favorite perennial veggies for the garden. They’re an heirloom variety of onion that produces a long scape with an onion flower on the end that turns into a bulb. Just let it reach for the sky and then bend over and plant itself right into the earth again, walking its way around your garden. This is why my garden changes design each year. I modify the shape and configuration of beds based upon where the onions have walked and where other vegetables have reseeded themselves. I simply weed around my perennial food.
You eat the walking onion greens, which are a full-bodied onion flavor, very strong, and can be used as an onion substitute in any recipe.

walking onions.jpg

Chives, Garlic, Shallots: Chives are a perennial, so just plant a row and they’ll reappear each spring. Put them in your perennial beds, too, as their beautiful allium-family purple-blue flowers add color to every garden. I also leave a few garlic and shallot heads in the garden to see if a few will sprout the next spring, and of course they always do.

chives

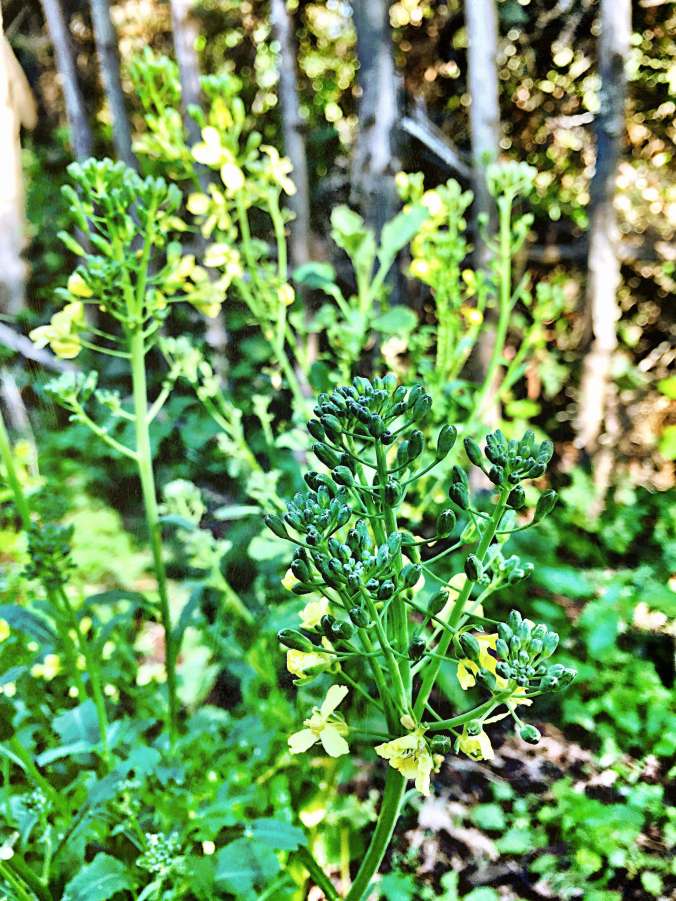
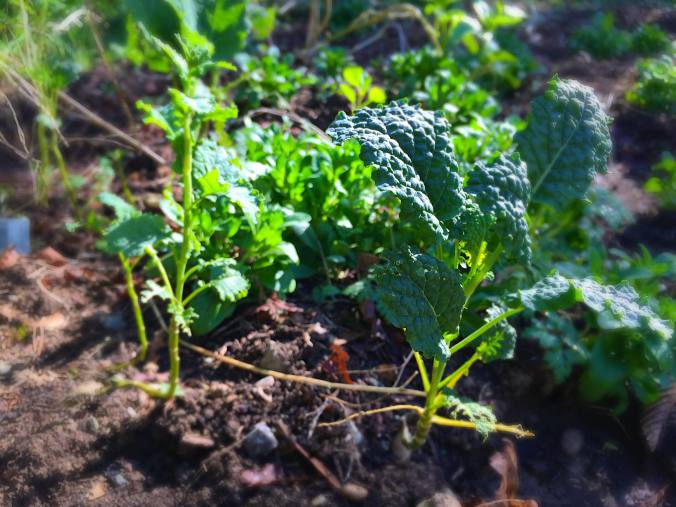
Brassicas: Here’s a confession — I have kale plants in my vegetable garden that are 2 and 3 years old. They look like dinosaurs but I just keep pinching them back and they keep producing leaves and little flower heads which are perfectly edible. They’re like mini broccolis and go beautifully in a frittata. Letting a few flower, too, adds color and pollen/nectar for our honeybees.

Brassicas.jpg

Arugula: You never have to replant arugula if you plant it once and let it go to seed. Just watch those seeds sprout next spring, thin them out, and you’ll have a hearty rocket salad in no time.

Arugula strawberries.jpg

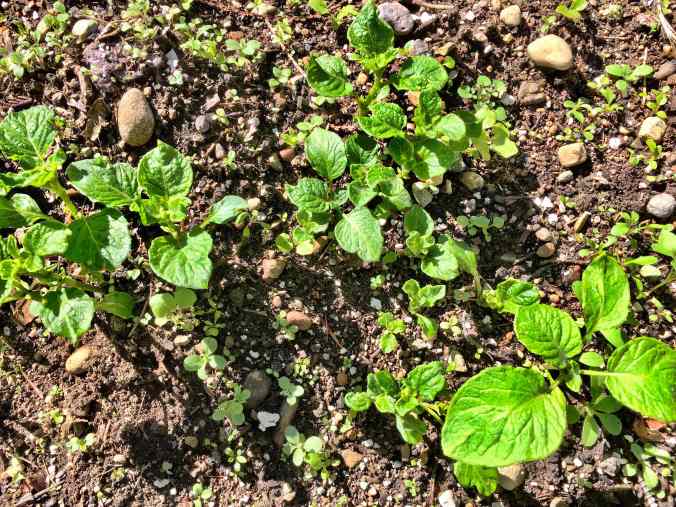
Strawberries: As in all berries, they’re a fruit of the earth that will come back year after year. The photo above shows how I’ve left some arugula in with the strawberries to commingle with each other this season.

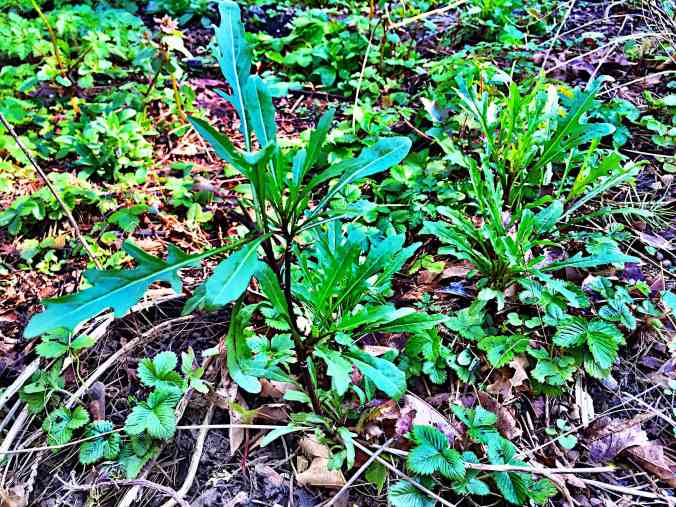
Swiss Chard, Kale, Collards: I put chard in the same category as my kale and collards. If I just let them go to seed and sprinkle all of the seeds around, a few hardy plants will come forth in the spring. Here’s a beautiful specimen that volunteered itself this spring, right in with some corn mache.

Chard.jpg

You never really need to buy kale, collard, or chard seeds if you just let them go to seed and replant themselves.

Kale2.jpg

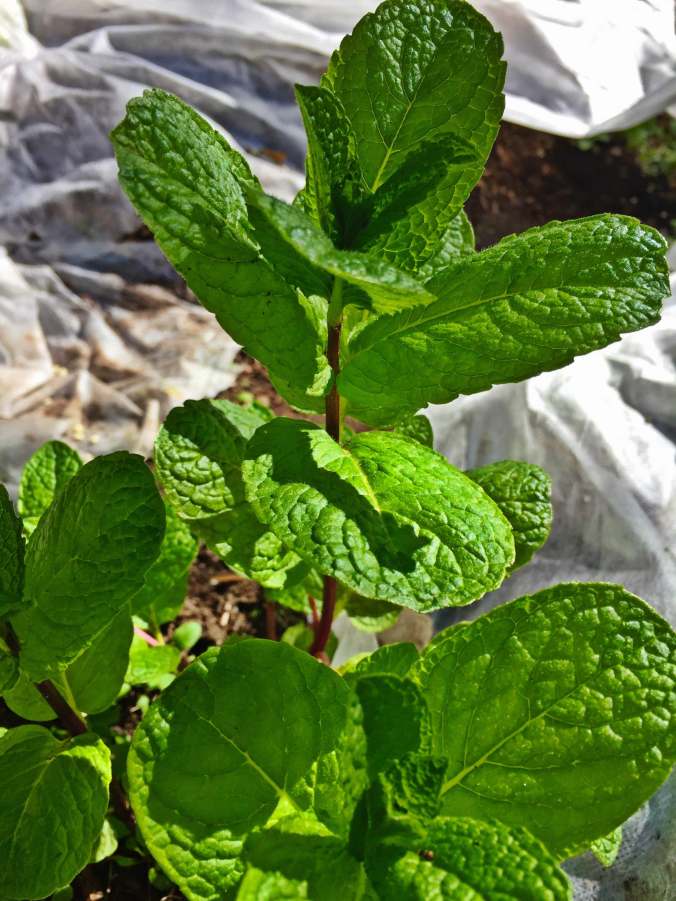
Mint: Mint always comes back, and you’ll likely have to whack it back a bit to prevent your whole garden from becoming a mintpalooza. Ours moves around a bit, but we let it stretch its legs because we’re perennial plant nurturers, and let our veggies do some walkin’ so they find their favorite spots to thrive.

Mint.jpg

Potatoes: It goes without saying (but I’m saying it anyway) that when you plant potatoes, you’ll have them for life, in the same bed you originally planted them in. There will always be little taters you somehow missed during your harvest. And they’ll reappear next year to bring a smile to your face in the spring.

Potatoes

Asparagus: Another favorite. If you make the effort to dig a trench and get your asparagus planted, it’ll bring you joy each year once the plants are established.

Sorrel and Miners’ Lettuce: Two more heirloom category veggies that will rock your world. My friend, Rebecca, has these all winter long in her garden and she gladly shares her bounty with us. I never bother to plant them since she has so much to share. Check out her sorrel and miners’ lettuce pesto.

Rhubarb: Rhubarb is a vegetable, so I’m including it in my list of perennial veggies. Plant it once, and you’ll thank yourself for years to come. Rhubarb is versatile!

Blueberries.jpg

The welcome site of spring blueberry blossoms

So, enjoy your no-work perennial veggies. Your fruits, too, will come back year after year if you give them what they need (prunings, compost, water and love.) Our lives are so enriched by the blueberries, raspberries, kiwis, apples, plums, figs, blackberries, and gooseberries that ripen each year on our property. Veggies can, and will, do the same if you nurture them and allow them to find their sweet spot in your garden to flourish.
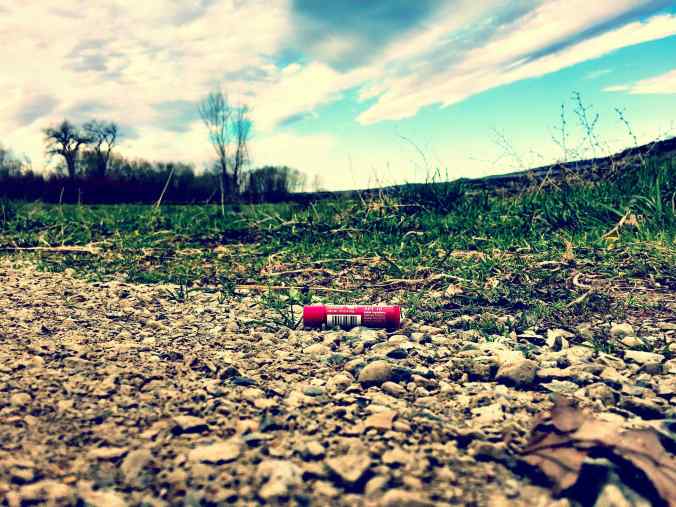
 

Chickens Love Pond Algae

We have a pond. Starting in the early spring, the algae on the surface blooms and spreads its bright green color around the pond, stunning us with iridescence. But at mid-point in the summer we decide to slow down that spread of green and harvest the algae for our compost and chickens. This spring we’ve taken some algae earlier, and the chickens are thrilled.

They just love it, and it’s excellent green-matter, apparently full of nitrogen, for the compost.

It’s a good day for the chickens when we feed them algae. At first they hesitate, not so sure about all the tiny “leaves” connected together by tiny filaments. But then the algae is consumed en mass, every last morsel ingested by our egg-layers.

The more we feed our chickens the fruits from our land, the less we spend on the pricey organic soy-free whole grain layer mash they’d otherwise consume. What special foods do your hens consume?


DIY Stone Pillars & Planters

We simply have too many rocks in our soil. When we harvest potatoes, there are many false alarms on harvest day as perfect potato-shaped rocks are  procured from the soil rather than spuds. So when we cleared a new spot to add planting space to our veggie garden this summer, we had a pile of waste as a result — rocks. What to do with the rock pile? I thought about giving them away in our local Buy Nothing group (yes, I’ve seen people post that they want rocks on our neighborhood Buy Nothing group), but then the hoarder in me took over and we chose to make stone pillars instead. It’s quite easy, but there are a few tricks you’ll need to know about to pull this artistic gardenscaping off well.

First, you’ll need chicken wire. Make sure your chicken wire holes are not too wide for the size of your rocks.

1) You’ll need to cut a rectangle of chicken wire out, about 2.5 to 3 feet high (depending on how high you want your pillars to be) by 4 to 5 feet wide. Wrap the wire around, into a cylindrical shape and hook it together with the wire ends you’ve created in your wire-cutting process. Make sure you leave no wire ends poking out anywhere as those could be a hazard for passers-by. You now have a cylinder cage for your rocks.

2) Then, start filling your chicken wire cylinder with rocks! The trick is to place your largest spuds, I mean stones, on the outside of the wire so they block the smaller ones from falling through the mesh. My son and daughter love filling the pillars up with the stones they bring in on their wheelbarrows.

3) Fill until your cylinder is full, brimming with stones to give a pretty fieldstone pillar affect to your favorite spaces.

Now, Make Stone Pillar Planters!

We love our pillars around the pond so much, and found we had plenty more rocks to deal with, so we created 2 more pillars with the added feature of a planter inside. Here’s how:

Fill your stones only 1/3 of the way up your chicken wire cylinder. Then, add a gallon or half gallon plastic or clay pot inside so the pot’s rim is flush with the top of the chicken wire cylinder.

Fill in around the outside edges of the pot with stones and completely cover up the pot from the outside, all the way to the rim of the pillar.

Then, plant your favorite flower in the pot as you would any planter!

Chive Salsa

In which chives and mint are combined to make a stunning salsa.

Chives and Mint Work Together For Salsa

I’m not one to follow recipes to the letter so feel free to add and subtract as you see fit for your tastebuds.

We have a lot of chives in the garden at the moment and since this is the time for gathering and preparing foods the year ahead, we make salsas, jams, and pestos like crazy around here throughout the spring and summer. This salsa is savory with a hint of mint to give a fresh taste in place of tomatoes which take their sweet time to make an appearance around here. This green salsa-like paste goes well with quesadillas, grilled fish, and burritos.

Start with a bunch of chilves from the garden.

1 bunch chives

6-8 fresh mint leaves

1 garlic scape (or clove of garlic)

1/2 bunch cilantro (about a handful (I use stems, too, but that’s up to you))

1 jalapeno pepper

3/4 teaspoon sea salt

2 Tablespoons water

Roast your pepper in the oven until it’s blackened or do it over the stove. Sweat your pepper for 20 minutes or so in a jar or paper bag, then remove the stem and seeds. I roast mine on my camp stove toaster that we use for our off-the-grid toast.

Roasting a pepper on my camp stove toaster (I love this thing.)

Throw everything in your Cuisinart or food processor and let it rip until the salsa looks like salsa. If you don’t have a food processor, using a mortar and pestle works perfectly, simply add the water last. I use a rock salt sea salt and grind it in the mortar and pestle as it tastes so wonderful that way!

I grind my own sea salt in a heavy mortar and pestle on the floor.

If you amend this recipe with your own additions or subtractions, please let me know what works for you in the comments below.