Fabric Scrap Doll Tutu

Easy Fabric Scrap Tutu For a Child to Make, Photo © Liesl Clark

Visiting grandma means we get to dive into her boxes of fabric scraps. For 40 years, no fabrics have been wasted in her house. Just last month, she passed on several boxes to a local quilt-making organization, but luckily we found a few more up in her attic.

Grandma's Fabric Scraps, Photo © Liesl Clark

We looked in the Trash Backwards app for some good fabric scrap reuse ideas for small hands and landed upon a fun tutu tutorial for a little girl. My daughter decided she wanted to make it for her stuffed panda. So, we took our lead from the tutorial at Home Sweet Home and made a mini version for a doll or stuffed animal.

Strips of Fabric Scraps, Photo © Liesl Clark

1) First, cut your fabrics into 1/2 inch to 1 inch wide strips. We made ours approximately 6-8 inches long.

2) Find an elastic waistband, about 8-12 inches-worth and sew 2 ends together so you have it in a loop.

Sew Your Waistband Into a Loop, Photo © Liesl Clark

3) Fold your strips in half length-wise and place them underneath the waistband with the loop sticking out of the top and thread the ends of the fabric scrap through your loop, tying half of a square knot. This is how you tie on your skirt scrap pieces.

Adding Fabric Scraps to The Waistband, Photo © Liesl Clark

4) Tie your scraps on one after the other and gather them together tightly.

Tying One On, Photo © Liesl Clark

5) We wanted to be sure that the waistband was sewn together well, so grandma reinforced it with some hand-sewing.

Reinforce Your Waistband Ends, Photo © Liesl Clark

You’re Done! Spread around your strips so they even-out your skirt and you can add on more strips of color wherever they’re needed.

A Tutu For a Doll or Stuffed Friend, Photo © Liesl Clark

Panda Loves Her Tutu, Photo © Liesl Clark

Dancing With Her Tutu, Photo © Liesl Clark


Fabric Scrap Tutu, Photo © Liesl Clark

Letting Go of Honey Hill Farm

JPEG image-74D81F27B287-11

Our daughter was born here. It’s a 300-year-old beautifully renovated farm that is a testament to the impermeability of time, weather, and wear on a well-loved home. Our babies lived the first years of their lives swinging in their car seats from the 1705 beams, crawling on the wide pine floor boards, and sledding down through the apple orchard out behind the barn. The hill was where we kept bees and in our first year there 100 pounds of clover honey was harvested from three hives perched beyond the white pine. We sold the golden elixir on our porch to neighbors we met over time. It was an idyllic place to live, but alas it’s now time to let it go.

Sideoutback

The truth is, we haven’t lived there for the past 10 years.

JPEG image-74D81F27B287-5

Due to a need to move to the Pacific Northwest for work, we left our beloved New England farm and family 10 years ago, just before the market crashed. When housing prices plummeted, we knew we had to hold on to the home, and rent it out, to wait until the situation stabilized. In 3 months’ time, if all goes as planned, our farm will change hands, and become an experiential preschool for families who want to bring their children in close contact with the Earth.

Essex from street 2

Although we moved our primary “stuff” from the farm years ago, we’ve had to slowly get rid of the last bits and pieces that comprise a final vacating of a property.

JPEG image-74D81F27B287-6

These are the kinds of items most people simply throw away, too hurried to mindfully find new stewards for their still-useful items.

JPEG image-74D81F27B287-16

We travelled back to New England last summer to take 3 days to gift our stuff to members of our former community. I connected with the admin of the local Buy Nothing group and she let me temporarily join the group to post our remaining possessions to neighbors.

Screen Shot 2016-03-04 at 11.00.05 AM

Everything disappeared in a matter of hours. Paint, farm tools, antiques, old hardware, large work benches and potting tables were hauled off the property by people happy to come in their cars and trucks to reuse what we couldn’t fathom carting across the country to our home in the Northwest.

Screen Shot 2016-03-04 at 11.00.58 AM

We’re essentially masterminding a zero waste move.

JPEG image-74D81F27B287-8

Here are our best simple tips for a low impact move for anyone trying to reduce their waste when moving out of one property and into another:

  1. Create recycle/reuse waste streams in boxes for easy-to-recycle/reuse items: i) Regular commingled recycling (plastic bottles, glass and paper); ii) Plastic bags (to recycle at grocery stores); iii) Metal (to recycle in a metal recycling facility); iv) Office supplies (pencils, pens, paper clips, etc to give to a teacher or an office somewhere); v) Batteries (take them to your nearest battery recycling facility.)
  2. Don’t buy new boxes. Ask for them on your Buy Nothing group or get them from your nearest liquor store.
  3. Create collections to give away: It’s easier to commingle all of your hardware, or garden supplies, paint supplies, pet supplies, music, etc together to give to neighbors as collections of like-items rather than randomly giving away each item individually.
  4. Don’t buy paper for wrapping fragile items: Use newspaper (ask for it in your Buy Nothing group) or plastic bags, bubble wrap, and styrofoam that you’re planning on recycling,  or napkins, t-shirts, clothing to wrap around your glasses and fragile items for shipping. It saves money and waste.
  5. Even old paint can be reused: Before taking your remaining household hazardous waste to your hazardous waste facility, do check with neighbors to see if they’ll use it. We had people come to pick up our interior and exterior paint for their own projects.

JPEG image-74D81F27B287-3

What additional broad-strokes tips can you add to this list?

JPEG image-74D81F27B287-13

We’ll dearly miss our Essex home on the marshes. © Liesl Clark

25 Bread Clip Reuses

IMG_4795 Photo © Liesl Clark

Photo © Liesl Clark

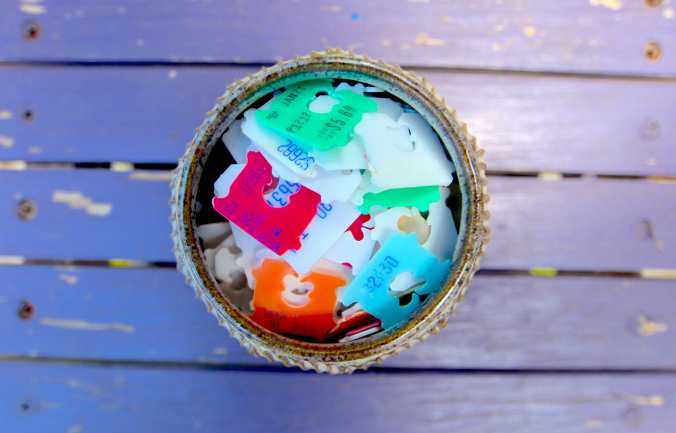
Although we most often bake our own or purchase locally baked plastic-free bread from our local baker, there is the occasional store-bought bread that comes in a plastic bag (recyclable at most grocery stores, if clean) with a hard plastic clip to keep it shut. These clips might also make their appearance on produce bags. Some call them bag clips, others bag tags. They’re made of hard plastic and as of yet we know of only one address in the US where you can send them, where they’re stockpiled and sold to help wheelchairs get to South Africa where they’re needed. So, if you’ve collected them over the years, please send them to this address here.

Did you know that over 20 cases of accidental ingestion of plastic bag clips have been published? The incidence are so detrimental to health that a team of researchers have classified in the British Medical Journal “morphology” chart the many varieties of bag clips, in an effort to determine which ones are most dangerous to the digestive tract and which designs are more benign.  Don’t swallow them, or you might become yet another statistic for this study.

We do have a few bread clips saved in some drawers, mostly for reuse. Here are a few of the ways we’ve used them in our home?

1) Reuse to seal other bags (yep, it’s obvious but I had to list it so you don’t throw them away.) We store our bread in a bread box, to keep it plastic-free. But, occasionally we’ll need to pack it in plastic when we go camping. Bread clips come in handy then.

2) Label your spare keys with them!

3) Place on the end of tape, like duct tape and masking tape, so you don’t have to spend time peeling the tape off itself.

4) Use them as earbud tamers to store those earbuds and prevent the inevitable tangles.
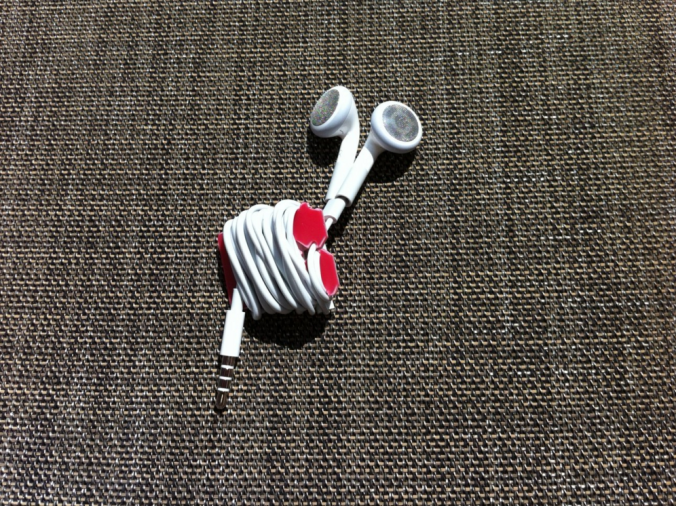
Screen Shot 2016-03-01 at 3.19.01 AM

Photo: Jake Ducey

5) Use them as counter scrapers for hard-to -scrape -off crud. Same for pots and pans.

6) Use to hold together all your rubber bands in your everything drawer.

7) Make a cool cereal box and bread clip abacus by following this tutorial provided by Almost Unschoolers!

8) Use your bread clips to organize and label your desk and entertainment cables.

9) Make bread clip monsters like these at Crafts by Amanda.

10) Make bread clip snowmen a la Crafts by Amanda, and impress your housemates.

11) Use as a bookmark.

12) Use to replace missing game pieces. A bread clip avatar for monopoly could be quite imposing if you put a scary business face on it.

13) Make a bread clip monster garland. Cute.

14) Use as wine glass identifiers for a party. Multicolored bread tags, or ones you’ve added faces to, work well to differentiate your guests’ glasses. Just clip ’em to the stem of the glass.

15) Write the letters of the alphabet on 26 bread clips and let your child put them in order.

16) Make some cute bread tag earrings.

17) Make bread clip gingerbread men!

18) Use them to hold hair ties in the bathroom.

19) Learn how to make a robot necklace from Mich L in LA.

20) Make some more fine jewelry.

21) Here’s a pendant for some more ideas.

22) Use them to hold your twist ties in your reusable grocery bag for bulk items. I reuse these twist tie bulk food labelers, so having them in a bundle helps keep track of them when I’m in the bulk department.

23) Flip flop about to blow out? Use a bread tag on the bottom to hold the little end in place for a quick reinforcement fix.

24) Make a bread clip shower curtain (ok, I know you won’t, but it’s an interesting and artful idea.)

25) For some fun bread clip robot reprintables, please visit Mich L in LA’s blog, which is an inspirational site for repurposing our “trash” into artful creations.


Stone Garlic “Press”

If you’re a lover of kitchen gizmos like garlic presses but just haven’t enjoyed the clean-up factor, get yourself a big stone to use in your kitchen. Skip that gizmo that’s a pain to clean up, is going to eventually break, doesn’t give you all the garlic from that clove since it gets stuck in weird places, and simply use a pestle-shaped stone instead.  I’ve used one in my kitchen for 10 years now and I couldn’t live without it. In Nepal, my friends use stones in their kitchens: One flat one and one cylindrical one for crushing, mashing, and grinding either garlic, chili peppers, whole grains or whole spices. I brought a stone home with me and would recommend you look for one, too. Maybe there’s a pestle-shaped on out in the woods, in your garden, or on the bank of the nearest river or stream. Think cave man, not Pottery Barn. One hit on the garlic and it’s peeled. Another smash and it’s crushed. Easy.

5 Planters Made From Everyday Objects

Large plastic containers make great container gardens. Think twice before you throw plastic receptacles away as someone might like to reuse it.

Planters are easy to come by. Whether you have little growing space outdoors, or want to beautify a patio or rooftop, pull your nearest receptacle or container from your trash and turn it into a planter. The more innovative, the more interesting and discussion-worthy for your friends and neighbors. Here are a few unusual planters we’ve come across in our travels in the Himalaya:

1)    Thermos Planter

The planter on the right is an old broken thermos. They also make great modified bird feeders.

2)    Styrofoam Cooler Planter

Herb planters in styrofoam. The village of Kalopani doesn't have styrofoam recycling. But this family found a way to reuse theirs to plant herbs for their restaurant.

3)    Paint Can and Bucket Planters

Paint Cans and Buckets Make Perfect Succulent Planters, Photo: Liesl Clark

4)    Gerry Can Planter

When this plastic water or fuel container broke, it was turned into a large planter.

5)    Barrel Planter

These barrels make great containers for donkey or yak loads when we go on expedition. When they break, they can make a great container garden.

These are all utilitarian planters, used in a place where there are no garden stores to simply go and buy yourself a clay pot. They’re also used in high Himalayan villages that have short growing seasons. Placed along a south-facing wall, these planters extend the growing season by a couple months.

What innovative planters have you grown your food in?

8 Uses For Garlic Skins

Garlic Skins Have Some Use Beyond the Compost Bin

In my ongoing fascination with the things I typically throw away, even in the compost pile, I thought I’d look up some of the most interesting ways to reuse garlic skins. Some, I already do, but there are a few new uses in this list I thought you might want to try.

Don’t toss those papery white skins!

1) Save them in your freezer and use for your vegetable or chicken stock. I also throw them in my slow-cooked beans to add more flavor.

2) Compost them.

3) Keep the skins on your garlic when you roast it and the protective skin layer keeps your garlic soft on the inside.

4) Eat it! According to the Daily Mail, the skin on fruits and veggies shouldn’t be discarded. As for garlic: “Peeling garlic cloves removes the ­phenylpropanoid antioxidants which help fight the ageing ­process and protect the heart.”

5) Make a paper rose out of your garlic skins.

6) Turns out garlic skin is a major antioxidant. Plan on seeing it in all sorts of health products in the near future.

7) Add them to your handmade paper recipe. They add a lovely texture.

8) Dye your hair with them using a natural ayurvedic technique.

Green Guide To Recycling Ski Gear

By Mr. Everest

Ski Equipment Doesn't Have to Go to the Landfill. Photo © Liesl Clark

We’re at the height of the ski season and if you’re like me, this is a great time to start demo-ing new gear. But what to do with the old? Here are a few options I’ve been able to find:

SELL
You can always list your gear on Craigslist or take it to Play It Again Sports to find a buyer.

GIVE
Joining your local Buy Nothing group and giving them away to your neighbors is a great way to keep your ski and snowboard gear out of landfills and still cruising the slopes. Some people are cool with using outdated gear. My wife, for example, skied the slopes for 15 seasons on her old Black Diamond AT gear. And our 12 year old son is going to give them a try on his first hut trip this week.

Donate your gear to a local youth ski program or adaptive ski program. If you check with your ski areas or local ski shops, you’ll most likely find a program that would be happy to use your equipment that’s in good condition and not outdated. Snowpals of Tahoe is just one example.

REUSE
You could always start your own ski swap, enticing others in your community to bring their gear so families can outfit the kids with neighbor’s hand-me-downs. It’s a great way to keep skiing affordable for us all.

Out With the Old and In With the New. Outfitting Your Family in New Ski Gear Means You Need to Find Green Means to Get Rid of Your Old Gear. Photo © Pete Athans

Yankee Magazine has a great article, with plans, showing you how to make your own ski Adirondack chair. Some people build cool fences with stockpiled skis.


RECYCLE
The North Face stores will take all of your ski clothing (hats, gloves, pants, bibs, jackets, socks), ski boots, goggles, and ski helmets. Their Clothes The Loop program sends the gear to a company called I:CO which shreds it into its elements and makes new products with it. My article about this great program goes more into depth about this the Clothes The Loop initiative in all of The North Face stores, and where to find those stores.

Ski poles? They’re mostly made of metal, so taking them to your nearest metal recycling center might be your best bet. Poles haven’t changed much over the years, though, so be sure to try giving them away before you send them to metal recycling.

If you live or ski in Colorado or Utah, a great ski industry recycling service was set up by the Snow Sports Recycling Program, which recycles ski gear collected at participating stores. I can’t find a list of the stores any longer but calling the phone number listed on the page, under “Waste Not” could likely get you the names of stores near you that’ll recycle your old gear. This program turns your gear into chips that will be turned into new goods. They’ll take skis, snowboards, boots, helmets, bindings and poles. These materials create waste streams that are approximately 5% steel, 25 % aluminum, 60% plastic and the balance are wood and fiberglass, all reusable in new applications.

JPEG image-790B5550467E-1 2

Ski Poles Are Mostly Made of Metal © Liesl Clark

If you live near Aspen, CO you can contact Reeski to see if they’ll take your skis and boards to turn into cool looking furniture.

There’s no need for our gear to end up in the landfill. If you’re stumped about a particular item and want to find a reduce, reuse, recycle option for it, drop us a line in the comments below and we’ll get on it.

8 Reuses For Unmatched Socks

Sock Singles Party on Our Floor. Photo © Liesl Clark

We all know about sock-hungry dryers. Well, I believe drawers are sock-eaters, too. Somehow socks go into dresser drawers in pairs but come out as singles, forever abandoning the sacred union. We started a special box of single socks a few months ago and decided it was high time we searched the house for all socks to take a full tally of the situation.

Sorting Socks is Sorta Fun. Photo © Liesl Clark

Sorting Socks is Sorta Fun. Photo © Liesl Clark

It was the perfect task for a 7 year old, searching through every drawer in the house and coming up with nearly 100 single socks! The laundry room coughed up a few more. Then, we got to work with our matching game. Thirty pair were reunited! But sadly, about 40 odd socks now have no mate. What to do?

Reunited Socks After Nearly a Year. Photo © Liesl Clark

I’m vowing to have a moratorium on sock-buying for at least a year, or until our dryer and drawers have consumed them all. This family has way too many socks. In the meantime here’s a list of what we’re doing with our 40 odd socks:

1) A few special unions have been created, and we look forward to showing them off at school as soon as possible.

Do you approve of this union. Speak now or forever hold your peace. Hey, mismatched socks are in! Photo © Liesl Clark

2) I put one in the freezer to use over our ice pack. It’ll protect a child’s skin against that cold pack.

Single sock turned ice pack cover. This penguin motif seemed appropriate. Photo © Liesl Clark

3) The 7-year-old, has her sights set on a few sock creatures, like this adorable sock hippo named “Emma” that she made the other day.

Sock + Rubber Bands + Bits & Bobs = Sock Hippo. Photo © Liesl Clark

4) I invented a new type of yarn, like T-shirt yarn, but it’s….Sock Yarn! This stuff is easy and kinda cool to make.

My new favorite "ribbon." Sock Yarn. Photo © Liesl Clark

First, find a single sock and cut strips into it without fully reaching the edge. A great photo that explains it in a tutorial for T-shirt yarn is here. You’ll then cut diagonally, linking the strips together in a spiral cut. It’s easy!

Cut strips into your sock but not all the way to the edge. Photo © Liesl Clark

Then stretch your sock yarn out so it curls in on itself:

Stretch Your Sock Yarn to Let It Curl. Photo © Liesl Clark

You might attract a feline in the process. Sock yarn makes an excellent cat play toy.

Kitties live for soft sock yarn. Photo © Liesl Clark

Willa. Ready to Wear Her Sock Yarn. Photo © Liesl Clark

Roll your yarn into a ball and you’re done!

Sock Yarn. Try It. Photo © Liesl Clark

Sock Yarn. Try It. Photo © Liesl Clark

5) A travel utensil holder is a sock reuse I’ve been meaning to do. Now it’s done.

Sock Travel Utensil Holder. Photo © Liesl Clark

Just use a piece of your sock yarn to tie it shut.

Sock Ribbon to Tie Up Your Sock Utensil Holder. Photo © Liesl Clark

Socks make excellent pencil holders too, just use an extra thick sock.

6) I saved a few socks for our rag basket, for dusting and other fine-rubbing I might need to do on furniture or countertops.

7) Cut the toe section out and use your sock tube as a travel coffee mug cozy.

sockcozy

My Favorite Sock Reuse: Travel Coffee Mug Cozy © Liesl Clark

8) The rest went back into the super duper sock box under the bed in waiting for sock sorting day next year when I vow yet again to never buy new socks and then learn how to darn the odd ones that remain. Actually, each week on laundry day we take the single socks and open up the box to see if the missing mates are inside. I have the box sorted by color, darks to lights, so the task goes quickly:

IMG_1750

Can you believe how many unmatched socks we have?

Do you combine unmatched socks, in an effort to stave off buying yet another pair? Or is there a special reuse you’d love to share? We have a few hundred more you might want to check out at our Trash Backwards app.

Click Through for Sock Reuses at Trash Backwards.

Rockin’ Valentines

IMG_1729

Gratitude to all of you who venture here to read about our trials and jubilations as we journey toward a lower impact life. These little rocks were gathered down at our nearby beach and turned into missives of love and positive affirmation by my daughter for her classmates and friends.

IMG_1730

A few stones and some scrap yarn brought smiles to 26 fourth grade students, proof that the simple things in life can still be perceived as beautiful and grounding. We wish you a happy Valentines Day, a day of love and kindness, and a break from it all.

IMG_1731

Love and gratitude,

Liesl, Pete, Finn & Cleo

DIY Mason Jar Soap Dispenser

I’ve eyed the useful mason jar soap dispensers made by creative people and thought I’d try to make one myself. Was it difficult? Not at all. This DIY project takes a few minutes to pull off.

All you need is a mason jar with a wide mouth lid, a push pump from a discarded soap or hand cream dispenser (I had to cut mine down so it would fit in my pint jar,) a pair of pliers, and a Sharpie.

Mason Jar + Lid, Pliers, Sharpie, and Pump. Photo © Liesl Clark

Find the center of your flat mason jar lid and punch a hole in it with a can opener (oh right, that’s one more tool you’ll want.)

Making Your Center Hole. Photo © Liesl Clark

I was able to make a hole quite easily with my pliers. Draw a circle around the hole that’s in the center of your lid, is in my first picture, and start to pull the hole apart, making it wider and wider.

Starting to Make Your Center Hole Wider. © Liesl Clark

You simply keep pulling the pieces of metal wider and wider around the edges of your circle until they’re just wide enough for your pump to fit through.

It Will Start To Look Like a Flower. Photo © Liesl Clark

When you have sufficient room for your pump, slip it through but try to keep the fit quite tight.

Thread The Pump Through the Hole. Photo © Liesl Clark

I pressed the edges of the metal lid down tight against the lid to prevent any future cuts when I need to add soap to my dispenser. You can use a silicone sealant to lock the pump down to its center hole and smooth out your sharp edges.

Sealed Soap Dispenser. Photo © Liesl Clark

This whole project took 5 minutes once I had gathered my supplies.

DIY Soap Dispenser, Ready For Use. Photo © Liesl Clark

When we went away on vacation our cat knocked over a pretty glass dispenser I gave my husband for Christmas. My husband is the dishwasher after dinner and I wanted him to feel like he had a cool “tool” to use at the sink.

Our cool new kitchen 'tool:" Our DIY soap dispenser. Photo © Liesl Clark

We mostly use baking soda for our dishes, but this liquid soap gives great suds if you like ’em and makes a mild hand soap, too. Our current liquid soap is an extremely watered-down (like 6:1 water to soap) biokleen dish soap.

DIY Dish Soap Dispenser. Photo © Liesl Clark