Why I Never Buy Trash Bags

A friend of mine recently asked me what to do when she had something stinky in her trash, like meat packaging. She often has to empty her smelly trash and waste a whole plastic trash bag because her bag is only half full.

I responded, a bit sheepishly, telling her to just skip using bin liners/trash bags altogether. We haven’t used or bought trash bags in years. What’s the point of using them if your trash is headed to a landfill anyway? Why send it all wrapped up in yet another piece of plastic that won’t ever disappear from the planet?

IMG_480807111-4

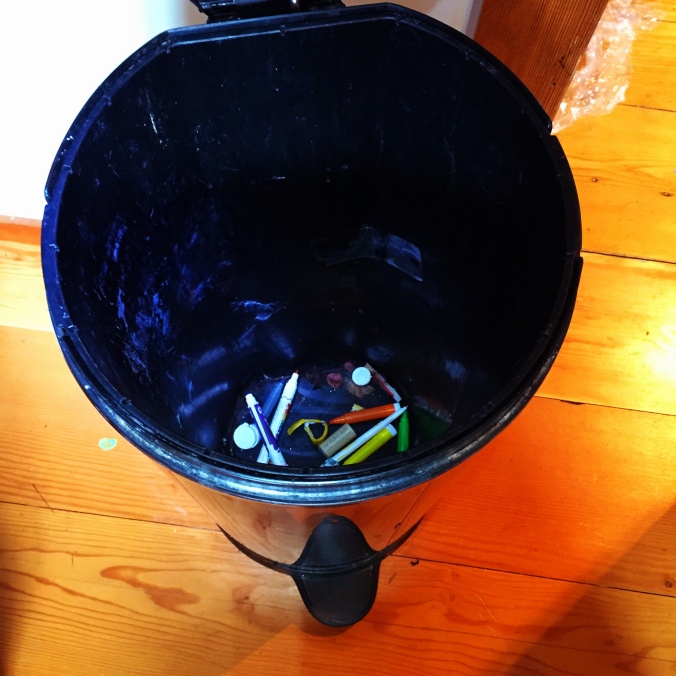
Here’s what’s in our trash bin, just outside the kitchen. 1 family’s solid waste for a week. The Magic Markers are about 10 years old, but they’ve finally bit the dust. 

We generate very little trash and since we compost all of our organics, our solid waste is truly solid and clean dry waste. It’s mostly made up of plastic packaging for a few things our kids just love, tortilla chips, the occasional clamshell strawberry holder, pens, plastic bottle caps. It all goes into our trash bin that’s in our laundry room, away from our everyday lives because when we throw things away, very occasionally, we truly want the children to work hard to throw it “away,” whereas the compost and recycling is all in the kitchen.

IMG_480807111-2

Where we throw things “away.” It’s around the corner, trash bag-free! We can remove the black plastic circular bin and wash it. Looks like it needs a good wash, ahem. 

We fill a large trash can about once every 3-6 months. Neither does our kitchen bin need a tall trash bag, but we also don’t line our trash can with a plastic bag either. The clean dry waste just gets packed into the can and it’s taken to our transfer station when it gets full. Why pay for weekly pickup when you only generate a handful of plastic each week? I’m amazed, always, to see that it’s 100% plastic in there, as our textiles, shoes, organics, metal, wine corks, and batteries, which make up the rest of our trash, are all recycled.

IMG_480807111-1

My friend, Lissa, could throw her old styrofoam meat trays and attendant plastic packaging in her freezer until she accumulates enough trash to fill her trash can. Then, she can dispose of her trays, stink-free. She could also take a container to her favorite store where she buys meat and ask the butcher to put the meat right in there for her. No need for the store’s packaging. I’ve done it a few times here on Bainbridge Island at our local store, with no problem. But we don’t eat meat very often any more, if at all.

IMG_480807111-3

I talked to a local garbage worker once about whether they cared if the trash was all in plastic trash bags or not. He said it didn’t make a bit of a difference to them, because they throw the trash into the maws of the truck and a crusher then smashes it down inside the truck. The filled plastic bags often break open anyway, with the help of the crusher.

So, think about going plastic-trash-bag-free. It’s yet another form of plastic you can easily eliminate from your shopping list and garbage can. Wash your trash can out every so often. In Europe, most people I know don’t use a bin liner. It’s time we took heed and followed suit, to reduce our plastic footprint.

Are you willing to give it a try and let your waste get all naked and go trash-bag-free?


10 Toxic-Free Home-Made Easter Egg Ideas

Home-spun toxic free Easter dyes are beautiful. Photo © Liesl Clark

1) Toxic-Free Magic Marker Dye: I’ll start with my favorite because it’s so easy and does 2 things in 1. It dyes your eggs but also revives your tired out Crayola or other toxic-free magic markers. Do visit our article about it to read the full instructions, but all you need is some warm water in a glass with a splash of distilled white vinegar. Put your markers head down into the glasses, grouping them by color (we have tons of magic markers because we collect those that our school throws out and simply revive them.) That’s it! Let the eggs soak in there for as long as you wish. The longer the darker the color. If you start by making polka dots or designs on the eggs with white crayons, you’ll get a lovely design on your eggs where the wax won’t allow the dye to do it’s magic. When you’re done, pull the markers out, cap ’em and they’ll work again for you for quite some time!

2) Natural Dye: The above dyes aren’t all that natural and you wouldn’t want your child eating the ink from a magic marker, but since they’re labeled non-toxic we figure using them to dye our eggs is probably still better than using chemical food coloring. But, by far, the best option is to make your own natural dyes. There are lots of articles available on the subject. We tried it one year and liked some of the colors, but not all.

3) Kombucha Natural Dye: This recipe is similar to that above except you’re using kombucha vinegar.

4) The Ultra-Natural Easter Egg: These colorful eggs are laid as Easter eggs directly from the hens! Find yourself a dozen eggs from heritage breed hens and you’ll see that Easter egg colors can come naturally. And, Rebecca is right, brown eggs can be colored for Easter, too.

5) Sienna Easter Eggs: This beautiful technique requires onion skins and some natural items from outdoors like ferns and grasses. It leaves a beautiful sienna or sepia color on your eggs with the imprint of your fern, flower or grasses. Gorgeous.

6) Silk Tie Tie Dyed Eggs: Reuse a silk tie and tie dye your eggs.

7) No-Dye Decorating: Creative egg decorating is another great non-toxic alternative. Non toxic glue and some cute art supplies are all you need.

8) Use an Egg-Bot! This totally frivolous machine (a robot actually), if you use it with a non-toxic pen, might just wow your neighbors when you hide those eggs on the fenceline.

9) Put a ribbon on it: Wrap a ribbon around your egg and glue it down with non-toxic glue or wrap your egg in yarn with glue. These eggs look beautiful.

10) Modpodge: I’ve modpodged eggs in the past with pretty tissue paper and a light solution of sugar water that dries overnight.

Do you have any ideas to add?

Non-Toxic Magic Marker Easter Egg Dye

How did our little hackers dye their eggs for Easter the last few years without producing waste or buying new? With dried out colorful markers! We thought they were at the end of their life, so we threw them upside down into glasses of water, added a splash of vinegar, and….presto! Easter egg dye.

After soaking the eggs in the watery dye for 20-30 minutes, they came out beautifully. And an unexpected added bonus? The markers work perfectly again! All they needed was a few minutes at the spa for a soak. Caps are back on  and they’re back in the marker bag with their friends.

Happy Trash-Hacky Easter.

25 Trellises From Your Trash

Trellises are about as easy to come by as planters. Almost anything that’s upright and has a few arm-like features can be climbed upon by plants. This list will definitely get you thinking about what you can place in your garden for vertical fun:

1) Sticks are the original trellis. If you have sticks available, place them in a tripod-like structure, like a tipi, or if your sticks have many branches, just sink one stick into the ground with many branches for your peas or other veggies to climb upon.

A Stick Trellis for Peas

2) Bike Trellis: Line up a few bikes, or bike parts, and you have a colorful trellis for your plants. Imagine peas growing on this cute bike fence…

A Bike Fence in Paonia.

3) Patio Umbrella Trellis: A broken patio umbrella can have a second life as a trellis. I have one in my garden now.

A Broken Patio Umbrella Turned Trellis. Photo © Liesl Clark

4) Bamboo and String Trellis: For your more delicate vines a bamboo frame for string is a beautiful trellis.

5) Tipi Trellis: With some long sticks, you can make a tipi trellis that serves to hold up your veggies and vines while providing a great green space for the kids.

6) Wagon Wheel Trellis: Wagon wheels make pretty trellises for climbing roses.

7) Old Window Frame with Chicken Wire: Use an old frame as a trellis with chicken wire attached.

8) Step Ladder Trellis: An old step ladder is an easy trellis to set up.

9) Bike Wheel Trellis: The photo here says it all. It’s a bike wheel totem trellis.

9) Wooden Coat Hanger Trellis: With an accordion-style wooden coat hanger, a few pencils and a paint stirrer, you’ll have a trellis.

10) Screen Door Trellis: Like the old window frame, an old screen door frame works beautifully as a trellis against your house.

11) Ski Trellis: Use skis to set up a trellis for your raspberries.

12) Bookshelf Trellis: An interesting book shelf partially buried in the dirt could make a nice trellis.

13) Sawhorse Trellis: A sawhorse or 2 can make an instant garden trellis.

14) Old Chair Trellis: Use an old wooden chair for a trellis.

15) Stretch of Picket Fence Trellis: If you have a length of picket fence, try using that as a trellis.

16) Rain Pipe Trellis: Our drain pipe on our house is serving as a trellis, and the clapboards, too. Some plants can climb anything.

Rain Pipe Trellis

17) Fence Trellis: Just use a section of your fence to allow a flowering climber, like clematis, take over.

A section of our garden fence is a clematis trellis.

18) Chicken Wire Trellis: Don’t think I need to explain that one.

19) Ladder Trellis: An old ladder can hold up grape vines. You can add some bright paint to give it some pizazz.

20) Barbed Wire Trellis: If you’re handy like this Etsy artist, try making a barbed wire trellis. They’re beautiful.

20-25) Read our original post on DIY trellises for 5 more ideas including a headboard trellis, a baby crib trellis, and innovative stick trellises.


Vacations And The Allure Of The Simple Life

BT0C0601

Vacations are an opportunity to try new places, new lifestyles on for size, to see how they feel.

BT0C0424

We like to dream of living our everyday lives in the places we visit, and interestingly most places we spend time in, when vacationing, are deeper into the wilderness.

BT0C0631

These trips into the outback bring us closer together as a family.

BT0C0301

The children get to try new outdoor sports, like alpine touring on mountaineering skis and equipment, carrying their own backpacks filled with their chosen clothes for a few days.

BT0C0434

It teaches them a little about self-reliance and reliance upon us as their teachers.

BT0C0487

Our time in the wilderness is special for us, where we face the gambit of all emotions, together, while pushing ourselves to go harder and further than we thought we could.

BT0C0355

And we have time for silence together in the depth of the woods.

BT0C0461

The children learn how precious our time is spent together, the value of setting goals, simple ones, like getting to where we’re sleeping for the night.

BT0C0782

Just when you think that goal is not attainable: 6 and a half hours uphill to 10,450 feet and your own feet ache…

BT0C0889

You arrive.

BT0C0809

Hot cocoa comes quickly, along with a warm fire where snow is melting for water.

BT0C0881

Days are spent telling stories, far from the allure of social media and electronics.

BT0C0816

We create a magic together, a joy of simplicity.

BT0C0899

And slow way down, just enough to commune with the pinyon jays.

BT0C1046BT0C1063

We have family council out in the snow on the snow chairs the children make for us.

BT0C0928

The frosty air feels good for the soul.

BT0C0966

Thank you, 10th Mountain Division, for sharing the beauty of your mountain huts with us.

BT0C0979

We can’t wait to come back again soon.

BT0C1084

What simple pleasures do you share together as a family?

Can I Recycle Broken Glass, Wine Glasses, Drinking Glasses, Window Panes?

We’ve broken a couple of wine glasses lately and although I knew our recycling facility in our home town won’t take glass from wine or drinking glasses, I thought I’d look up the reasons why. According to Washington State’s Department of Ecology: “The combination of ingredients used to make glassware is different from what goes into container glass for bottles and jars. If these two types of glass are recycled together, the resulting glass will not be suitable for container glass. In fact, glassware, ceramics, window panes, or mirrors can pose a threat to equipment in a glass recycling plant.”

So that’s our answer for wine glasses, and likely the answer for all glass recycling facilities. We don’t want to contaminate the glass used for containing food. But if you break your mason or mayo jar, you can still put it in your glass recycling. It’s the material that counts, not whether it’s broken. I simply put the glass shards inside another jar that I’m recycling, as tightly as I can, so it all just melts down together.

So, for the non-recyclable glass, here are a few reuses I came up with that also might help:

1. Will anyone else take your broken drinking glasses? If they’re made of pretty colors, you might try a local potter or ceramics artist since glass mixed in with other glazes can make pretty colors in a firing.

2. Have windows that you want to recycle? Try your nearest Habitat for Humanity Store or save them and turn to our Trash Backwards app for window reuse inspirations:

3. If you have a tumbler hanging around, save your broken glass to make your own tumbled sea glass.


4. Recycle This in the UK has some interesting reuse ideas, like using your broken glass under your wood shed to deter rats!

5. Take the stem of your broken wine glass and glue it to the bottom of a teacup for a pretty teacup wine glass.

6. If your wine glass only has a chip or crack in it, or if it’s etched from your dishwasher, you can transform it into an adorable tea candle lamp. And if your kitty breaks enough of your wine glasses, then you can make a whole set of ’em.

7. Put your glass shards in the bottom of a plant pot to help with drainage?

What do you do with your broken glass? Send us your comments below or if you have a great solution you’d like to include in our app, please submit it through our contributor’s page.

Patio Umbrella Pea Trellis

Trellises can be made from just about anything with a little height and some expansiveness. When a patio umbrella broke in half recently due to high winds, I saw a nice pea trellis-in-the-making.

A Broken Patio Umbrella Turned Trellis. Photo © Liesl Clark

I couldn’t wait to get these images out because I’m excited about this garden hack, so you have to use your imagination. OK, don’t laugh, the peas are just sprouting but there are signs of promise to come.

Just Sproutin'. Peas are reaching toward their patio umbrella trellis.

The next time you have a patio umbrella that breaks in half, save the inner wooden part for a pea trellis in your garden. Take the canvas off and you’ll see that what remains is the perfect shape, octopod-like, that will serve you for many years. If you want to see how it’ll look with a little more vegetative matter around it, aristonorganic has a great pic to give you some perspective. I think I’ll paint mine a bright red with some leftover paint for some added garden color.

A broken patio umbrella soon to be a pea trellis.

Oh, and if you’re wondering what to do with the fabric of your umbrella, sun-drenched as it is, take it to your nearest The North Face store for recycling through their Clothes the Loop program. They’ll take all of your textiles and shoes for reuse and recycling. Don’t hesitate, because there’s a store discount waiting for you in exchange for your used clothing or textiles.

But I have to show you something pretty incredible. My friend, Michelle, is an extremely talented seamstress. She took one of my worn out patio umbrellas and turned the fabric into a post apocalyptic recycled outfit for her daughter. Seriously! It’s so cool, you have to check this reuse out! 

Fixing Tools With Broken Handles

By Mr. Everest

I’ve noticed a trend lately that’s surprising: tools with broken handles are discarded when only the wooden handle is broken. I grew up with acres of woods around me and tools like axes and rakes came in handy every day. I still use them quite regularly and when a wooden handle snaps in half, replacing it costs a fraction of the replacement cost for the entire tool. It just takes a little custom fitting, but anyone can do it.

If your axe handles break, you can always replace them. Photo © Liesl Clark

I replaced the handle for an old axe head of mine this week and I’ve broken the process down into 5 simple steps: I suggest you buy a good quality hardwood handle like hickory or ash from a hardware store or, if you have a good hardwood source nearby, just carve your own.

1) Cut out a piece at the end of your wooden handle to match the slot of your iron that will fit inside your tool head’s insertion hole. You’re making the end insertable into the tool head, so cut your piece making sure it’s not too small. I use a draw cut saw.

IMG_3221 Photo © Liesl Clark

2) You can see the gist of it below. You’re just trying to create a wooden neck that will fit inside the eye of the tool.

IMG_3225 Photo © Liesl Clark

3) Now you need to slide the wooden handle-neck into the eye of the tool head.

IMG_3228 Photo © Liesl Clark

4) I force it by bouncing the bottom of the handle onto a hard surface like stone or concrete and usually the head will pop on. If you have any gaps between the iron head and the wooden neck you can fill that with wooden shims.

IMG_3231 Photo © Liesl Clark

5) Drop it in a bucket filled with water and soak overnight. If it’s good kiln-dried wood, a 24-hour soaking is probably fine. If it’s a piece of wood you cut from your woods, it’ll need to soak a little longer so that the wood swells nicely inside the tool head.

IMG_3235 Photo © Liesl Clark

If your head is still loose after the soaking, you can always drive a metal shim into the top to tighten your fit.

IMG_3782 Photo © Liesl Clark

Repairing our tool handles runs in the family. By observation, our 9-year-old was able to carve his own handle for a broken rake.

Replacing a tool handle is a great carving project for a whittler. Photo © Liesl Clark

It took him 15 minutes to carve a spare baluster we had to the right size, fit the handle into the rake’s slot, and then take it up to the pond for an overnight soak.

Replacing the broken handle on an old rake took 15 minutes. Photo © Liesl Clark

DIY Fly Paper

Somehow, we’ve lost our fly swatter and there’s an odd phenomenon of tiny flies swirling around the center of our living room. It’s nearing spring, and my sense is this is the time of year they seek refuge indoors. Well, not in this door. Even the Buddhist in me wants to send these flies to a new life.

DIY Fly Paper. Photo © Liesl Clark

Before I send you on a journey to make your own fly paper, I can testify that one of the best ways to get rid of flies in your house is the half-filled Ziploc bag method. Simply half fill a medium size Ziploc bag with water, throw in a penny, and hang it in the room where you want to get rid of flies, especially in the place where they enter the room. They will scram when they see your scary water. It has something to do with the reflected light in the water, to their very many eyes, and looks like predatory danger to them. We see these bags in tea shops in Nepal and I know they do the trick.

Meanwhile, did you know that traditional fly papers used to have arsenic in them, not to mention the other toxic poisons they harbor? After searching past all the tragic posts about housepets getting caught up in fly paper (a love bird included), I stumbled upon a great DIY recipe at Going Home to Roost. We modified the recipe a bit to ensure added stickiness. And I noticed how my sweet-toothed 7-year-old jumped into the DIY game when she saw how much honey and sugar I was throwing into the pot. It might be a slow death for the winged buggers, but it’ll be a sweet one.

All you’ll need is:

Scrap paper

String or yarn

1/4 Cup honey

1/4 Cup sugar

1/8 Cup water

Cut paper strips. Photo © Liesl Clark

We used some pretty scrap paper from our scrap paper bin. No use having ugly strips hanging about the house. Our thinking was that flies like pretty colored things, too. Cut your paper into 2″ wide by 5-6″ long strips.

Punch a hole in your strips. We used a star punch. Photo © Liesl Clark

Punch a hole at the top of each strip and tie a string loop through the hole.

Sweetness in a pot. Photo © Liesl Clark

Throw the honey (I give credit to our honey bees for their fine work creating this gorgeous blackberry honey), sugar and water in a pot and bring to a simmer as you stir all the ingredients until they’ve dissolved completely. This is the point at which you can sing a witches’ song, as you stir your sweet potion in the cauldron. The kids’ll love it.

Saturated with honey bait. Photo © Liesl Clark

Place the strips individually in the pot, holding the string, ensuring they become saturated with your sticky rue.

Don't let the drips get all over the kitchen! Photo © Liesl Clark

Hang the strips where you can place a cookie sheet or newspaper below them to catch drips as they cool and dry a little.

Hanging out to dry. Photo © Liesl Clark

Then hang them up in convenient places around your home and wait for the flies to find your sweet bait.

Our first victim. Photo © Liesl Clark

I think our first victim got its tongue stuck.

Reusing Pickle Juice

We love our Claussen pickles (they’re one of the few commercial brands of food we buy) and for years I’ve regretfully poured the pickle juice out, until my passion for reuse got the better of me and we did an experiment.

Claussen Kosher Dill Pickle Juice, Sans Pickles. Photo © Liesl Clark

We sliced some beautiful spanish onion very thinly and threw it in the pickle juice sans pickles. A few hours later, the pickled onions were perfect! We’ve been enjoying them ever since. They go nicely on a salad, in guacamole, in tuna salad sandwiches and would likely be perfect for hamburgers and hot dogs. My children eat them straight out of the jar.

Thinly sliced Spanish onion is perfect for pickling. Photo © Liesl Clark

I did a little research across several discussion boards, to make sure reusing the juice is okay, and here’s what I learned: You can definitely reuse the juice to pickle fresh or blanched veggies in your refrigerator. Some people expressed concern about the health risks in reusing pickle juice for a new stash of pickled somethings. But almost all sites concluded that you should simply use your best judgement. Many admitted even drinking the stuff. Perusing the web showed me that there are pickle  juice-reusers out there who have been doing it for years. With good instincts and taste buds, and as long as you only reuse the pickle juice for short-term pickling in the refrigerator (no more than a couple of weeks), I think your re-pickles will be worth the risk.

Pickled onion. Yum. Photo © Liesl Clark

Some people add a teaspoon of kosher salt and another of distilled white vinegar to the jar to ensure a strong brine.

We’ve even started pickling our fresh-laid (hard boiled) eggs in there for a delicious lunch snack for the kids when cucumbers aren’t in season. Vegetables to definitely try are: Green tomatoes, green beans, cucumbers, cauliflower, and mushrooms (very short term pickling). I’d like to also try a kimchi experiment with cabbage and carrots and use the pickle juice when I’m brining my favorite kimchi.

Of course, the one down-side to Claussen pickles is that they’re not entirely plastic-free. There’s that little plastic neck thing that corporate food tends to have around it to prove that no one has tampered with the glass jar. Local organic pickles don’t have those annoying plastic sealers and most of us are used to hearing that “pop” when a jar of safely-canned food is opened. You can always make your own pickles. We do, when they’re in season, and we have a great refrigerator pickle recipe for you here.

Organic Homemade Refrigerator Pickles. Photo © Liesl Clark

Other pickle juice reuse ideas that I’ve discovered?

1) I found one reference online that said you can clean your copper pots with pickle juice. Just dip your sponge in the juice and polish away!

2) Make a salad dressing using your pickle juice.

3) Try your hand at Polish pickle rye bread.

4) Pickletinis: Mix pickle juice with a dash of vodka or gin. I dare you to try one. Or, just do a pickleback shot: One shot of Irish whiskey and one shot of pickle juice.

5) Some extreme athletes have claimed that pickle juice helps them fight dehydration and cramping.

6) Fight colds with your pickle juice! Here are some words from a reader: “When my throat starts getting scratchy and I can tell I’m coming down with a sore throat, I take a big swig of pickle juice, and another in a few hours if need be. Not sure why, but it never fails to wipe out that nasty sore throat before it takes hold.”

Do you have any pickle juice reuses to share? Please do in the comments below!