Why I Never Buy Lip Balm In Plastic Tubes

One of the more common items we find along shorelines, nationwide, are Chapstick tubes. Somehow they either fall out of pockets, cars, trash cans or are inadvertently left behind when we’re on outings so they make their way down to the water and float back in on the high tide. I’ve collected hundreds of these buggers from beaches — enough to turn me off plastic tube lip balm forever.

Reduce & Refuse: We try our best, now, to purchase lip balm in tin or wood containers. Or make it ourselves with our own beeswax. There are many non-plastic options on the market, like Earthwise Medicinals’ Wintermint Lip Balm.

Earthwise Medicinals’ Wintermint Lip Balm comes in cute tin containers, Photo © Earthwise Medicinals

The containers are small, attractive, and 100% recyclable. My children use the little wooden boxes of their favorite lip balm over and over again as specimen containers for archaeology outings. But they’d also make great kindling.

Repurpose and Reuse: So, if you have a Chapstick tube, what to do with it when you’re done with the balm?

1) Salt & Pepper Shaker for camping trips – Pour a little salt and pepper into clean empty tubes and toss in your bag for a little salt and pepper at work or whenever you are on the go eating.

2) Perfume refresher- Don’t have a travel size perfume? Soak a cotton ball in your favorite perfume (or essential oil) and stuff inside an empty lip balm tube. When you need a refresher, just remove the cotton ball and swipe on! Also great for tossing in a drawer for freshness, or even coat pockets when they are stored for the summer.

3) Instructables has a tutorial for making a tiny Chapstick tube LED flashlight.

4) Yours Truly, G recommends simply refiling your tube with homemade lip balm. They make excellent gifts, too.


5) Always wishing you had a spare plastic bag when you go grocery shopping? Make a travel plastic bag holder that attaches to your key ring!

6) A 7-year-old trash hacker designed a travel toothpick holder from a used lip balm tube.

7) Send a secret message to a friend inside your lip balm tube or turn it into a secret waterproof treasure map holder:

8) Store an emergency $100 bill inside your tube and put inside your purse, backpack, briefcase, glove compartment. But don’t forget about it.

Recycle: Most lip balm containers are made of #5 plastic, which is also used for things like yogurt and over-the-counter medicine bottles. Whole Foods, along with Organic Valley and Stonyfield Farm, has a Gimme 5 initiative that accepts #5 plastics in some stores. Check to see if there’s one in your area.

balm on the road.jpg

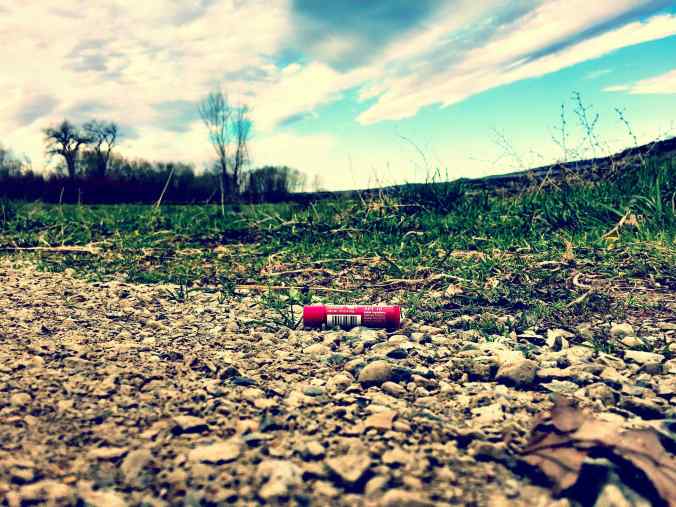
I know there’s a campaign out there, questioning whether any of us have actually fully used up our chapstick (before the chapstick tube somehow disappears). Well I have! And often. I’m one of those people who’ve used up plenty of ’em because lip balm is critical protection against the elements. High in the mountains in remote parts of the planet, lip balm is tantamount to survival. I’ve even attached lip balm to the outside of my pack or to a gizmo that goes around my neck so it’s always available, a lip balm necklace of sorts. Go to the mountains or desert sans lip balm and you quickly end up with blistery bloody lips that crack and ooze with a simple smile. Gross. And painful. So, use up your lip balm, and better yet, skip the plastic tube and bring it to your favorite places in nice metal or wooden containers.


My Zero-Work Perennial Vegetables

I love my perennial veggies. My whole food garden, each spring, is designed around the little edibles that emerge, many as new unplanned-for surprises.

Corn mache is among the first edibles to appear in the garden. I let them go to seed each spring so they can come up around the garden next winter. If you haven’t tried corn mache, it’s a hearty salad green you’ve likely seen in fancy restaurants. It can be eaten as part of your raw salad or you can stir fry it. We also throw it in smoothies for an extra jolt of green veggie vitamins.

corn mache.jpg

Jerusalem artichokes: Plant them once and you’ll get them year after year as you’re sure to miss a few tubers during harvest. These can be harvested all winter long.

Walking onions: These are one of my favorite perennial veggies for the garden. They’re an heirloom variety of onion that produces a long scape with an onion flower on the end that turns into a bulb. Just let it reach for the sky and then bend over and plant itself right into the earth again, walking its way around your garden. This is why my garden changes design each year. I modify the shape and configuration of beds based upon where the onions have walked and where other vegetables have reseeded themselves. I simply weed around my perennial food.
You eat the walking onion greens, which are a full-bodied onion flavor, very strong, and can be used as an onion substitute in any recipe.

walking onions.jpg

Chives, Garlic, Shallots: Chives are a perennial, so just plant a row and they’ll reappear each spring. Put them in your perennial beds, too, as their beautiful allium-family purple-blue flowers add color to every garden. I also leave a few garlic and shallot heads in the garden to see if a few will sprout the next spring, and of course they always do.

chives

Brassicas: Here’s a confession — I have kale plants in my vegetable garden that are 2 and 3 years old. They look like dinosaurs but I just keep pinching them back and they keep producing leaves and little flower heads which are perfectly edible. They’re like mini broccolis and go beautifully in a frittata. Letting a few flower, too, adds color and pollen/nectar for our honeybees.

Brassicas.jpg

Arugula: You never have to replant arugula if you plant it once and let it go to seed. Just watch those seeds sprout next spring, thin them out, and you’ll have a hearty rocket salad in no time.

Arugula strawberries.jpg

Strawberries: As in all berries, they’re a fruit of the earth that will come back year after year. The photo above shows how I’ve left some arugula in with the strawberries to commingle with each other this season.

Swiss Chard, Kale, Collards: I put chard in the same category as my kale and collards. If I just let them go to seed and sprinkle all of the seeds around, a few hardy plants will come forth in the spring. Here’s a beautiful specimen that volunteered itself this spring, right in with some corn mache.

Chard.jpg

You never really need to buy kale, collard, or chard seeds if you just let them go to seed and replant themselves.

Kale2.jpg

Mint: Mint always comes back, and you’ll likely have to whack it back a bit to prevent your whole garden from becoming a mintpalooza. Ours moves around a bit, but we let it stretch its legs because we’re perennial plant nurturers, and let our veggies do some walkin’ so they find their favorite spots to thrive.

Mint.jpg

Potatoes: It goes without saying (but I’m saying it anyway) that when you plant potatoes, you’ll have them for life, in the same bed you originally planted them in. There will always be little taters you somehow missed during your harvest. And they’ll reappear next year to bring a smile to your face in the spring.

Potatoes

Asparagus: Another favorite. If you make the effort to dig a trench and get your asparagus planted, it’ll bring you joy each year once the plants are established.

Sorrel and Miners’ Lettuce: Two more heirloom category veggies that will rock your world. My friend, Rebecca, has these all winter long in her garden and she gladly shares her bounty with us. I never bother to plant them since she has so much to share. Check out her sorrel and miners’ lettuce pesto.

Rhubarb: Rhubarb is a vegetable, so I’m including it in my list of perennial veggies. Plant it once, and you’ll thank yourself for years to come. Rhubarb is versatile!

Blueberries.jpg

The welcome site of spring blueberry blossoms

So, enjoy your no-work perennial veggies. Your fruits, too, will come back year after year if you give them what they need (prunings, compost, water and love.) Our lives are so enriched by the blueberries, raspberries, kiwis, apples, plums, figs, blackberries, and gooseberries that ripen each year on our property. Veggies can, and will, do the same if you nurture them and allow them to find their sweet spot in your garden to flourish.


Chickens Love Pond Algae

We have a pond. Starting in the early spring, the algae on the surface blooms and spreads its bright green color around the pond, stunning us with iridescence. But at mid-point in the summer we decide to slow down that spread of green and harvest the algae for our compost and chickens. This spring we’ve taken some algae earlier, and the chickens are thrilled.

They just love it, and it’s excellent green-matter, apparently full of nitrogen, for the compost.

It’s a good day for the chickens when we feed them algae. At first they hesitate, not so sure about all the tiny “leaves” connected together by tiny filaments. But then the algae is consumed en mass, every last morsel ingested by our egg-layers.

The more we feed our chickens the fruits from our land, the less we spend on the pricey organic soy-free whole grain layer mash they’d otherwise consume. What special foods do your hens consume?


DIY Stone Pillars & Planters

We simply have too many rocks in our soil. When we harvest potatoes, there are many false alarms on harvest day as perfect potato-shaped rocks are  procured from the soil rather than spuds. So when we cleared a new spot to add planting space to our veggie garden this summer, we had a pile of waste as a result — rocks. What to do with the rock pile? I thought about giving them away in our local Buy Nothing group (yes, I’ve seen people post that they want rocks on our neighborhood Buy Nothing group), but then the hoarder in me took over and we chose to make stone pillars instead. It’s quite easy, but there are a few tricks you’ll need to know about to pull this artistic gardenscaping off well.

First, you’ll need chicken wire. Make sure your chicken wire holes are not too wide for the size of your rocks.

1) You’ll need to cut a rectangle of chicken wire out, about 2.5 to 3 feet high (depending on how high you want your pillars to be) by 4 to 5 feet wide. Wrap the wire around, into a cylindrical shape and hook it together with the wire ends you’ve created in your wire-cutting process. Make sure you leave no wire ends poking out anywhere as those could be a hazard for passers-by. You now have a cylinder cage for your rocks.

2) Then, start filling your chicken wire cylinder with rocks! The trick is to place your largest spuds, I mean stones, on the outside of the wire so they block the smaller ones from falling through the mesh. My son and daughter love filling the pillars up with the stones they bring in on their wheelbarrows.

3) Fill until your cylinder is full, brimming with stones to give a pretty fieldstone pillar affect to your favorite spaces.

Now, Make Stone Pillar Planters!

We love our pillars around the pond so much, and found we had plenty more rocks to deal with, so we created 2 more pillars with the added feature of a planter inside. Here’s how:

Fill your stones only 1/3 of the way up your chicken wire cylinder. Then, add a gallon or half gallon plastic or clay pot inside so the pot’s rim is flush with the top of the chicken wire cylinder.

Fill in around the outside edges of the pot with stones and completely cover up the pot from the outside, all the way to the rim of the pillar.

Then, plant your favorite flower in the pot as you would any planter!

Chapstick Tube Turned Salt & Pepper Shaker

We went on a backpacking trip last week and decided, at the last moment, to not bring our salt and pepper shakers because of the added weight. Luckily, we didn’t miss them due to the foods we had chosen to bring with us, but for the future I was looking for that perfect DIY salt & pepper container.

The finished Dermatone tube my husband handed to me this a.m. was all I needed to get my DIY juices going to make our own little camping condiment container. The steps, you’ll see, are quite easy:

1) Find yourself a used-up Chapstick tube.

2) Remove the inner plastic cup that holds the lip balm and should be at the top of your tube. Simply turning the tube upside down and banging it on the table should do the trick.

3) Boil the tube and lid in water for 2-3 minutes to sterilize it and get rid of the remaining goop inside.

4) Remove the sticky label if you’d like on the outside of the tube and write with a permanent pen the name of what you’re stashing inside: “Special Herb Blend” or “salt & pepper” for example. We chose to put the salt & pepper together due to weight constraints when we’re in the mountains.

5) Add your condiment of choice inside. I used our favorite Celtic sea salt and freshly ground 3-color pepper.

Voila!

Here are a few other trash hacks you can do with a chapstick tube:

  1. Use it to hold any pills you might need on a trip.
  2. Make a mini travel sewing kit out of it.
  3. Put some emergency cash inside your tube as a hideaway.
  4. Condom stash?

Non-Toxic Magic Marker Easter Egg Dye

How did our little hackers dye their eggs for Easter the last few years without producing waste or buying new? With dried out colorful markers! We thought they were at the end of their life, so we threw them upside down into glasses of water, added a splash of vinegar, and….presto! Easter egg dye.

After soaking the eggs in the watery dye for 20-30 minutes, they came out beautifully. And an unexpected added bonus? The markers work perfectly again! All they needed was a few minutes at the spa for a soak. Caps are back on  and they’re back in the marker bag with their friends.

Happy Trash-Hacky Easter.

25 Trellises From Your Trash

Trellises are about as easy to come by as planters. Almost anything that’s upright and has a few arm-like features can be climbed upon by plants. This list will definitely get you thinking about what you can place in your garden for vertical fun:

1) Sticks are the original trellis. If you have sticks available, place them in a tripod-like structure, like a tipi, or if your sticks have many branches, just sink one stick into the ground with many branches for your peas or other veggies to climb upon.

A Stick Trellis for Peas

2) Bike Trellis: Line up a few bikes, or bike parts, and you have a colorful trellis for your plants. Imagine peas growing on this cute bike fence…

A Bike Fence in Paonia.

3) Patio Umbrella Trellis: A broken patio umbrella can have a second life as a trellis. I have one in my garden now.

A Broken Patio Umbrella Turned Trellis. Photo © Liesl Clark

4) Bamboo and String Trellis: For your more delicate vines a bamboo frame for string is a beautiful trellis.

5) Tipi Trellis: With some long sticks, you can make a tipi trellis that serves to hold up your veggies and vines while providing a great green space for the kids.

6) Wagon Wheel Trellis: Wagon wheels make pretty trellises for climbing roses.

7) Old Window Frame with Chicken Wire: Use an old frame as a trellis with chicken wire attached.

8) Step Ladder Trellis: An old step ladder is an easy trellis to set up.

9) Bike Wheel Trellis: The photo here says it all. It’s a bike wheel totem trellis.

9) Wooden Coat Hanger Trellis: With an accordion-style wooden coat hanger, a few pencils and a paint stirrer, you’ll have a trellis.

10) Screen Door Trellis: Like the old window frame, an old screen door frame works beautifully as a trellis against your house.

11) Ski Trellis: Use skis to set up a trellis for your raspberries.

12) Bookshelf Trellis: An interesting book shelf partially buried in the dirt could make a nice trellis.

13) Sawhorse Trellis: A sawhorse or 2 can make an instant garden trellis.

14) Old Chair Trellis: Use an old wooden chair for a trellis.

15) Stretch of Picket Fence Trellis: If you have a length of picket fence, try using that as a trellis.

16) Rain Pipe Trellis: Our drain pipe on our house is serving as a trellis, and the clapboards, too. Some plants can climb anything.

Rain Pipe Trellis

17) Fence Trellis: Just use a section of your fence to allow a flowering climber, like clematis, take over.

A section of our garden fence is a clematis trellis.

18) Chicken Wire Trellis: Don’t think I need to explain that one.

19) Ladder Trellis: An old ladder can hold up grape vines. You can add some bright paint to give it some pizazz.

20) Barbed Wire Trellis: If you’re handy like this Etsy artist, try making a barbed wire trellis. They’re beautiful.

20-25) Read our original post on DIY trellises for 5 more ideas including a headboard trellis, a baby crib trellis, and innovative stick trellises.


Can I Recycle Broken Glass, Wine Glasses, Drinking Glasses, Window Panes?

We’ve broken a couple of wine glasses lately and although I knew our recycling facility in our home town won’t take glass from wine or drinking glasses, I thought I’d look up the reasons why. According to Washington State’s Department of Ecology: “The combination of ingredients used to make glassware is different from what goes into container glass for bottles and jars. If these two types of glass are recycled together, the resulting glass will not be suitable for container glass. In fact, glassware, ceramics, window panes, or mirrors can pose a threat to equipment in a glass recycling plant.”

So that’s our answer for wine glasses, and likely the answer for all glass recycling facilities. We don’t want to contaminate the glass used for containing food. But if you break your mason or mayo jar, you can still put it in your glass recycling. It’s the material that counts, not whether it’s broken. I simply put the glass shards inside another jar that I’m recycling, as tightly as I can, so it all just melts down together.

So, for the non-recyclable glass, here are a few reuses I came up with that also might help:

1. Will anyone else take your broken drinking glasses? If they’re made of pretty colors, you might try a local potter or ceramics artist since glass mixed in with other glazes can make pretty colors in a firing.

2. Have windows that you want to recycle? Try your nearest Habitat for Humanity Store or save them and turn to our Trash Backwards app for window reuse inspirations:

3. If you have a tumbler hanging around, save your broken glass to make your own tumbled sea glass.


4. Recycle This in the UK has some interesting reuse ideas, like using your broken glass under your wood shed to deter rats!

5. Take the stem of your broken wine glass and glue it to the bottom of a teacup for a pretty teacup wine glass.

6. If your wine glass only has a chip or crack in it, or if it’s etched from your dishwasher, you can transform it into an adorable tea candle lamp. And if your kitty breaks enough of your wine glasses, then you can make a whole set of ’em.

7. Put your glass shards in the bottom of a plant pot to help with drainage?

What do you do with your broken glass? Send us your comments below or if you have a great solution you’d like to include in our app, please submit it through our contributor’s page.

Patio Umbrella Pea Trellis

Trellises can be made from just about anything with a little height and some expansiveness. When a patio umbrella broke in half recently due to high winds, I saw a nice pea trellis-in-the-making.

A Broken Patio Umbrella Turned Trellis. Photo © Liesl Clark

I couldn’t wait to get these images out because I’m excited about this garden hack, so you have to use your imagination. OK, don’t laugh, the peas are just sprouting but there are signs of promise to come.

Just Sproutin'. Peas are reaching toward their patio umbrella trellis.

The next time you have a patio umbrella that breaks in half, save the inner wooden part for a pea trellis in your garden. Take the canvas off and you’ll see that what remains is the perfect shape, octopod-like, that will serve you for many years. If you want to see how it’ll look with a little more vegetative matter around it, aristonorganic has a great pic to give you some perspective. I think I’ll paint mine a bright red with some leftover paint for some added garden color.

A broken patio umbrella soon to be a pea trellis.

Oh, and if you’re wondering what to do with the fabric of your umbrella, sun-drenched as it is, take it to your nearest The North Face store for recycling through their Clothes the Loop program. They’ll take all of your textiles and shoes for reuse and recycling. Don’t hesitate, because there’s a store discount waiting for you in exchange for your used clothing or textiles.

But I have to show you something pretty incredible. My friend, Michelle, is an extremely talented seamstress. She took one of my worn out patio umbrellas and turned the fabric into a post apocalyptic recycled outfit for her daughter. Seriously! It’s so cool, you have to check this reuse out! 

Reusing Pickle Juice

We love our Claussen pickles (they’re one of the few commercial brands of food we buy) and for years I’ve regretfully poured the pickle juice out, until my passion for reuse got the better of me and we did an experiment.

Claussen Kosher Dill Pickle Juice, Sans Pickles. Photo © Liesl Clark

We sliced some beautiful spanish onion very thinly and threw it in the pickle juice sans pickles. A few hours later, the pickled onions were perfect! We’ve been enjoying them ever since. They go nicely on a salad, in guacamole, in tuna salad sandwiches and would likely be perfect for hamburgers and hot dogs. My children eat them straight out of the jar.

Thinly sliced Spanish onion is perfect for pickling. Photo © Liesl Clark

I did a little research across several discussion boards, to make sure reusing the juice is okay, and here’s what I learned: You can definitely reuse the juice to pickle fresh or blanched veggies in your refrigerator. Some people expressed concern about the health risks in reusing pickle juice for a new stash of pickled somethings. But almost all sites concluded that you should simply use your best judgement. Many admitted even drinking the stuff. Perusing the web showed me that there are pickle  juice-reusers out there who have been doing it for years. With good instincts and taste buds, and as long as you only reuse the pickle juice for short-term pickling in the refrigerator (no more than a couple of weeks), I think your re-pickles will be worth the risk.

Pickled onion. Yum. Photo © Liesl Clark

Some people add a teaspoon of kosher salt and another of distilled white vinegar to the jar to ensure a strong brine.

We’ve even started pickling our fresh-laid (hard boiled) eggs in there for a delicious lunch snack for the kids when cucumbers aren’t in season. Vegetables to definitely try are: Green tomatoes, green beans, cucumbers, cauliflower, and mushrooms (very short term pickling). I’d like to also try a kimchi experiment with cabbage and carrots and use the pickle juice when I’m brining my favorite kimchi.

Of course, the one down-side to Claussen pickles is that they’re not entirely plastic-free. There’s that little plastic neck thing that corporate food tends to have around it to prove that no one has tampered with the glass jar. Local organic pickles don’t have those annoying plastic sealers and most of us are used to hearing that “pop” when a jar of safely-canned food is opened. You can always make your own pickles. We do, when they’re in season, and we have a great refrigerator pickle recipe for you here.

Organic Homemade Refrigerator Pickles. Photo © Liesl Clark

Other pickle juice reuse ideas that I’ve discovered?

1) I found one reference online that said you can clean your copper pots with pickle juice. Just dip your sponge in the juice and polish away!

2) Make a salad dressing using your pickle juice.

3) Try your hand at Polish pickle rye bread.

4) Pickletinis: Mix pickle juice with a dash of vodka or gin. I dare you to try one. Or, just do a pickleback shot: One shot of Irish whiskey and one shot of pickle juice.

5) Some extreme athletes have claimed that pickle juice helps them fight dehydration and cramping.

6) Fight colds with your pickle juice! Here are some words from a reader: “When my throat starts getting scratchy and I can tell I’m coming down with a sore throat, I take a big swig of pickle juice, and another in a few hours if need be. Not sure why, but it never fails to wipe out that nasty sore throat before it takes hold.”

Do you have any pickle juice reuses to share? Please do in the comments below!