This Homemade Citrus Power Cleaner Works

We have hard water in these parts, which means that whenever it sits around, like at the base of a water faucet, you get calcium/mineral buildup. Here’s what ours looked like a few hours ago. Ew!

IMG_6194

Thanks to some homemade citrus vinegar that I made last month, I now have a power cleaner that’ll cut through the boilerplate mineral deposits found around our sinks, shower, and bathtub.

IMG_3967

This mineral deposit is hard and sticks like glue.

First, to make the citrus cleaner, just throw your orange peels into a mason jar and pour in some distilled white vinegar to cover the orange rind. Keep adding orange peels until the jar is filled, adding vinegar to totally cover over the peels.

IMG_3687

Screw a lid on the jar, and let it sit for a month with all of the peels totally submerged. Remove the orange peels and the remaining liquid is your all-purpose citrus cleaner that’ll work wonders in your home.

IMG_4499

I dilute it with water 1:1 into a spray bottle and use it wherever I’m cleaning: countertops, windows, ovens and stoves, bathrooms. But the kitchen sink faucet was where I hit paydirt. This stuff cut through that mineral deposit and enabled me to get my faucet back to looking like new.

hardwater before after

Just spray the 1:1 solution on your affected area and let it set for a few minutes and rub off.

closeup before and after

I had to repeat this several times, but it eventually removed the white caked-on material.IMG_4494

IMG_5979

So the next time you eat an orange, just save those peels, stuff them into a jar and cover with white vinegar, adding more peels and vinegar until the jar is full. After a month, you’ll have a citrus cleaner ready for your toughest jobs.

33 Eggshell Reuses

33 Eggselent uses for your eggshells. Photo © Liesl Clark

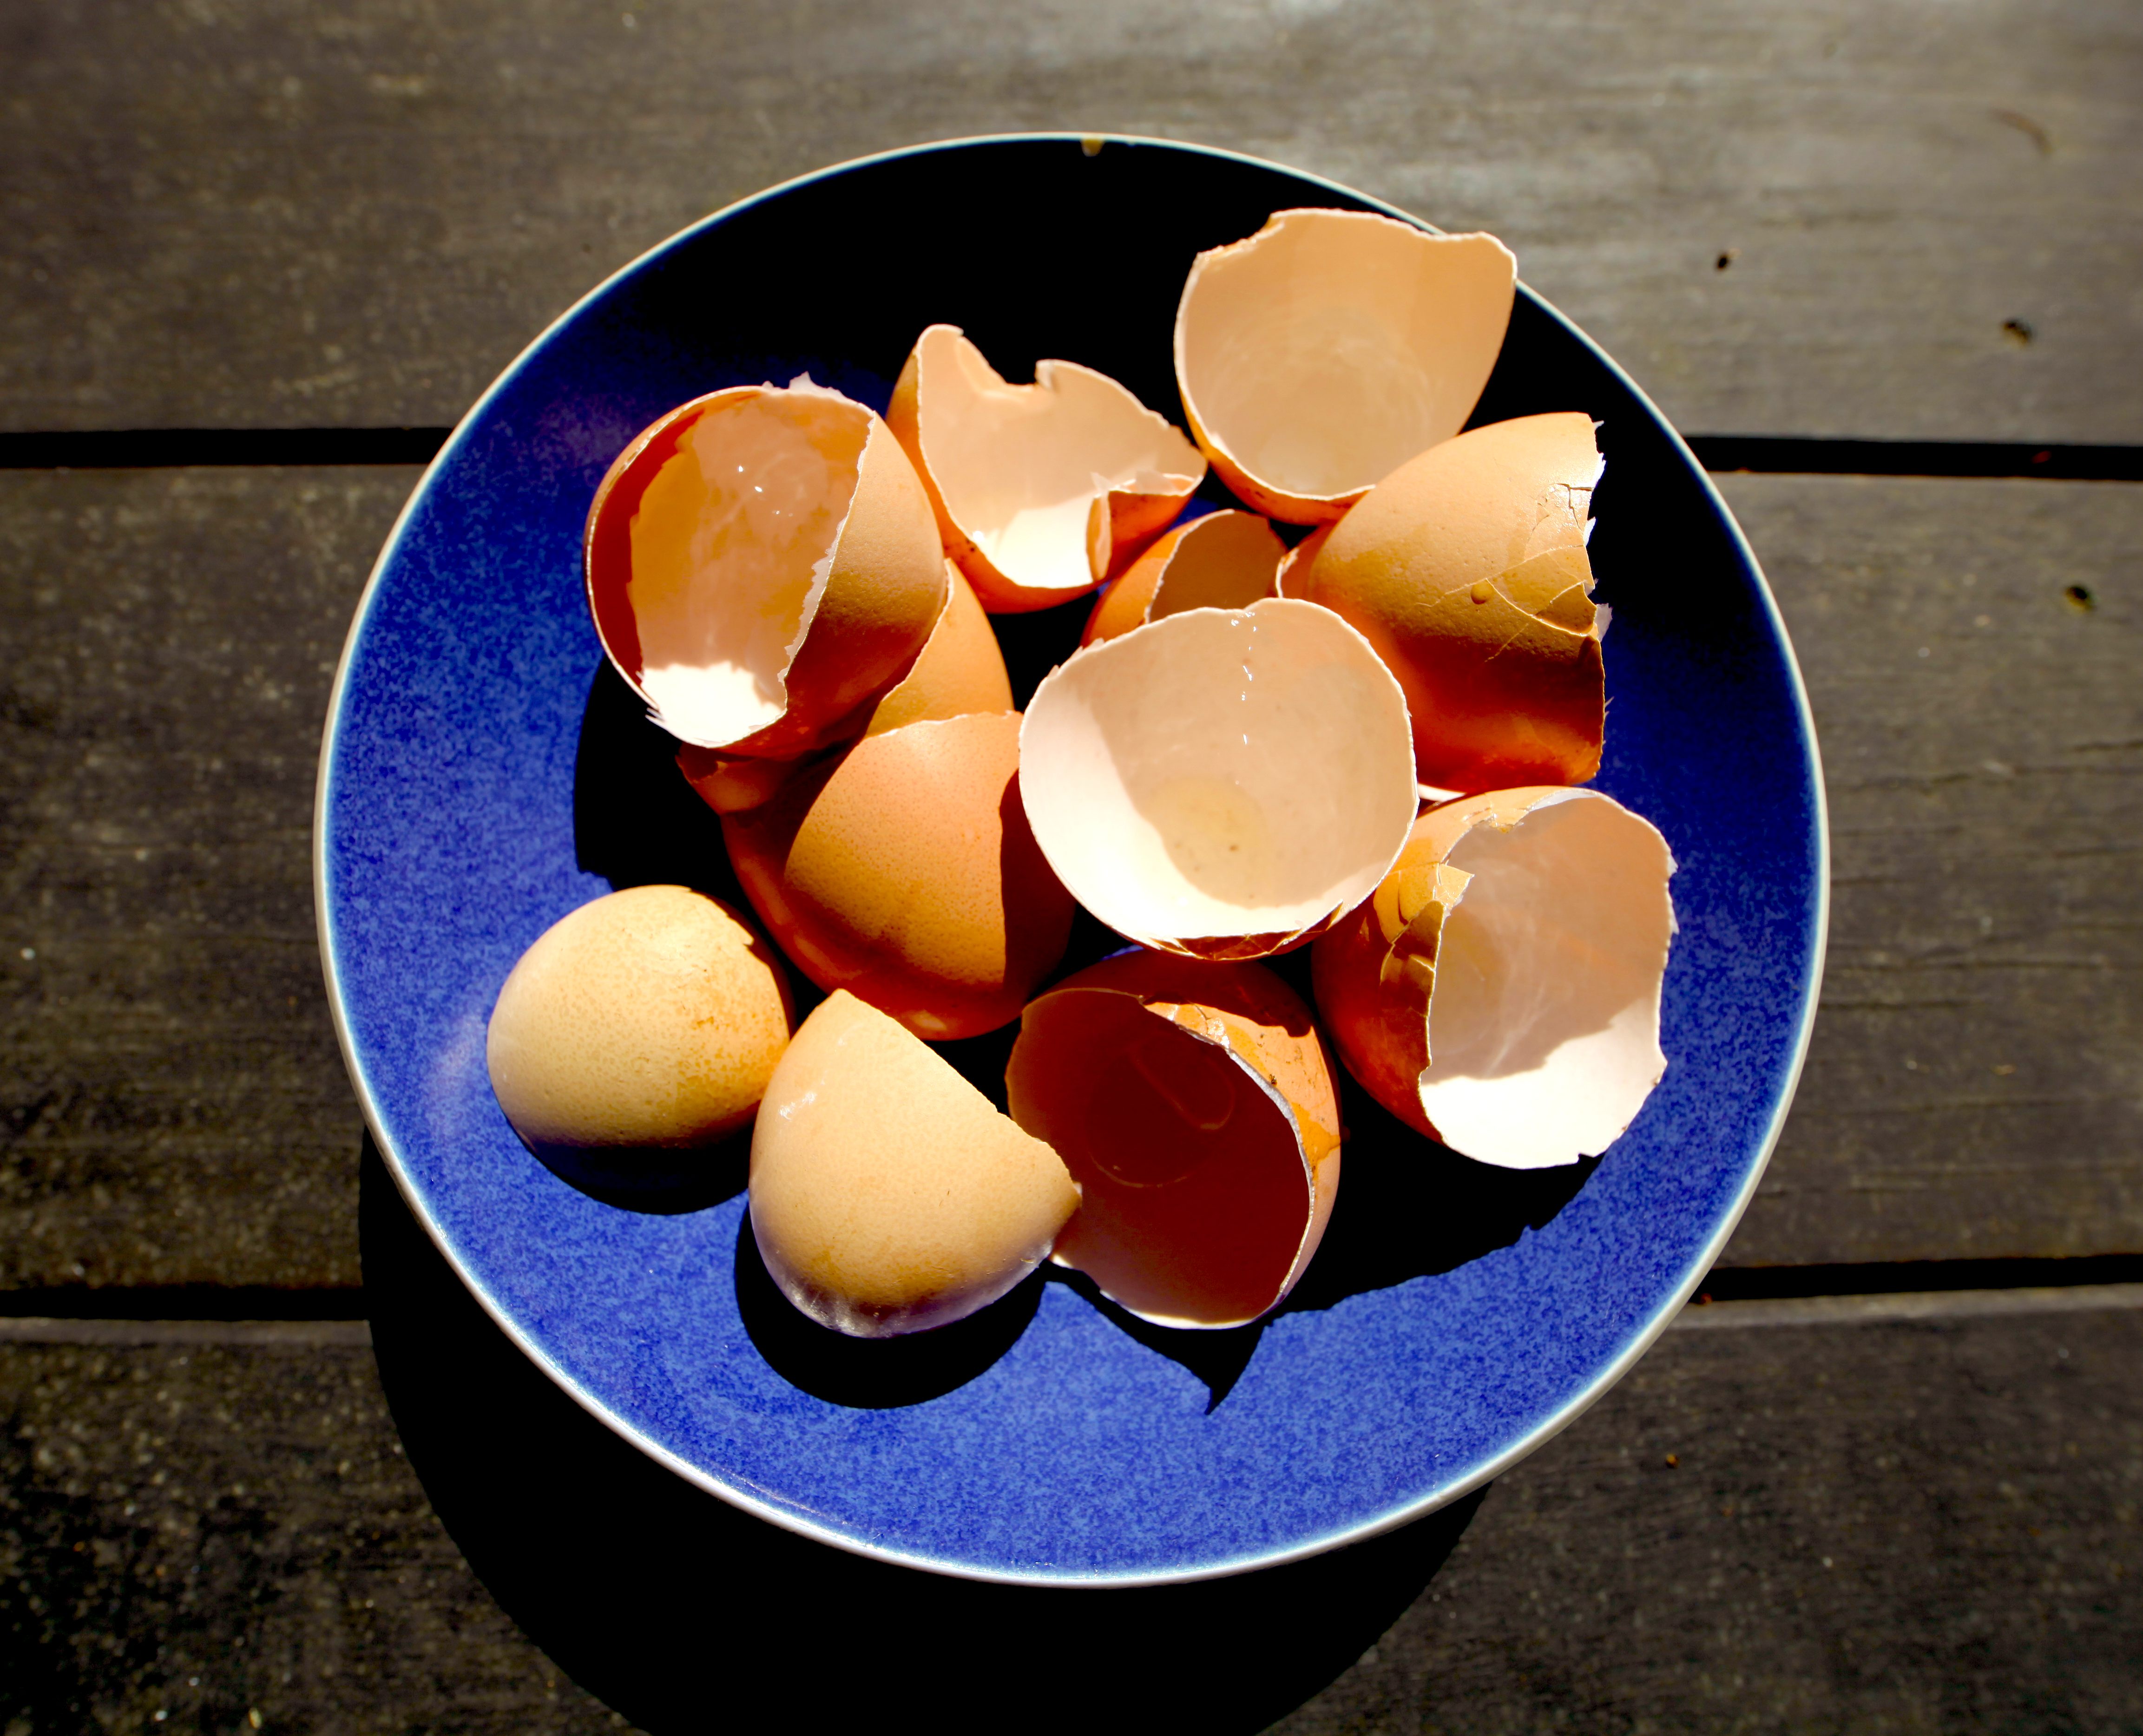
In the heart of the summer, our chickens lay a dozen eggs for us a day. For a family of 4 with 14 hens, we go through a lot of eggs. Here are a few reuses for those hardy shells.

1) Garden Fertilizer/Compost: Throw your shells in your compost or yard waste bin if your municipal recyclers allow kitchen scraps in there. Try to crumble them as they’ll decompose more easily if you do. They add calcium and other minerals to your garden soil. I use a stone mortar and pestle by the composter to crush them. Some people even put them in the blender.

2) Worm Food: Our worm bin worms love egg shells. Truly. I find their eggs inside eggshell clusters.

3) Garden Pest Deterrent: Crush and spread them around your favorite plants. Some slugs, snails and cutworms just don’t like them so they won’t “cross the line.”

4) Pot Drainage: Crumble them up and add them to the bottom of potted plants that need drainage. Tomatoes and eggplants will love the added calcium to deter end rot.

5) Chicken Egg Hardener: If your chickens are laying eggs with soft shells feed them some…..eggshells. I know that sounds gross, but it helps give them a dose of calcium and the girls love it. Be sure to crush the shells. Chickens go on the shape of things for foraging so if they get used to eating egg-shaped goodies they’ll start eating their (gasp) own eggs.

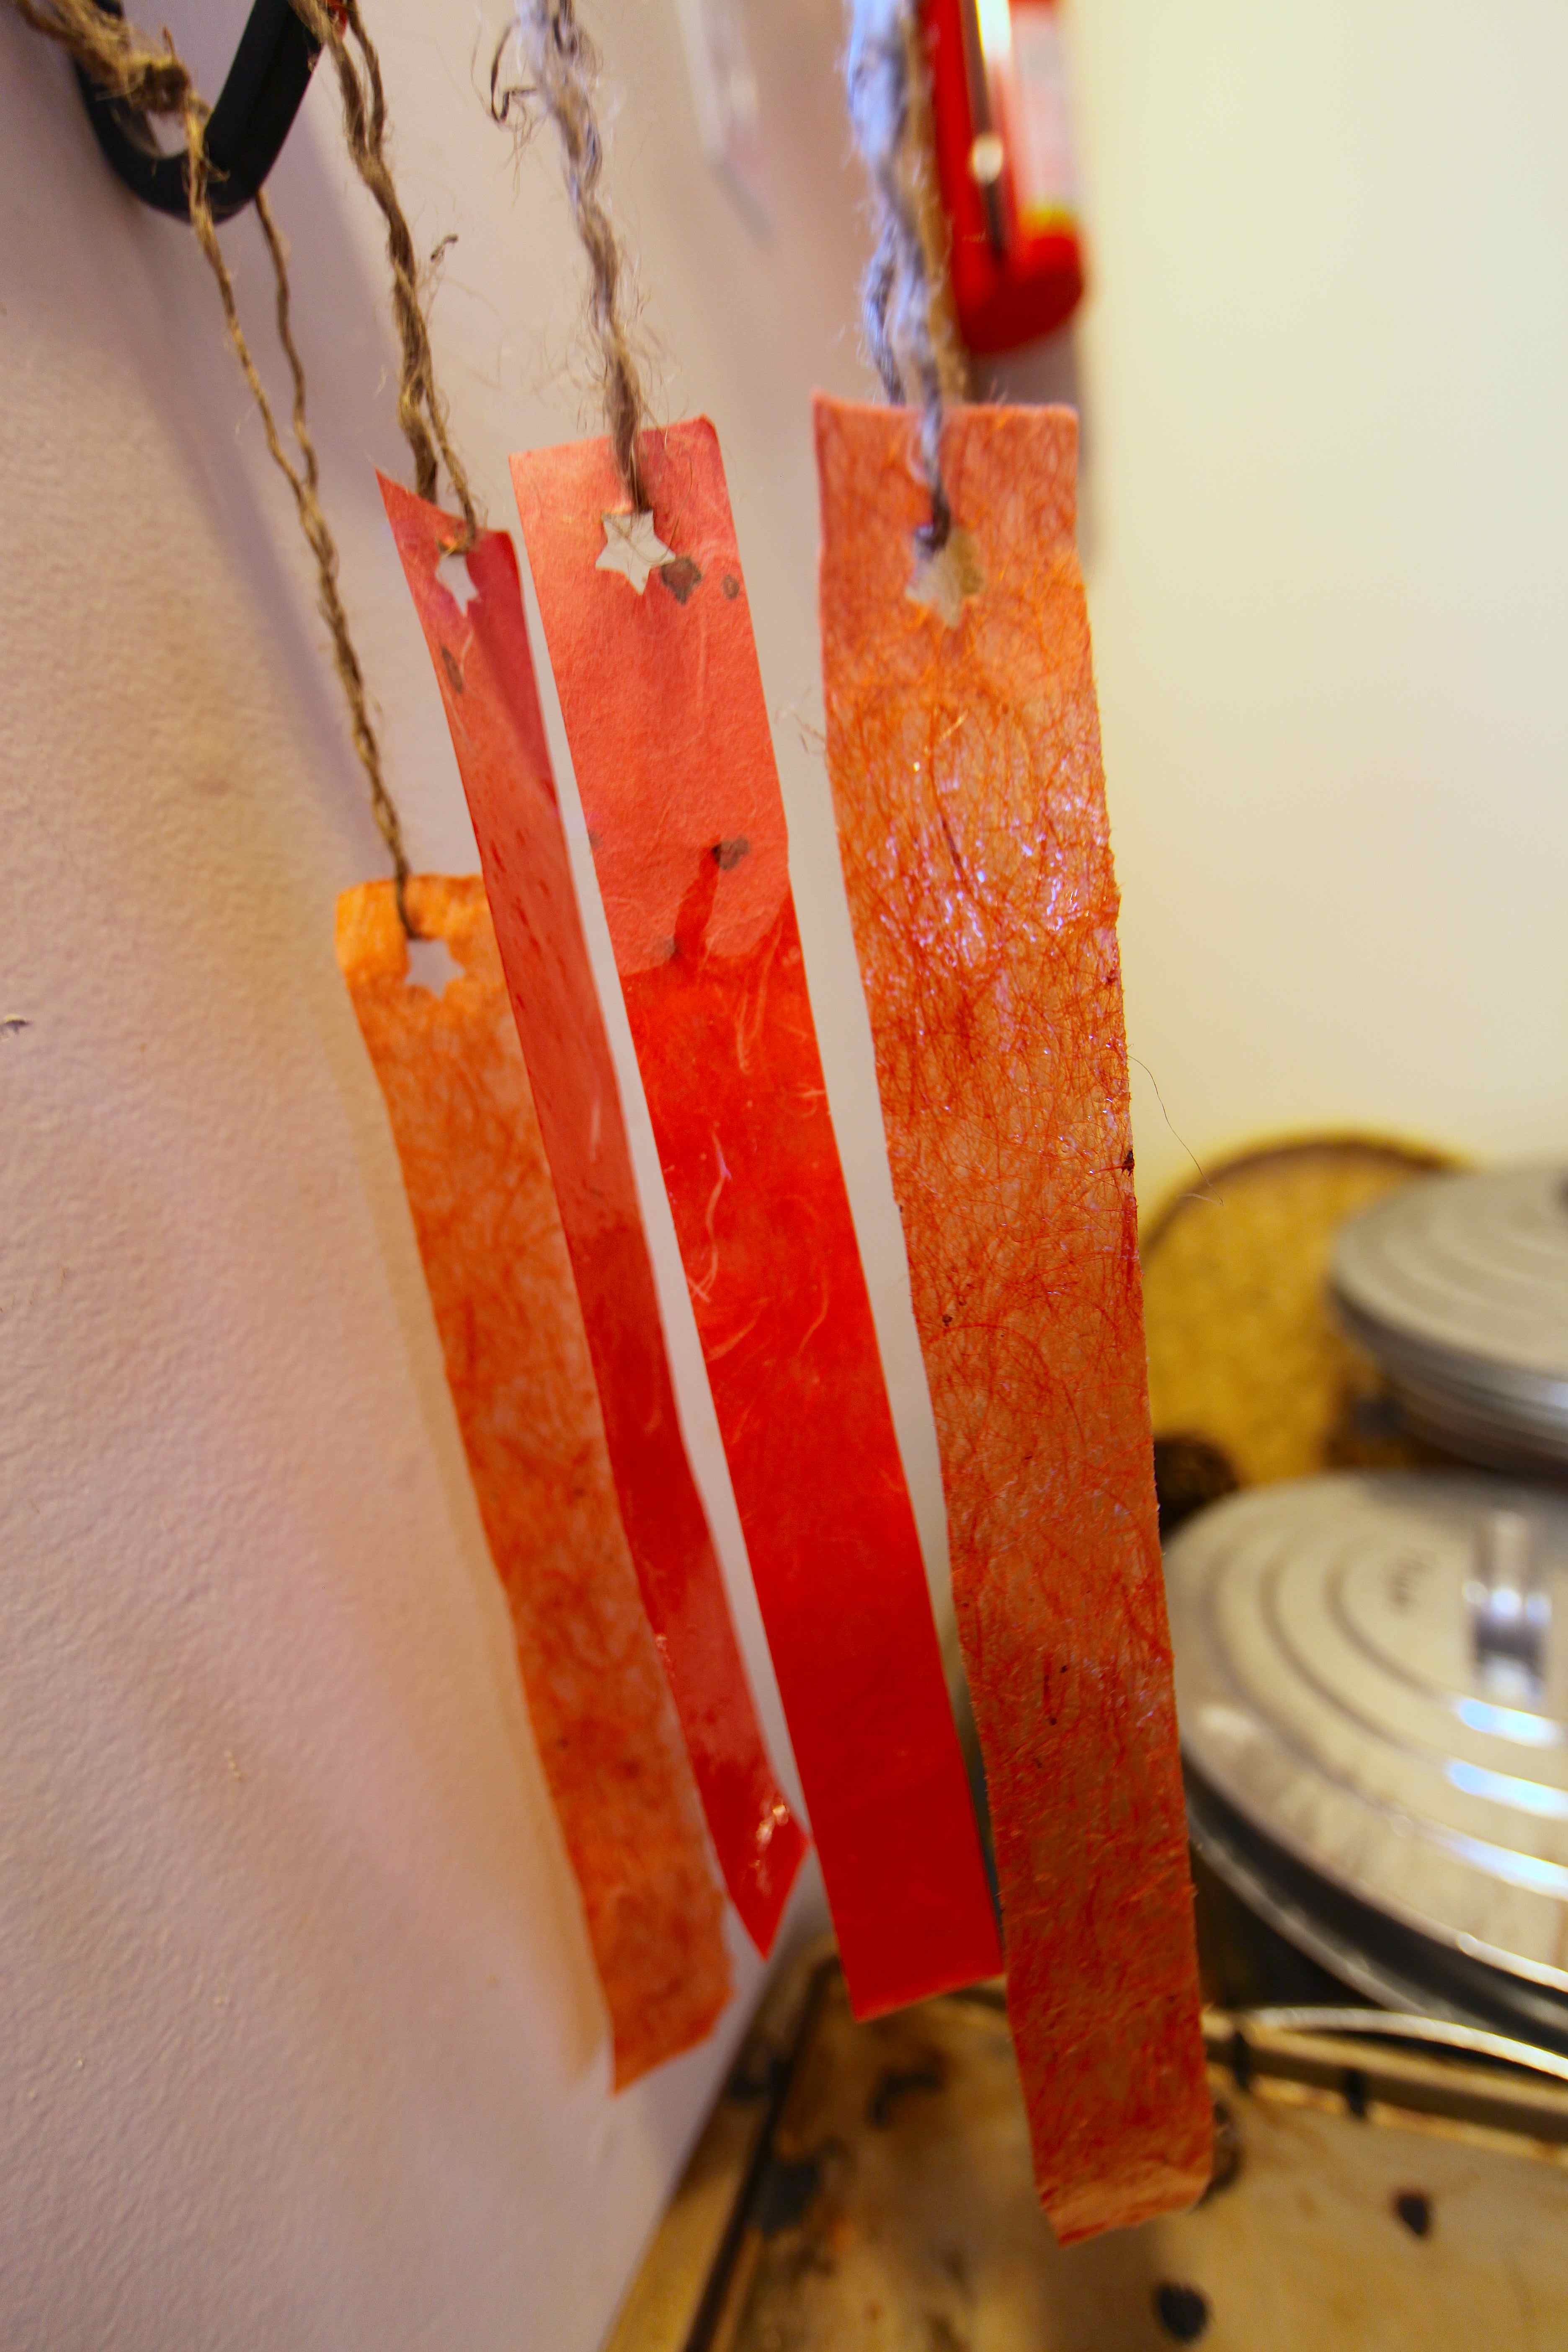
6) Eggshell Candles: Yes! They’re beautiful and easy to make.

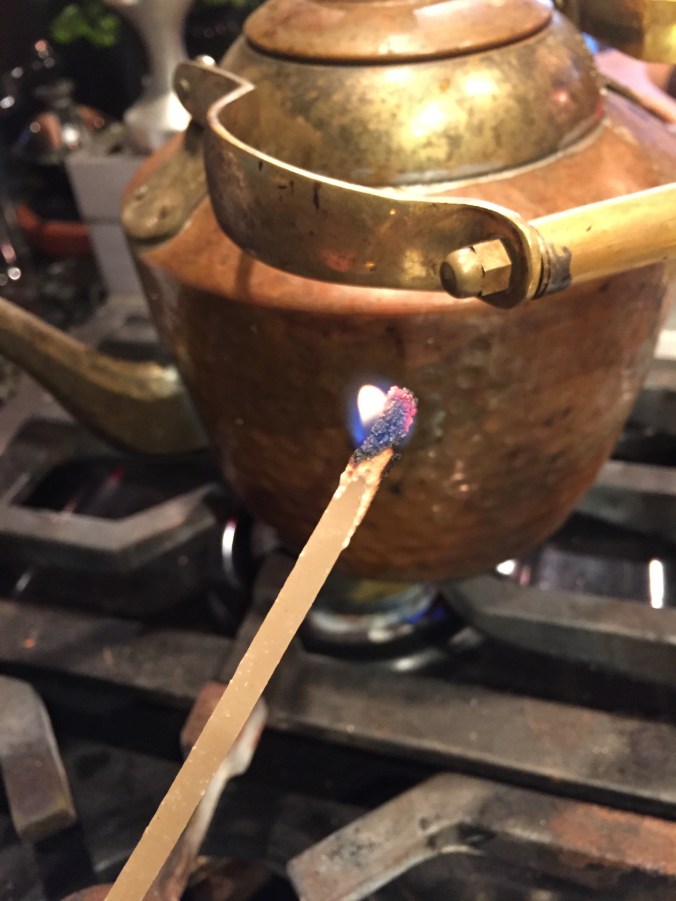
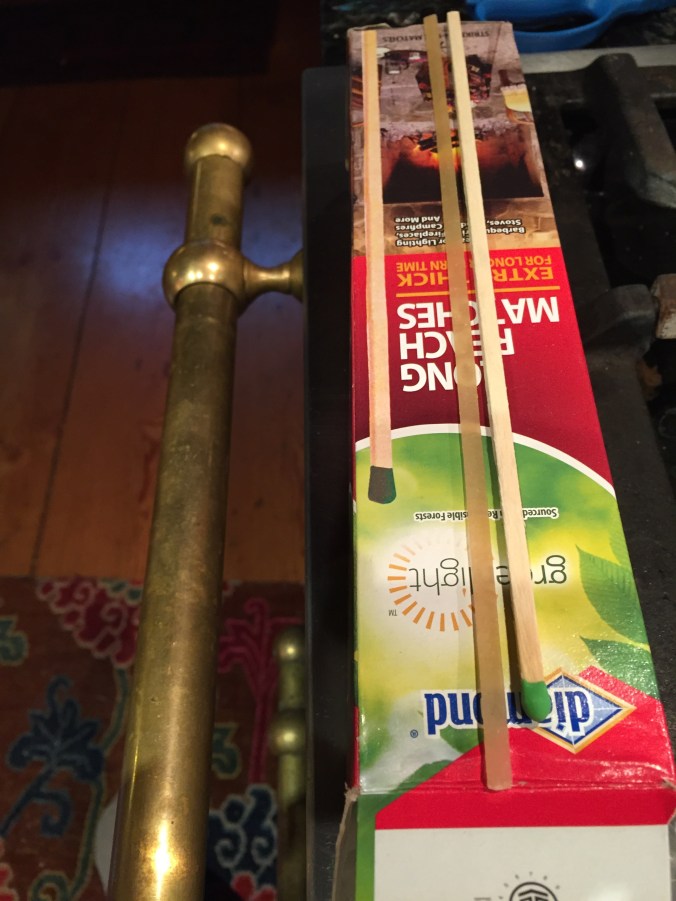
7) Homemade Space Geodes: These are really cool to make with the kids and they even glow in the dark.

8) Spring Flower Vase: These look quite beautiful with hyacinths held in an egg cup. I only have one chicken that lays white eggs, but seeing these makes me want to save all those white shells.

9) Organic Seedling Starter Pots: Just plant your seeds inside the shell (with potting soil too, of course you dummy), put the shell inside your cardboard egg carton, fill all the other egg carton cups up and you can plant the whole thing in your garden.

10) Egg Shell Succulent Planters: Make a lovely mini succulent garden using your egg shells and the carton, too.

11) Sidewalk Chalk: Big sticks of sidewalk chalk are easy to make and you can use a toilet paper tube roll as your mold and just peel it off.

12) Science Eggsperiments: Here are 10 cool science-y experiments for your child to try with eggs. Fun!

13) Calcium Supplement: Skip the pills and simply bake your shells at 350 degrees for 8 minutes. Let them cool and grind them to a fine powder. Add your supplement (a teaspoon or less) to your favorite smoothie or juice once a day.

14) Pet Calcium Supplement: Do the same as above but just add the powder to their food.

15) Egg Shell Mosaics: You can make beautiful mosaics with Easter egg shells or from ones you dye just for this project.

16) Drain Cleaner: Occasionally send a few crushed-up egg shells down the drain. They can help keep it unclogged by their abrasive action.

17) Egg Shell Decor: Getting in the Easter spirit? Try this idea of hanging your egg shells from a tree as a pretty accent.

18) Instant Bandaid: This one’s my favorite. Technically, you’re using the inner membrane of the shell. Tear a bandaid-size piece of it from your egg shell and place it over your ow-ie. By overlapping the 2 ends together, they stick and will stop the bleeding, too. Love it.

19) Vanilla Custard Pots: Serve up your vanilla custard in natural egg shells.

20) Egg Shell Frame: Make a cool modpodge picture frame with egg shells.

21) Christmas Ornaments: If you blow your eggs out you can turn the shells into pretty ornaments.

22) Abrasive Cleaner: Crush them to a coarse texture and use them to scrub down your pots.

23) De-Bitter Your Coffee: If your coffee is too bitter, add finely crushed egg shell powder to your coffee filter and your joe will taste smoother and sweeter.

24) Bird Food: Add some crushed shells to your bird seed mix. The birds need calcium, too.

25) Garbage Disposal Drain Cleaner: Feed some to your garbage disposal. They are an eggsellent cleaner and sharpener for it.

26) Soup Stock Booster: Add egg shells to your soup stock when boiling it. The nutrients can’t hurt.

27) Garden Walkway Addition: I add crushed shells to a garden path made of white gravel and sea shells. The egg shells just blend right in and hopefully deter the slugs, feed the birds, amend the soil, etc, etc. I guess I like walking on egg shells.

28) Stain Remover: According to Apartment Therapy crushed egg shells can help remove stains in your sink, on your tea pot and from other kitchen or household items.

29) Laundry Whitener: Some say that if you toss some shells in a mesh bag in your laundry, the gray tint to your whites will disappear.

30) Sensory Play: Egg shells make great sensory play items for your toddler.

31) Eggshell Toothpaste: That just about says it all — follow the directions in the link. My daughter and I are going to make some this weekend.

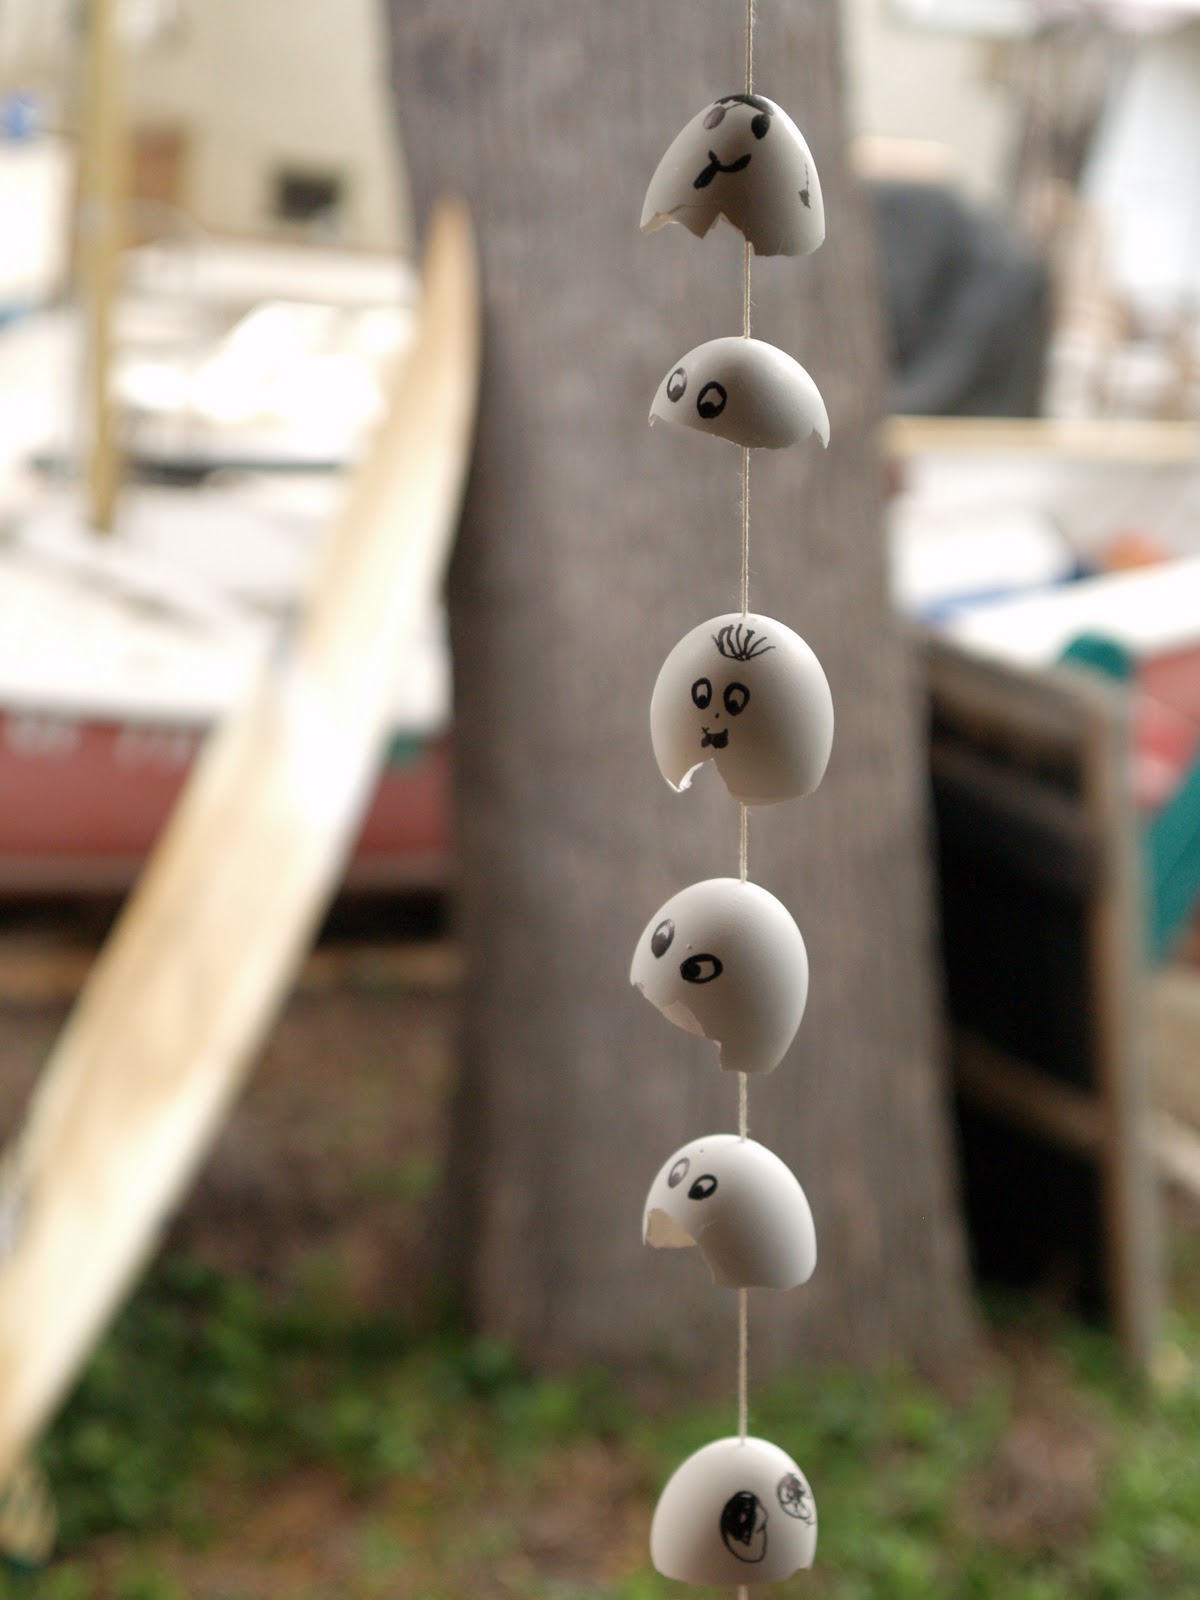
32) Cute Halloween Ghost Decoration: They hang like wind chimes but look like little ghosts on the breeze.

33) Try the Walking on Eggs Experiment: Want to make eggs into eggshells fast? Try this! No, seriously, this experiment conducted by a 6-year-old is a pictorial essay worth checking out.

Now that you’ve reused your egg shells so nicely, what to do with those egg cartons?!

How to Catch Fruit Flies

Fruit flies share 75% of the genes that cause disease in humans, so scientists love studying fruit fly genetics to learn more about scenarios  of  human resistance to disease. But let’s face it, other than in the lab, we really don’t like having these 3mm-long flies in our midst. Females can lay up to 50 eggs per day in your worn-out fruit and in drains and sponges. This time of the year, a kitchen with any overnight wine glasses left unattended will bring about a few hundred fruit flies in no time.

Relief is here, in the form of advice from by big brother. This trick is so simple, and it works. Bryn demonstrated it, and my kitchen has been thanking him ever since.

Make yourself a fruit fly funnel with paper. I just used some scrap paper from an art project my daughter left on the counter.

IMG_6294_DL.png

Place the funnel in a glass jar with a few tablespoons of wine or vinegar inside. Leftover red wine has worked really well for me. And, that’s it! Just leave the funnel jar on the counter and it will attract the unwanted flies quickly and thoroughly. It’s a bit like Hotel California: The fruit flies can check in any time they want, but they can never leave.

img_6289

See the little fly there? Proof! I even poured the wine through the funnel and some of it stained the paper and, frankly, I think that helps to attract more flies. I don’t see any fruit flies flying around my kitchen anymore and this jar is sitting right next to some very ripe fruit.

What are your fruit fly trap ideas?

Easy DIY Snack Boxes

By Finn Clark

Aunt Kelly's Cool Carton Snack Boxes. Photo © Finn Clark

My Aunt Kelly gave me the idea to make snack box containers because she made us one as a gift for Christmas. Since we get local organic milk delivered in cartons, I started saving some so I could try to make my own, using Kelly’s as a template.

Aunt Kelly's Cool Snack Box, Opened Up. Photo © Finn Clark

Here’s how it’s done:

1) You’ll want your box to be square. Each carton is about 3.5 inches wide. Measure 3.5 inches up from the bottom of each corner and put a dot there with a Sharpie. This will be the point where you will cut down to from the top.

2) Then measure another 3.5 inches above that and put another dot there. This is the high point of your arch.

Drawing the high point of your arch. Photo © Finn Clark

3) We used Kelly’s as a template so just traced the arches, but I’ve given you the measurements above, so you can now draw your arch like we did.

Put a dot 3.5 inches up from the bottom. This is the point where you cut down to from the top. Photo © Finn Clark

4) Now that you have an arch drawn for each side of your carton, start cutting them out with scissors. Be sure to cut on the corners all the way down to your 3.5 inch mark (up from the bottom.)

Cutting down the corners from the top of the carton all the way down to the 3.5 inch mark. Photo © Finn Clark

5) Now cut out your arches.

Cutting the arches. Photo © Finn Clark

6) Fold your sides down at the 3.5 inch marks.

Folding the sides down.

7) Sew on a nice large button. Just sew it on like you would normally sew a button. We chose our favorite side to sew the button onto, centered it, and measured about 1.5 inches down from the top.

Sew on a button. Photo © Finn Clark

8) Wrap a rubber band around the button once tightly and use it to cinch down your little snack box.

The right size rubber band adds the finishing touch. Photo © Finn Clark

You’re done! Enjoy your snack box. I use mine to hold apple slices, or home made crackers, nuts, whatever I can find in our pantry for a school snack. And it’s really easy to wash out!

Me and my DIY snack box.

Oh, and you can save the left-over cut carton and use it as a crown.

DIY Matches, With Pasta

Here’s a simple hack I learned recently when we ran out of long matches which we often need for lighting our homemade candles, our pilot lights on our stove, or for the fire. The longer matches enable me to get deep inside some of our long candles that glow from the inside out. If you’re in a pinch and need one, but don’t have one on hand, just use a long piece of dried fettuccini pasta! I light my piece of pasta with our pilot light on the stove and we’re off to the races.

IMG_0564

You can also use a piece of spaghetti. They’re both long enough to help you get to those out-of-reach spaces that need to be lit!

IMG_0566

Easy peasy.

DIY Fly Paper

Somehow, we’ve lost our fly swatter and there’s an odd phenomenon of tiny flies swirling around the center of our living room. It’s nearing spring, and my sense is this is the time of year they seek refuge indoors. Well, not in this door. Even the Buddhist in me wants to send these flies to a new life.

DIY Fly Paper. Photo © Liesl Clark

Before I send you on a journey to make your own fly paper, I can testify that one of the best ways to get rid of flies in your house is the half-filled Ziploc bag method. Simply half fill a medium size Ziploc bag with water, throw in a penny, and hang it in the room where you want to get rid of flies, especially in the place where they enter the room. They will scram when they see your scary water. It has something to do with the reflected light in the water, to their very many eyes, and looks like predatory danger to them. We see these bags in tea shops in Nepal and I know they do the trick.

Meanwhile, did you know that traditional fly papers used to have arsenic in them, not to mention the other toxic poisons they harbor? After searching past all the tragic posts about housepets getting caught up in fly paper (a love bird included), I stumbled upon a great DIY recipe at Going Home to Roost. We modified the recipe a bit to ensure added stickiness. And I noticed how my sweet-toothed 7-year-old jumped into the DIY game when she saw how much honey and sugar I was throwing into the pot. It might be a slow death for the winged buggers, but it’ll be a sweet one.

All you’ll need is:

Scrap paper

String or yarn

1/4 Cup honey

1/4 Cup sugar

1/8 Cup water

Cut paper strips. Photo © Liesl Clark

We used some pretty scrap paper from our scrap paper bin. No use having ugly strips hanging about the house. Our thinking was that flies like pretty colored things, too. Cut your paper into 2″ wide by 5-6″ long strips.

Punch a hole in your strips. We used a star punch. Photo © Liesl Clark

Punch a hole at the top of each strip and tie a string loop through the hole.

Sweetness in a pot. Photo © Liesl Clark

Throw the honey (I give credit to our honey bees for their fine work creating this gorgeous blackberry honey), sugar and water in a pot and bring to a simmer as you stir all the ingredients until they’ve dissolved completely. This is the point at which you can sing a witches’ song, as you stir your sweet potion in the cauldron. The kids’ll love it.

Saturated with honey bait. Photo © Liesl Clark

Place the strips individually in the pot, holding the string, ensuring they become saturated with your sticky rue.

Don't let the drips get all over the kitchen! Photo © Liesl Clark

Hang the strips where you can place a cookie sheet or newspaper below them to catch drips as they cool and dry a little.

Hanging out to dry. Photo © Liesl Clark

Then hang them up in convenient places around your home and wait for the flies to find your sweet bait.

Our first victim. Photo © Liesl Clark

I think our first victim got its tongue stuck.

How To Fix Dead Ballpoint Pens

I promise, I haven’t gone off the deep end. I hate to throw things away that don’t need to be tossed, and most pens that stop writing can be fixed in a matter of seconds.

Fix Those Pens

We had a few hundred pens to test after having collected them from boxes bound for a dumpster. Sure, we had saved them from the landfill, but did they work? Most did, but the 30 or so that wouldn’t write just needed a little nudge. The roller ball was locked in place by dried-up ink from lack of use and we decided to put an age-old remedy to the test. If you put the tip of a ballpoint pen in a flame for a second or two it heats up the ball and gets it moving again.

Moving parts are all that’s needed when you know there’s still ink in that pen. Here’s how we did it. This ain’t rocket science:


I had 2 excellent lab testers to do the job. The result? Thirty pens saved! And, why do we do this? Because we find too many plastic pens out in the environment, on our beaches, sides of roads, sidewalks. Every time we go to the beach or to town, we find pens.

Papermate Washed Ashore at Point No Point, WA © Liesl Clark

Paper Mate Washed Ashore at Point No Point, WA © Liesl Clark

I don’t think I’ll ever need to buy a pen again. They’re everywhere, and most are made of plastic so they’re here to stay, forever. Let’s try to fix the ones that don’t work and give them a second, third, and fifth life if necessary. And when all the plastic pens have been used up, we can start buying one special metal pen a year, like my husband does. He carries it with him and uses it religiously, because it’s his one pen, his favorite pen, meticulously made, and ready for him to write beautiful things because it’s well made and doesn’t dry up so easily.

DIY Mason Jar Soap Dispenser

I’ve eyed the useful mason jar soap dispensers made by creative people and thought I’d try to make one myself. Was it difficult? Not at all. This DIY project takes a few minutes to pull off.

All you need is a mason jar with a wide mouth lid, a push pump from a discarded soap or hand cream dispenser (I had to cut mine down so it would fit in my pint jar,) a pair of pliers, and a Sharpie.

Mason Jar + Lid, Pliers, Sharpie, and Pump. Photo © Liesl Clark

Find the center of your flat mason jar lid and punch a hole in it with a can opener (oh right, that’s one more tool you’ll want.)

Making Your Center Hole. Photo © Liesl Clark

I was able to make a hole quite easily with my pliers. Draw a circle around the hole that’s in the center of your lid, is in my first picture, and start to pull the hole apart, making it wider and wider.

Starting to Make Your Center Hole Wider. © Liesl Clark

You simply keep pulling the pieces of metal wider and wider around the edges of your circle until they’re just wide enough for your pump to fit through.

It Will Start To Look Like a Flower. Photo © Liesl Clark

When you have sufficient room for your pump, slip it through but try to keep the fit quite tight.

Thread The Pump Through the Hole. Photo © Liesl Clark

I pressed the edges of the metal lid down tight against the lid to prevent any future cuts when I need to add soap to my dispenser. You can use a silicone sealant to lock the pump down to its center hole and smooth out your sharp edges.

Sealed Soap Dispenser. Photo © Liesl Clark

This whole project took 5 minutes once I had gathered my supplies.

DIY Soap Dispenser, Ready For Use. Photo © Liesl Clark

When we went away on vacation our cat knocked over a pretty glass dispenser I gave my husband for Christmas. My husband is the dishwasher after dinner and I wanted him to feel like he had a cool “tool” to use at the sink.

Our cool new kitchen 'tool:" Our DIY soap dispenser. Photo © Liesl Clark

We mostly use baking soda for our dishes, but this liquid soap gives great suds if you like ’em and makes a mild hand soap, too. Our current liquid soap is an extremely watered-down (like 6:1 water to soap) biokleen dish soap.

DIY Dish Soap Dispenser. Photo © Liesl Clark

DIY Cat Scratching Post

Give your kitty what she wants and make a real-tree natural cat scratching post! My theory is that your average carpet-remnant cat scratch tree only encourages your furball to scratch up your carpet or upholstery. If you give your cat what she wants, an actual tree branch to sharpen her nails on, she’ll leave your furniture alone. That’s what our cat does…mostly.

A Real Tree Cat Scratch Tree!

So, we went out to our brush pile and found the perfect curving fat tree limb with two Y branches growing from it so our kitty could have a few spots to climb to. I found a piece of particle board to screw the sawed-off limb onto. It was as simple as that. This scratching post has lasted 4 years and our cat still uses it happily.

We often attach bits of string with fun things for our kitty to bat at, to make it a fun playspace for her.

She loves her real tree cat scratch tree.

But here’s the best thing about this cat gym: When we’re done with it, we can break it down and burn it in our fireplace. No issues about waste here.

Do you have a DIY cat scratching post you can share here?

Make Your Own Off-The-Grid Yogurt

I’m amazed at how hard it is to find yogurt in glass. Supermarket yogurt is mostly in plastic containers and if you’re trying to keep your family plastic-free, yogurt would have to be taken off your list. Unless you make your own.

We’ve been making yogurt for about 12 years now and it wasn’t until 4 years ago that I realized I didn’t have to make it in a yogurt maker with those tiny little jars. When I was 16, I recall making yogurt on the beach in a big camp pot when my big brother and I were camping during the summer on the island of Corsica in France. The simple process of making yogurt in a pot, bowl, or jars in the sun or by a fire should’ve stuck with me, but somehow I became complacent, thinking I needed a yogurt maker to make the good stuff. Not so.

Off-the grid yogurt with honey from our bees. Photo © Liesl Clark

Off-the grid yogurt with honey from our bees. Photo © Liesl Clark

Today, I make yogurt in bulk — large quart mason jars of it so I can share starter with friends or barter it for other fresh produce or home-made goodies. I don’t need any electricity to make it so I call it off-the-grid yogurt, reminiscent of my teen days in France.

This yogurt is the best I’ve ever made or tasted. All started from organic Greek full cream goat’s milk yogurt. But now I simply use our local organic whole milk as the yogurt’s main ingredient, which is delivered once a week to our home. This yogurt lasts in the fridge for months without molding!

All you need is a couple of tablespoons of leftover yogurt as your starter for the next batch. We usually make at least 2 quarts of yogurt.

Ingredients:

Whole milk (at least 1 quart)

2 Tablespoons yogurt (I prefer organic)

Jars with lids

Pour your favorite whole milk into a pot. There’s no exact measurement for this, just pour as much milk as you want yogurt. It’s basically a 1:1 ratio of milk to finished yogurt.

Pour whole milk into a pot. Photo © Liesl Clark

Pour whole milk into a pot. Photo © Liesl Clark

Set your timer for about 8 minutes so you don’t let the milk boil over.

You want to heat up the milk until it scalds. You’ve scalded it when little bubbles start to appear on the sides of the pot and a film develops on the surface.

Scald your milk. Film on top is proof of scalding. Photo © Liesl

Scald your milk. Film on top is proof of scalding. Photo © Liesl

Turn the heat off and take the yogurt off the burner to cool. Let it cool to room temperature. Add your 2 tablespoons of yogurt and with a wire whisk, whisk the yogurt completely into the milk. Pour the milk/yogurt mix into jars.

Place your jars of yogurt into a pot of warm water. You want to create a warm water bath. I simply put my pot of water over our pilot light and that’s enough to keep the jars warm overnight. You can also place the jars on a warm lintel above your fire in a towel or blanket for warmth. The key is to have a spot that is consistently warm for 8-12 hours. The longer you let your yogurt mixture sit in the warmth, the firmer it gets. I go about 12 hours.

Water bath pot over pilot light method. Photo © Liesl Clark

Water bath pot over pilot light method. Photo © Liesl Clark

When it’s to the consistency you like, put it in the fridge to let it cool. Enjoy!

Off-the-grid yogurt in a quart jar. Photo © Liesl Clark

Off-the-grid yogurt in a quart jar. Photo © Liesl Clark

My friend Rebecca has another method, which I call the warm cooler method: It involves putting your yogurt jars-in-the-making in a cooler surrounded by other jars of warm water and some blankets and towels. Check out her excellent method here.

Do you make your own yogurt? What method do you use? Let us know in the comments below!