Stop Friending Spammers

When an unknown person “friends” you on Facebook, do you accept their virtual friendship, without knowing who they are? For the past month, every day I’ve received about 5 new friend requests on Facebook from spammers. What’s disturbing is that many of them are friends of my real-world friends. Corporations and sponsoring organizations are ever-increasing the pressure they put on employees, sponsored athletes, independent filmmakers, freelance writers, and content producers to garner as many “friends” and followers as possible in social media. This encouragement to use social media as a platform to reach a broader audience means that spammers are easily getting in the door, and posting their unwanted advertising for more unwanted plastic crap. Or worse yet, they’re identity thieves looking for your financial information, or fake news spreaders, doing all they can to alter reality.

The irony is that this corporate push for employees to have a big social media footprint allows scammers to push the very products that are in competition with the corporations my inadvertent spam-supporting friends work for. Do you see where I’m going with this?

Let’s do our best to make sure we’re only friending real people who have real profiles. I’ve seen athletes and aspiring public figures approaching the coveted 5,000 friends mark,  yet at least a fifth of those so-called friends are spammers. In a culture that already has too much commercialization in our everyday lives, couldn’t we be more proactive in reporting the scammers and saying “no” to their friend requests, which only serve to boost their ability to spam unwanted advertising all over Facebook and other social media platforms?

*Go through your friends list and be sure the people you’re friends with are real people.

*Spammers often don’t bother to put a banner photo on their page.

*Spammers often have a male or female profile photo but their gender is marked as the opposite. This is a sure sign of a spammer.

*You’ll see pretty pictures of girls in their profile pictures.

*Hit the message button, and you’ll see what groups they’re in and your mutual connections. If you know this person is a spammer, take an extra step and let your mutual friends know he/she is a spammer, too.

*If a spammer is trying to friend you, you can friend them and then look at their profile for a few minutes to determine if you really want to be their friend. If not, unfriend them. And, if you think they’re a spammer, when you decline their friendship, there’s an option to mark them as spam. Do the right thing and call them out. Facebook will thank you.

Here are a few examples of my prospective “friends” that are sitting in my friend request queue this week. Meet Liam:

Screen Shot 2016-03-01 at 8.48.46 PM

As you can see, Liam loves Oakley sunglasses. But more importantly, you’ll see he’s friends with 7 of my very real friends. Note, too, that he doesn’t have a cover photo.

And here’s Mark:

Screen Shot 2016-03-01 at 8.53.41 PM

Mark with no cover photo only has 13 friends, and his understanding of his gender is all confused. You can see he/she updated her/his profile photo on January 28th.

Alina, too, is unclear whether she’s a he. If I want to see posts on Alina’s timeline, Facebook tells me I’ll have to accept his friend request.

Screen Shot 2016-03-01 at 8.56.11 PM

And then there’s the very attractive Detweiler Roy Robert. He, too, just opened his Facebook account and quickly replaced his male mug with these attractive images of porn star, Kelsey Hess. (I only know that because I did a Google Image search of this cover photo and found several articles about spammers stealing her photos.)

Screen Shot 2016-03-01 at 8.57.17 PM

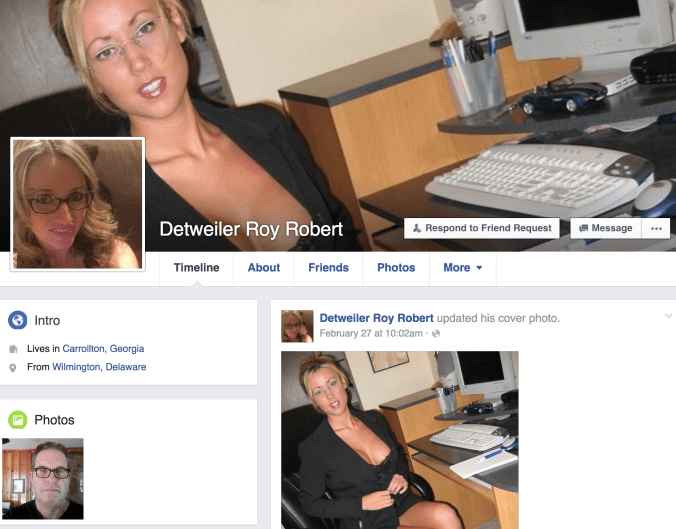
It’s no surprise that 97% of Detweiler’s 45 friends are male, and that he has joined some of the largest Facebook groups around (with over 8,000 and 9,000 members.)

If you’d like to know how to identify a scammer, like Detweiler, on Facebook, here are some further pro tips I’ve received from admins who regularly monitor groups with large numbers of members:

How to Identify Spammers:

1)  Very little normal social networking activity.

2)  New account.

3) Often there’s a lack of a cover photo (the long banner photo at the top of a personal Facebook account.)

4) Large number of Group memberships. Spammers typically are members of 100’s of groups all which have high membership like a thousand or more members. They also tend to be members of groups that start with the same letter of the alphabet and bear no relation to one another. They use apps to quickly join those groups. Our Buy Nothing local gift economies are increasingly getting requests to join from such scammers.

5) Fake profile picture, (for example, a pretty young female.) Simply do a Google Image search of their cover image or profile photo. Spammers steal photos from catalogues and other websites.

6) Gender confusion. Name is female but the pronoun associated with it is male and vice versa.

How to Report a Spammer:

Go to their account and report the account. Or, hit “Delete Request” and then hit the button “Mark as Spam.”

What are typical Spammers Spamming?

1) Sunglasses – often with a pretty young woman profile picture, the account usually belongs to a male.  You’ll find many are from Asian locations, but lately there have been more African spammers.

2)  Shoe sellers – Similar to Sunglass sellers.

3)  Low airfare sellers.

4) Money lenders – Often 45-55 year old man profiles, from Begium/France etc., wanting to “help end poverty” and such with easy to get low interest loans.  These scammers are known to steal personal/financial information.

This last category of scammers is of most concern. Let’s do our best to report spammers to Facebook. They manually review every report. And if you don’t mind, and you’re a Facebook friend of mine, can I let you know when I’ve received a friend request from one of your fake lovelies? I’d welcome it if you did the same for me.


25 Bread Clip Reuses

IMG_4795 Photo © Liesl Clark

Photo © Liesl Clark

Although we most often bake our own or purchase locally baked plastic-free bread from our local baker, there is the occasional store-bought bread that comes in a plastic bag (recyclable at most grocery stores, if clean) with a hard plastic clip to keep it shut. These clips might also make their appearance on produce bags. Some call them bag clips, others bag tags. They’re made of hard plastic and as of yet we know of only one address in the US where you can send them, where they’re stockpiled and sold to help wheelchairs get to South Africa where they’re needed. So, if you’ve collected them over the years, please send them to this address here.

Did you know that over 20 cases of accidental ingestion of plastic bag clips have been published? The incidence are so detrimental to health that a team of researchers have classified in the British Medical Journal “morphology” chart the many varieties of bag clips, in an effort to determine which ones are most dangerous to the digestive tract and which designs are more benign.  Don’t swallow them, or you might become yet another statistic for this study.

We do have a few bread clips saved in some drawers, mostly for reuse. Here are a few of the ways we’ve used them in our home?

1) Reuse to seal other bags (yep, it’s obvious but I had to list it so you don’t throw them away.) We store our bread in a bread box, to keep it plastic-free. But, occasionally we’ll need to pack it in plastic when we go camping. Bread clips come in handy then.

2) Label your spare keys with them!

3) Place on the end of tape, like duct tape and masking tape, so you don’t have to spend time peeling the tape off itself.

4) Use them as earbud tamers to store those earbuds and prevent the inevitable tangles.

Screen Shot 2016-03-01 at 3.19.01 AM

Photo: Jake Ducey

5) Use them as counter scrapers for hard-to -scrape -off crud. Same for pots and pans.

6) Use to hold together all your rubber bands in your everything drawer.

7) Make a cool cereal box and bread clip abacus by following this tutorial provided by Almost Unschoolers!

8) Use your bread clips to organize and label your desk and entertainment cables.

9) Make bread clip monsters like these at Crafts by Amanda.

10) Make bread clip snowmen a la Crafts by Amanda, and impress your housemates.

11) Use as a bookmark.

12) Use to replace missing game pieces. A bread clip avatar for monopoly could be quite imposing if you put a scary business face on it.

13) Make a bread clip monster garland. Cute.

14) Use as wine glass identifiers for a party. Multicolored bread tags, or ones you’ve added faces to, work well to differentiate your guests’ glasses. Just clip ’em to the stem of the glass.

15) Write the letters of the alphabet on 26 bread clips and let your child put them in order.

16) Make some cute bread tag earrings.

17) Make bread clip gingerbread men!

18) Use them to hold hair ties in the bathroom.

19) Learn how to make a robot necklace from Mich L in LA.

20) Make some more fine jewelry.

21) Here’s a pendant for some more ideas.

22) Use them to hold your twist ties in your reusable grocery bag for bulk items. I reuse these twist tie bulk food labelers, so having them in a bundle helps keep track of them when I’m in the bulk department.

23) Flip flop about to blow out? Use a bread tag on the bottom to hold the little end in place for a quick reinforcement fix.

24) Make a bread clip shower curtain (ok, I know you won’t, but it’s an interesting and artful idea.)

25) For some fun bread clip robot reprintables, please visit Mich L in LA’s blog, which is an inspirational site for repurposing our “trash” into artful creations.


Stone Garlic “Press”

If you’re a lover of kitchen gizmos like garlic presses but just haven’t enjoyed the clean-up factor, get yourself a big stone to use in your kitchen. Skip that gizmo that’s a pain to clean up, is going to eventually break, doesn’t give you all the garlic from that clove since it gets stuck in weird places, and simply use a pestle-shaped stone instead.  I’ve used one in my kitchen for 10 years now and I couldn’t live without it. In Nepal, my friends use stones in their kitchens: One flat one and one cylindrical one for crushing, mashing, and grinding either garlic, chili peppers, whole grains or whole spices. I brought a stone home with me and would recommend you look for one, too. Maybe there’s a pestle-shaped on out in the woods, in your garden, or on the bank of the nearest river or stream. Think cave man, not Pottery Barn. One hit on the garlic and it’s peeled. Another smash and it’s crushed. Easy.

5 Planters Made From Everyday Objects

Large plastic containers make great container gardens. Think twice before you throw plastic receptacles away as someone might like to reuse it.

Planters are easy to come by. Whether you have little growing space outdoors, or want to beautify a patio or rooftop, pull your nearest receptacle or container from your trash and turn it into a planter. The more innovative, the more interesting and discussion-worthy for your friends and neighbors. Here are a few unusual planters we’ve come across in our travels in the Himalaya:

1)    Thermos Planter

The planter on the right is an old broken thermos. They also make great modified bird feeders.

2)    Styrofoam Cooler Planter

Herb planters in styrofoam. The village of Kalopani doesn't have styrofoam recycling. But this family found a way to reuse theirs to plant herbs for their restaurant.

3)    Paint Can and Bucket Planters

Paint Cans and Buckets Make Perfect Succulent Planters, Photo: Liesl Clark

4)    Gerry Can Planter

When this plastic water or fuel container broke, it was turned into a large planter.

5)    Barrel Planter

These barrels make great containers for donkey or yak loads when we go on expedition. When they break, they can make a great container garden.

These are all utilitarian planters, used in a place where there are no garden stores to simply go and buy yourself a clay pot. They’re also used in high Himalayan villages that have short growing seasons. Placed along a south-facing wall, these planters extend the growing season by a couple months.

What innovative planters have you grown your food in?

Leftover Wine And Fruit Scrap Vinegar

Wine aficionados claim that a bottle of wine should be consumed within 36 hours before the perishable liquid inside starts to deteriorate. Once oxygen is introduced, the wine begins to change. Recorking or sucking the air out of it will only deter the deterioration by a matter of hours. Putting the bottle in the refrigerator might help keep it for up to a week, but after that, it’s time to make wine vinegar!

Vinegars are so easy to make, it’s almost a crime to not make them with your leftovers. In a glass jar combine 2 cups of leftover red wine with a cup of distilled water and some “mother” from a previous organic vinegar you’ve finished and cover the jar with cheese cloth or a clean piece of cotton cloth so air can get in and dust stays out.

“Mother?” You ask.

If you look closely at the contents of the bottles above, you’ll find my 3 mothers. They’re from blackberry, apple, and pear vinegars, respectively, and I’ve been hanging on to them so I can use them as a starter for the next vinegars I make. A vinegar’s mother is a gelatinous mass that usually sits at the bottom of your vinegar bottle. It’s a sign that your vinegar is likely organic because it houses a lovely live culture. The mother is actually a type of acetic acid-producing bacteria called “acetobacter” and it consumes the alcohol in your wine, converting it into delicious vinegar.

If you don’t have a mother with which to start your homemade vinegar, you can find some in the bottom of a jar of Bragg’s Unfiltered Raw Organic Apple Cider Vinegar. Until I started making my own apple cider vinegar, this stuff was an essential ingredient in our home. It’ll cure you of any cold and is an excellent rinse for your hair. Save that mother and you’re ready to start making your own vinegars.

What about fruit vinegar? I make my own throughout the year from scrap apple peels and cores when making pies and apple sauce. Blackberries from our vines also make an incredibly delicious vinegar. Simply put your fruit scraps in a jar with some water and a “mother” from another vinegar and cover with cloth so the vinegar can breathe.

If you get mold because your fruit is on the surface and exposed to air, take the offending mold out and make sure your fruit is totally submerged in the water/mother mixture. Check on your jars periodically, but it’ll take a few weeks for the fermentation and culture to reach its peak. I always go by feel. After about a month I run the vinegar & fruit mixture through a cheesecloth, separating out the fruit but I retain the mother and place it and the filtered vinegar into a pretty bottle and cork it. And as the vinegar ages, like me, it only gets better.

Vinegars make great gifts, so you can never make too many bottles! Do you make your own vinegars? Please share your thoughts and let us know what your favorite fruit or wine varieties are.

Use Newspaper to Wash Windows

By Finn Clark

Have you ever tried washing windows with a rag? What happens? You get lots of smudges and lint all over your window. And if you’re using paper towels for window washing, the same problem will occur because paper towels have lots of loose material that gets stuck on your nice glass window. I’ve found a simple solution to the problem: Use newspaper! (My mom has also banned paper towels from our house, so we can’t use those.)

Use Newspaper For Window Washing. Photo © Liesl Clark

If I were to be really scientific about it, here’s the method I’d use for best results:

Spray a solution of mostly water and just a little vinegar onto the window. I don’t know why anyone would go out and buy “window cleaning solution” since this simple solution is easy to make, is less expensive, and is great for the environment.

Kids Love to Wash Windows. Give Them Some Newsprint and Let 'Em Go! Photo © Liesl Clark

Don’t use too much spray or it’ll be harder work for you rubbing all the wet stuff off your window. Next, rub in any direction you want. Some might say circular motions work well on caked-on bird poop. (Yup, I said bird poop in this post and I think it’s funny. Don’t worry, there’s no bird poop on our windows.) Your final strokes should be long up and down or back and forth motions to take off any residue. That’s it.

No-Smudge Newspaper Method. Photo © Liesl Clark

Does newspaper leave an inky smudge on your windows? No! I’ve never noticed any smudging, even with colored newsprint. We bring the crumpled wet newspaper inside and let it dry so we can use it as starter for our wood fires, or in summer we put it in our compost or worm bin. The worms love worn newspaper for laying eggs in.

Happy window cleaning!

Be Sure to Reuse Your Used Newspaper in the Compost or Worm Bin. Photo © Liesl Clark

8 Uses For Garlic Skins

Garlic Skins Have Some Use Beyond the Compost Bin

In my ongoing fascination with the things I typically throw away, even in the compost pile, I thought I’d look up some of the most interesting ways to reuse garlic skins. Some, I already do, but there are a few new uses in this list I thought you might want to try.

Don’t toss those papery white skins!

1) Save them in your freezer and use for your vegetable or chicken stock. I also throw them in my slow-cooked beans to add more flavor.

2) Compost them.

3) Keep the skins on your garlic when you roast it and the protective skin layer keeps your garlic soft on the inside.

4) Eat it! According to the Daily Mail, the skin on fruits and veggies shouldn’t be discarded. As for garlic: “Peeling garlic cloves removes the ­phenylpropanoid antioxidants which help fight the ageing ­process and protect the heart.”

5) Make a paper rose out of your garlic skins.

6) Turns out garlic skin is a major antioxidant. Plan on seeing it in all sorts of health products in the near future.

7) Add them to your handmade paper recipe. They add a lovely texture.

8) Dye your hair with them using a natural ayurvedic technique.

10 Toughest Steps to Reduce Your Plastic Footprint

If you’ve followed our guides to zero waste, which are simple ideas to get you thinking about reducing unnecessary plastics in your home environment, you’re doing really well! But you’ll likely still have plastics in your trash can every day, like I do. These are the toughest steps we take to get beyond our fear of being judged and push through the next level of plastic-free(dom) and even closer to zero waste:

1) Figure out what your biggest plastic vice is and find a plastic-free alternative. One of my family’s weaknesses is Amy’s frozen organic burritos. My children love them and they’re easy to heat up for school lunches. But we also love to eat burritos and enchiladas for dinner from delicious dried black beans that we slow cook and then assemble the burritos and enchiladas from scratch. Solution? Make an extra-large batch of burritos on burrito night and save them for school lunches. You can even freeze quite a few so you have your very own Amy’s-style yummies to keep the earthlings happy at school.

Amy's Burrito Packaging Isn't Recyclable. So, We Try To Make Our Own. Photo © Liesl Clark

If your vice is raw bars or granola bars and snack bars, find a baker near you who makes them and order them plastic-free. On Bainbridge Island, Rebecca makes Rawbecca Bars that are better than anything I’ve ever purchased in a store. She’ll make them for you in bulk, in many flavors, and totally plastic-free. We’ve ordered them in bulk to take on our expeditions in the Himalayas because they last over a month. Our local bakery also makes some unbelievably tasty peanut butter raw bars that I can order up waste-free.

We love crackers but can’t find our favorite varieties without plastic packaging. And our homemade crackers are better than any bought in a store. So, once in a while, we’ll make our own to help reduce our impact. And we’ll make enough for 2-3 days. They go fast.

Homemade Seed Crackers, Recipe at Slim-Shoppin. Photo © Liesl Clark


2) Stop buying plastic containers and come to love glass. I love glass containers of all sizes and can’t find anything that I can’t store in them.

Peek in my fridge and you'll find jars of all shapes and sizes: Patron bottle for flax seed oil, homemade yogurt in a large mason jar, homemade salad dressing in a jam jar and bulk yeast for our bread in another mason jar. Photo © Liesl Clark

3) Buy your cheese plastic-free. This might take some hutzpa on your part, but if you talk sweetly to your deli counter people, they’ll likely let you buy their bulk (often gourmet) cheese without any of their packaging. Just bring your own container and act confidently when you ask if they can just put their cheese it it. Smile, say “cheese.” Then, at home, store it in a beautiful glass cheese container. It stays fresher longer and looks delicious in there.

IMG_3147 Photo © Liesl Clark

We store our cheese in a large glass container, like our friends in France do. © Liesl Clark

4) Same goes for meat and fish. Buy it fresh, bring your own container, and store in glass.

5) Just say “no” to plastic clamshells. Clamshells? These are the polystyrene boxes that hold fresh berries and cherry tomatoes. Yes, it might mean you’ll have to say goodbye to these delicious food items until they’re in season and you can get them at your local farmer’s market. Refusing them sends a message to your grocer that you just won’t buy produce in that packaging. Better yet, take a letter to your grocery store’s customer service department and let them know that you, and a whole lot of other people in our community, are refusing to buy fresh produce in clamshells.

Clamshell Polystyrene Packaging Can't Be Recycled Where We Live. Photo © Liesl Clark

6) Say “no” to plastic mesh produce baskets (see above.) And use our letter to your grocer to do some good.

Plastic Mesh Produce Basket

7) Flowers don’t need to be wrapped in plastic for the journey home. First let your florist know you’ll carry them home sans plastic in your bag or basket, or your own two hands like you do at the farmer’s market or from your garden to your table.

Plastic-free flowers have less impact. Photo © Liesl Clark

8) Try a less plastic toothbrush. It’ll make you feel good. Some are so plastic-free they can be used as kindling when you’re done with them.

Toothbrushes Made Entirely of Bamboo are an Excellent Plastic-Free Alternative

9) Switch to homemade powder toothpaste. I’m still perfecting our recipe, but it’s basically baking soda, a few drops of stevia and a few drops of organic peppermint extract. The kids like it and we’ve reduced our toothpaste tube waste significantly.

DIY Zero Waste Toothpaste and Miswak Toothbrush Sticks, photo by Rebecca Rockefeller

10) Exert your buying power by choosing products that are entirely plastic-free. You’ll thank yourself later when your wood/metal/rubber/glass item is still functioning years later. I can attest to this for useful household items I’ve bought like pencil sharpeners, colanders, cheese graters (ones with plastic handles break), rakes, rubber spatulas (that’s why they call them rubber and the wooden handles are nicer to hold), soup ladles, straws (glass ones have a lifetime guarantee). My list could go on and on. I’ve never regretted purchasing a sometimes more expensive plastic-free item.

What are the toughest steps that you’ve taken to reduce the persistent plastics that you can’t seem to eradicate from your bin? Please let us know in the comments below so we can all try to come up with solutions together to help you reduce them.

DIY Tooth Powder (Plastic-Free Toothpaste)

When you’re trying to go plastic-free, toothpaste is a crux issue for most people. But crux no more! We have a plastic-free toothpaste/tooth powder recipe that’ll keep you happy and make you wonder why we all strayed from this basic recipe years ago in the first place.

Plastic-Free Tooth Powder is Easy to Make. Photo © Liesl Clark

I remember the days of tooth powder. It came in a family-size metal bottle with a top on it that you could shake over your toothbrush and the powder would come out. Pretty basic. But this stuff was great and I wonder why we’ve replaced it with paste in a plastic tube?

My family has used variations of this recipe for the past 4 years, on-again and off-again, and we’re always happy when we get back to using it. The baking soda cleans my teeth better than any other toothpaste out there.

And it takes less than 3 minutes to put it together:

2 tablespoons Baking Soda

2 pipette stoppers-ful of liquid stevia (liquid stevia comes in glass jars with stoppers)

1/4 teaspoon organic peppermint flavor (It’s a combination of sunflower oil and peppermint oil)

1/8 teaspoon organic mint extract

Mix your ingredients together in a small bowl or small mason jar.

The next step is perhaps the toughest: Finding the right container to hold and apply your tooth powder with. I found a pretty vanilla extract bottle with a small lid that works perfectly. We just shake it over our toothbrushes over the sink and if any powder falls into the sink it’s an added bonus for cleaning the sink! Baking soda has many uses. Cleaning your teeth AND your sink are just 2 of them.

My vanilla jar with a pretty paper label. The kids love it and our sink stays extra clean! Photo © Liesl Clark

So, why not give it a try? You’ll love the clean feel of this toothpaste/powder. It’s truly somewhere half-way in between a paste and a powder and feels great!

And to the question of toothbrushes:

A Bamboo Toothbrush With Plastic-Free Toothpaste is How We Roll at Chez Trash Backwards. Photo © Liesl Clark

Toothbrushes wash up on our beaches much too often, presumably because of the sewage that oft seeps into Puget Sound and the Pacific. Imagine that, some people flush their old toothbrushes down the toilet.

Going plastic-free in the bathroom is a great way to reduce our overall impact. Our post on toothbrushes can help you find ones that have less plastic and we’ve also found some helpful reuses for your old brushes so they can be utilized for special jobs around the house.

Green Guide To Recycling Ski Gear

By Mr. Everest

Ski Equipment Doesn't Have to Go to the Landfill. Photo © Liesl Clark

We’re at the height of the ski season and if you’re like me, this is a great time to start demo-ing new gear. But what to do with the old? Here are a few options I’ve been able to find:

SELL
You can always list your gear on Craigslist or take it to Play It Again Sports to find a buyer.

GIVE
Joining your local Buy Nothing group and giving them away to your neighbors is a great way to keep your ski and snowboard gear out of landfills and still cruising the slopes. Some people are cool with using outdated gear. My wife, for example, skied the slopes for 15 seasons on her old Black Diamond AT gear. And our 12 year old son is going to give them a try on his first hut trip this week.

Donate your gear to a local youth ski program or adaptive ski program. If you check with your ski areas or local ski shops, you’ll most likely find a program that would be happy to use your equipment that’s in good condition and not outdated. Snowpals of Tahoe is just one example.

REUSE
You could always start your own ski swap, enticing others in your community to bring their gear so families can outfit the kids with neighbor’s hand-me-downs. It’s a great way to keep skiing affordable for us all.

Out With the Old and In With the New. Outfitting Your Family in New Ski Gear Means You Need to Find Green Means to Get Rid of Your Old Gear. Photo © Pete Athans

Yankee Magazine has a great article, with plans, showing you how to make your own ski Adirondack chair. Some people build cool fences with stockpiled skis.


RECYCLE
The North Face stores will take all of your ski clothing (hats, gloves, pants, bibs, jackets, socks), ski boots, goggles, and ski helmets. Their Clothes The Loop program sends the gear to a company called I:CO which shreds it into its elements and makes new products with it. My article about this great program goes more into depth about this the Clothes The Loop initiative in all of The North Face stores, and where to find those stores.

Ski poles? They’re mostly made of metal, so taking them to your nearest metal recycling center might be your best bet. Poles haven’t changed much over the years, though, so be sure to try giving them away before you send them to metal recycling.

If you live or ski in Colorado or Utah, a great ski industry recycling service was set up by the Snow Sports Recycling Program, which recycles ski gear collected at participating stores. I can’t find a list of the stores any longer but calling the phone number listed on the page, under “Waste Not” could likely get you the names of stores near you that’ll recycle your old gear. This program turns your gear into chips that will be turned into new goods. They’ll take skis, snowboards, boots, helmets, bindings and poles. These materials create waste streams that are approximately 5% steel, 25 % aluminum, 60% plastic and the balance are wood and fiberglass, all reusable in new applications.

JPEG image-790B5550467E-1 2

Ski Poles Are Mostly Made of Metal © Liesl Clark

If you live near Aspen, CO you can contact Reeski to see if they’ll take your skis and boards to turn into cool looking furniture.

There’s no need for our gear to end up in the landfill. If you’re stumped about a particular item and want to find a reduce, reuse, recycle option for it, drop us a line in the comments below and we’ll get on it.