How to Preserve Arugula

Arugula likes me. For some reason — likely the soil on our property and the not-full-sun exposure — arugula, that spicy green also known as rocket, grows profusely in our garden. We never have to plant it because it just keeps sprouting year after year in our vegetable beds. I weed out the bed interiors and let the arugula grow along the edges, creating a green perimeter where kale, peas, and Egyptian walking onions happily grow in the middle.

IMG_5453.jpg

But this spicy goodness only lasts for the summer months and we dearly miss arugula the rest of the year. I make as much arugula pesto as I can and freeze it in small jars for pizza and pasta topping for later. Yet, since I have so much of it, and have been giving as much as I can away, I’ve been searching for a way to preserve arugula, so we can enjoy our it in the cold months of the year.

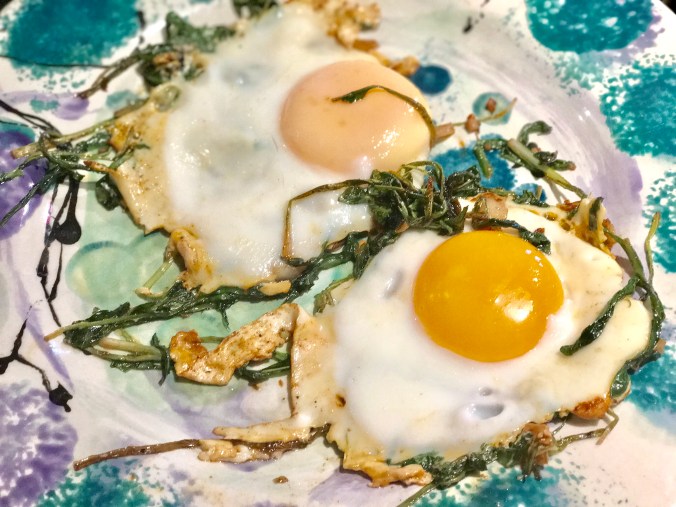
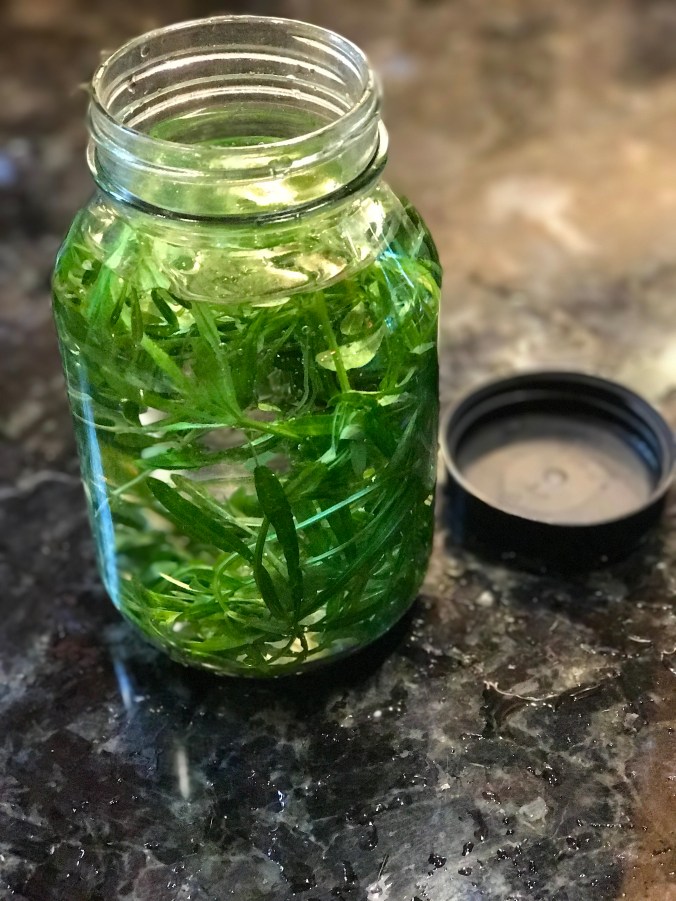
Frozen arugula doesn’t taste like arugula and doesn’t work well in smoothies, either. Blanching it takes the verve out of it, too. But, preserving arugula in olive oil, and freezing it, helps seal in the flavor!

IMG_0510

Here’s how: I use a pie tin and chop as much arugula as I can to fit just below the rim of the pie tin.

IMG_5471

I then pour in extra virgin olive oil until it’s about an inch deep and put the tin in the freezer. When it’s totally frozen, pop your tin out of the freezer and break your frozen oil/arugula into chunks that you can then store in the freezer in freezer bags or a large glass jar. I never buy freezer bags, but just reuse ones that I acquire through other frozen items we get at the store, or I double bag some Ziploc bags. Please don’t buy plastic bags, as there are so many in our landfills, we can simply make do with what we have, or ask for them on our local Buy Nothing groups.

FullSizeRender 97

So, what do we do with our frozen olive oil/arugula chunks? In the winter, I use one at a time, in salad dressings, on top of pizzas, in pastas, salads, and stir fries. The arugula still has its punch and my crop is extended into the heart of the cold months, reminding me of the dog days of summer.

Purple Deadnettle Purple Smoothie

Purple deadnettle is my new favorite weed. At the Brooklyn Botanical Garden, they have a great description for this lovely purple fuzzy flower to pop up in early spring: “This common weedy plant is a member of the mint family and forms early groundcover mats, with fuzzy, spade-shaped leaves and delicate purple-pink flowers, a lovely addition to a spring weed bouquet.”

FullSizeRender 95

For years, I’ve pulled it out of my vegetable garden, and have given it to my happy hens who devour it immediately. But this year, I’m eating as many weeds as I can, that are within just feet of my front door. For this, purple deadnettle is your friend. It’s a superfood, with known anti-inflammatory properties! I always let it flower because I know it’s one of the first spring flowers the honey bees use for nectar and pollen. Purple deadnettle looks a little like henbit, which is also edible, so there’s little chance of you getting a stomach ache from this beauty.

FullSizeRender 94

So, in our bellies it goes, with morning or lunch smoothies, pestos, or atop our green salads. Here’s a quick recipe that’s our staple for most smoothies, and you can replace the fruit with any favorite fruit you have on hand or replace the purple deadnettle with kale if you no longer have any on hand:

Purple Deadnettle Purple Smoothie

1 small bunch purple deadnettles, flowers and stems included

2 bananas

1 Cup coconut milk

2 Cups mixed berries (we love blueberries, marionberries, blackberries, and raspberries)

1 scoop of your favorite protein powder (I use Vital Proteins collagen)

FullSizeRender 92

That’s it! I throw a sprig of mint into our pretty glasses as garnish and the kids drink it down. When it ends up really thick, we use spoons and eat it like ice cream. Often, our bananas and berries are frozen, so this serves as a meal or an ice cream treat for the whole family.

Sticky Weed Cleansing Drink

You probably know this weed well, for its clingy tendencies. In the Northwest, we affectionately call it sticky weed. It comes in the door on our dog, our socks, and the backs of our sweaters. Also known as clivers, cleavers, goosegrass, catchweed bedstraw, or sticky willy, this little bugger with tiny hooked hairs that’ll stick to you better than velcro, now holds a special place in my kitchen culinary arts: I use it in a simple spring cleansing drink, thanks to the advice of a friend.

IMG_9069

The Kew Royal Botanic Gardens has this to say about its uses:

Galium Aparine — “The whole plant is edible, though not particularly tasty, and in China, for example, it is eaten as a vegetable. Its seeds can be roasted to prepare a sort of coffee substitute. It is also reputed to have a number of medicinal properties, having been used in traditional medicine (usually as an infusion) to treat kidney problems, skin disorders and high blood pressure among other ailments. Archaeological evidence suggests that it may have been used in this way for hundreds, if not thousands, of years. Cleavers is still used by medical herbalists today, although scientific evidence regarding its effectiveness is still lacking.”

I use it as a spring “cleanse” that might be good for my kidneys but just tastes wonderful, and excites my need to get the most out of the plants around me. As I weed it out of my garden, I set it aside to be washed and then stuffed into a jar filled with fresh water and throw it into the fridge.

IMG_4607

Twenty-four hours later, we have a refreshing sticky weed infusion that tastes like spring green. It thickens the water a little, too, (or maybe I’m just imagining that) making it feel silky on its way down.

IMG_4716

Drink Your Sticky Weed © Liesl Clark


This Homemade Citrus Power Cleaner Works

We have hard water in these parts, which means that whenever it sits around, like at the base of a water faucet, you get calcium/mineral buildup. Here’s what ours looked like a few hours ago. Ew!

IMG_6194

Thanks to some homemade citrus vinegar that I made last month, I now have a power cleaner that’ll cut through the boilerplate mineral deposits found around our sinks, shower, and bathtub.

IMG_3967

This mineral deposit is hard and sticks like glue.

First, to make the citrus cleaner, just throw your orange peels into a mason jar and pour in some distilled white vinegar to cover the orange rind. Keep adding orange peels until the jar is filled, adding vinegar to totally cover over the peels.

IMG_3687

Screw a lid on the jar, and let it sit for a month with all of the peels totally submerged. Remove the orange peels and the remaining liquid is your all-purpose citrus cleaner that’ll work wonders in your home.

IMG_4499

I dilute it with water 1:1 into a spray bottle and use it wherever I’m cleaning: countertops, windows, ovens and stoves, bathrooms. But the kitchen sink faucet was where I hit paydirt. This stuff cut through that mineral deposit and enabled me to get my faucet back to looking like new.

hardwater before after

Just spray the 1:1 solution on your affected area and let it set for a few minutes and rub off.

closeup before and after

I had to repeat this several times, but it eventually removed the white caked-on material.IMG_4494

IMG_5979

So the next time you eat an orange, just save those peels, stuff them into a jar and cover with white vinegar, adding more peels and vinegar until the jar is full. After a month, you’ll have a citrus cleaner ready for your toughest jobs.

DIY Taco Seasoning in Bulk

Buying taco seasoning is pricey and when you have the ingredients in your own home, why not just make a batch that’ll last you days. Your own seasoning is also lower in salt content. Here’s our family recipe that we’ve used for the past year, and sometimes the amounts of each ingredient change a little, based on just how much we have in the spice rack. We buy our spices in bulk, too, to save money, have a zero waste kitchen, and so we don’t accumulate a lot of those little plastic bottles.

IMG_3576

Taco Seasoning (makes about 1 2/3 Cups)

  • ½ Cup chili powder (we sometimes use speciality chili powders we find in Mexico. Go with your favorite!)
  • 1/3 Cup cumin
  • 3 teaspoons garlic powder
  • 3 teaspoons onion powder
  • 1 Tablespoon coarsely ground pepper
  • 2-3 Tablespoons ground coriander seeds
  • 2 Tablespoons paprika (sometimes we add smoked paprika)
  • 1 1/2 Tablespoons salt (feel free to add more if you like your seasoning salty)
  • 2 teaspoons red pepper flakes
  • 2 teaspoons oregano (we like Mexican oregano)FullSizeRender 83Enjoy!

Paper Bag Cast Iron Skillet Cleaner

We stopped buying paper towels years ago. Never really needed them.

And since we were eating mostly vegetarian meals, we rarely had the dilemma of what to do with a greasy cast iron skillet. Now that we eat bacon occasionally, because we’ve reintroduced a little locally-produced organic meat now and then, we have to contend with the leftover grease. We’ve used a few rags on the grease and just wash the rags, but that isn’t the best use for the rag.

And then, one day a week or so ago, I posted a dozen lunch-bag size bags to give away in my local Buy Nothing group. (I save these little bags whenever they somehow make their way into our house, and the kids use them when they go on school field trips.) A member immediately posted a comment explaining that he uses those thin lunch bags to sop up his bacon grease. It was an “aha” moment for me.

IMG_3974

Here’s what he wrote:

“If you have a new, or not-so-well-seasoned pan, a thicker bag will leave little micro fragments of paper. So generally, the smoother the pan and the finer quality of the bag, the better it works. Newspaper is completely unworkable because it’s such lo’grade.”

I decided to keep the bags, and now I have a small stash of little brown bags I can use to clean out my cast iron skillet when it gets a little too greasy. The thin bag is pretty darn absorbent.

IMG_3984

I throw in a little Celtic sea salt to scrub the bottom of the pan with the crumpled up bag, and the salt acts as a perfect scrubbing agent.

IMG_3986

No need to run soap and water over the well-seasoned skillet. And the pan is ready for its next job.

IMG_4001

The greasy bag goes into our next fire as fire-starter or we just toss it in our compost.

IMG_3996

Save those little bags for jobs like this!

Use Your Bean Water!

Did she say bean water? Yes, bean water is how I refer to the leftover liquid after I’ve cooked beans in my slow cooker or pressure cooker. Every week, we do at least one pot of beans, to provide the staple ingredient (beans) for many meals for the family.

FullSizeRender 81

Dried beans, bought in bulk, are among the cheapest and most nutritious foods we can buy. Now, that weekly practice of ours has yielded several more meals that I had never thought of before — using the bean water to make wonderfully delicious dishes!

FullSizeRender 82

Here’s our black bean water, leftover after I removed the beans to make refried beans.

This week, our beans of choice were black beans, and thanks to this article, I saved the bean water and used it as the basis for a huge pot of Tarascan Bean and Tomato Soup. It’s a recipe I first started making in my 20s, because I wanted to find something to use up the bacon grease that I save.

FullSizeRender 79

We save our bacon grease for recipes and bird suet 

The soup takes on the flavors of the bacon and it’s absolutely delicious and Whole30 compliant.

FullSizeRender 77

Bean water can also be saved for use as a base in vegetable stock and in soups like minestrone. Seems there’s a bit of a craze out there for bean water, especially chick pea water, which has the official name of “aquafaba.” Chick peas, or garbanzo beans, can yield a liquid that is a great replacement for egg whites and even meringues can be made from them. So, get creative, learn about aquafaba, don’t pour your bean water down the sink. Use it up to flavor your favorite meals.

FullSizeRender 80

Behold, our bean water.

I’m feeling so very proud that the Tarascan soup which I love has 3 ingredients in it that many people would normally toss: bacon fat, vegetable scrap broth, and bean water.

Here’s the recipe for it, which is based on one found in my favorite Mexican cookbook, The Cuisines of Mexico, by Diane Kennedy.

Sopa Tarasca

4 Cups Bean Water (pinto beans or black beans)

2 Tomatoes or 8 oz Canned Tomatoes

2 Cloves Garlic

Half an Onion

4 Tablespoons Bacon Grease

1 Cup Vegetable Broth (or Chicken or Pork Broth)

Cilantro for garnish

Salt and Pepper

Blend the tomatoes, garlic and onion in a blender or Vitamix until a soupy puree. Set Aside.

Place the bacon grease in a soup pot and put the heat on high to melt it. Add the tomato mixture and mix by hand as it cooks for about 5 minutes. Gradually add the bean water and bring the soup to a boil, turn the heat down to medium and cook for another 8 minutes, stirring occasionally.

Add the broth and allow the soup to cook for another 10 minutes on low, until your soup reaches the thickness you’d like. Add salt and pepper to taste.

Serve the soup and garnish with cilantro, paprika, shredded cheese or sour cream to taste.

Enjoy!

FullSizeRender 78

DIY Freezer Bags

We never buy freezer bags and I’m on a mission to help people see that they’re entirely unnecessary. In the category of plastic bags in general, please don’t ever buy them!

Most of our freezing is done in glass jars. Roasted pumpkin, for example, goes into a large mouth glass jar with a few inches left at the top to account for expanding liquid when it freezes.

But what about things that really don’t need to be put in jars, like berries and bananas and pre-made burritos? Enter the DIY freezer bag. I’m feeling sheepish even writing about this, because I know most of my friends already do this. If you’re going to freeze your goodies for more than a month, be sure to use a very sturdy bag. Simply reuse another thick bag!

FullSizeRender 76

We get frozen cassava tortillas, for example, and frozen berries when we run out of our own, and simply save those self-sealing bags to reuse as freezer bags for our own food.

FullSizeRender 75

A DIY Freezer bag, Ahem, is Just a Reused Freezer Bag.

And, if you run out of those, double up on regular self-sealing bags that you’ve saved. By using two, you’ll extend the freeze-life of your perishables. Simple! If you don’t have ziploc-style bags, just ask for them in your local Buy Nothing group. People will gladly share the ones they typically throw away and you’ll never have to buy those bags again.

IMG_2950

Don’t Buy Freezer Bags. Just Double Up on Your Reusable Self-Sealing Bags.

Eat and Drink Your Dandelions

It’s been a long winter, and since the deer ate all our kale, we’ve been sans greens for too long. This week, the dandelions are in full force, and I’m eradicating them from my vegetable garden while weeding the lovelies more selectively from the lawn. Honey bees need their pollen, too, so I aim to leave plenty to flower for the bees, as dandelion flowers are among the first pollen sources for bees in the spring.

FullSizeRender 74.jpg
Today, I collected a bucketful of dandelions, making sure to get as much of the roots and greens as I could. This is my second harvest, and we’re hungry for more. After washing the greens thoroughly, I’ve made a few dishes with them and they’re delicious!

FullSizeRender 73

Sausage on a Bed of Dandelion Greens (serves 2)

Sauté 4 sausages to your liking.

Add some olive oil to the pan and sauté 4 cloves of chopped garlic in olive oil. Add a teaspoon of red pepper flakes to sauté along with the garlic. Add two pinches of salt. After 2 minutes, add a couple of handfuls of dandelion greens and another pinch of salt. Pour 1/4 to 1/2 cup of vegetable or chicken broth into the pan and let simmer for a few more minutes. Place sausage on top of the greens on a plate and enjoy!

FullSizeRender 68

Poached Eggs on a Bed of Dandelion Greens (serves 2)

Follow the same instructions above for cooking your greens and in the last 4 minutes, add 4 eggs sunny side up to your skillet or pan, right on top of the greens. Put a cover over your pan to let the eggs poach. Let them cook for 3-4 minutes until the eggs have cooked to your liking.

FullSizeRender 67

Roasted Dandelion Root Tea

I love dandelion root tea as a substitute for coffee. It’s dark and bitter like coffee and tastes great with cream or your favorite creamer. Simply clean your dandelion roots as best you can.

IMG_2819

Dice them and throw them into a Vitamix or blender to chop them into small nugget size pieces. Don’t puree them into a powder.

IMG_2862

Place them in a 250 degree oven and roast for 2 hours. Let them cool completely and store in an airtight jar.

IMG_4823

IMG_2901

You can grind them down to a powder after this if you like. I just put them in a tea strainer like other loose leaf tea and brew up!

FullSizeRender 71

FullSizeRender 70


DIY Suet

I love making things from what I already have in my house, without buying anything new, things that are secondary uses for what might eventually become waste. When we fry up some bacon, there’s always some leftover grease. What do we do with that bacon fat? We turn it into suet for our wild birds.

chicadee suet 2

Our bacon comes from grass-fed natural sources with no added sugars or chemicals. It’s about as healthy as bacon can get. So, I’m happy to share the grease with our little feathered friends who in winter do need an added boost of calories.

chickadee suet 3

First, save the plastic holder for bird suet that commercial suets come in. If you don’t have any, ask in your local Buy Nothing group for the square plastic packaging for suet. This way, you’ll be able to use that plastic container as your future mold to fit into the suet feeder.

IMG_2794

Here’s our recipe:

  1. Fill 3/4 of a plastic suet mold with any kind of bird seed.sizzling bacon
  2. Collect the melted liquid fat from your bacon grease. You can keep it in a jar until you have about 2 cups of it, and melt it. Or, simply pour the not-too-hot grease into your plastic suet mold with seeds in it. Fill the suet mold with your grease. IMG_2777
  3. Place the plastic suet mold filled with seeds and bacon grease in the freezer. IMG_2787
  4. When the suet is completely frozen, take it out of the suet mold and place it in your suet feeder. Done!Suet 1

We sometimes add peanut butter, old flour, nuts, berries, anything that birds would like. Chicadee suet 1

Your little tweeties will love their suet and you won’t have to buy any more plastic-packaged suet again!

Willa and bird feeders