Save Your String

We salvage string. Don’t you? When I see rolls of string sold in the hardware store, I wonder who buys it? String is freely available if you just know where to look for it.

IMG_4364

The feed we buy for our chickens comes in large paper feed bags laced up with string. When we pull the string to open the bags, it comes out freely and we have plenty to last us throughout the year. We roll it onto a small roll of paper and it goes into the string box.

IMG_4357

I found an old wooden box that was covered with Christmas wrapping paper a few years ago. This box has been salvaged for the use of storing our saved string. So, shoelaces are salvaged and washed, bungee cord gets thrown in there, craft string, a few pieces of yarn, homemade “plarn,” cordage, twine, even pieces of candle wicking that hasn’t been put in wax go in there. Whenever something has reached the end of its life and we need to throw it away, any string on it gets salvaged and thrown into the string box.

IMG_4361

String is a staple for my gardening, as I use it to create pea ladders between woven sticks for my growing pea shoots, or to hold the hellebore up when the heavy blossoms weigh down the large plants.

The whole family knows where to go when they need a piece of string or shoe lacing to make a repair and tie together a few things. When my son was 5, he connected his favorite truck to its trailer with string when the hitch broke.

bag-o-string.jpg

String is the stuff of life, affording us everyday repairs to sew-up, tie together, wrap around, hold up, and weave anew.

Save your string, all forms of it. Don’t throw it away. And find a pretty container to hold it, for all to access for the projects that will come.

How To Reduce And Reuse Chip Bags

Potato chip bags are something we’ve all handled and then thrown into the trash.

If your conscience has you wondering if there are alternatives to sending that bag into the landfill, you’ve come to the right place.

If you simply want to try to reduce your chip bag footprint, just make your own easy microwave chips using Rock Farmer’s simple method. If you want an oil-free recipe with a few more steps, give this one from the Kitchn a try.

Reuse and Repurpose:

1) If you’re not able to resist purchasing snacks in crinkly bags, then use your bags as gift bags! It’s easy to do: Turn your chip bag inside out, wash it with dish soap to get rid of any grease. Dry it out. Then reuse the silvery or white side as a mylar-style gift bag. We do this all the time and reuse them over and over. We just attach some pretty ribbon like these pictured here which we found on the beach (no kidding) hanging beneath a deflated helium balloon all twisted up in seaweed. These ribbons last forever, they’re made of plastic, and look as good as new even after years of floating in the open sea. I’ve picked up so many of them on the beach, I’ve had occasion to give a bag of them away on my local Buy Nothing group, with the caveat that the person agrees to keep the ribbons on indoor gifts and not set them free with a helium balloon. When you’ve seen them wrapped around the necks of baby seals and sea turtles, you can’t help reconsider why we risk sending them into our seas via floating balloons in the first place. But I digress.

2) Make a shoulder bag. Some chip bags have a cool vintage look to them and could make a great shoulder bag.

3) Make a gum wrapper-style chain bracelet. Remember making paper chains from gum-wrappers? If you employ the same method with chip bags and candy wrappers, you can craft some amazing things. First step is making a bracelet.

4) And when you’ve mastered the gum wrapper-style bracelet, you’re ready to move on to the purse.

5) Craftbits has a tutorial for a nice clutch.

6) Make a potato chip bag mini scrap book. At making-mini-scrapbooks.com, you’ll learn how to make your own cool books that would also make excellent gifts for friends.

Mini Potato Chip Bag Scrapbook, Photo © making-mini-scrapbooks.com

7) Instructables has a tutorial for a chip bag wallet.

8) Craft a baby crinkly square to appeal to baby’s need for tactile and aural stimulation. We think a snack bag would make some good crinkly sounds for your little one.

Baby Crinkly Squares Can Be Made With Potato Chip Bags, Photo © Joy’sHope.com

Remember the Sunchip compostable bags and how loud they were (95 db)? Maybe stay away from those. They’ve been discontinued, apparently, but consumers certainly had fun with the deafening chip bags. Even a Facebook group was started, called SORRY, BUT I CAN’T HEAR YOU OVER THIS SUNCHIPS BAG. We were excited to see that compostable snack bags were being tested on the market, yet when we did our own compost test of the Sunchip bags in a commercial composter for a month, the bags, surprisingly, were still intact — no decomposition visible.

9) Make an adorable robot from the silvery side of your bag.

10) Yet another Instructable. This time it’s a pencil case. Who needs Terracycle when you can upcycle your own stuff?

11) Cover over an old bracelet with delightful snack bag colors to make a new one!

12) Make party tassels!

I figure that’s enough to keep you busy with your snack bags, but let’s face it, all of this will end up being tossed in the landfill eventually. Although my kids love to occasionally have a junk food fix of chips, we’re continuing to do our best to stop buying foods that come in unrecyclable bags. Until chips can be sold in something a little more sustainable, we’ll do our best to just say no, or make our own.

8 Plastic Kiddie Pool Reuses

After years of summer aquatic fun in 6 inches of baby pool magic with toddlers, my conscience took over and had issues with the unsustainable reality of the kiddie pool: Most inflatables get holes in them and whether they’re air-filled or hard plastic they’re made of PVC and laden with Bisphenol A, a toxic cocktail for earthlings just starting out on the planet.

We recently found a kiddie pool under our guesthouse deck, left behind by our renter, a mass of vinyl, pine needles, and hidden slugs. We cleaned it up with some high powered squirts from the garden hose and some serious scrubbing. I started inflating the thing by mouth in that way that Moms, Dads, and loved ones dedicated to preserving summer bliss can do, only to find that there was a small leak. Summer bliss had hit a road block.

Repairing inflatables is as simple as fixing a bike tire tube or Thermarest for camping. We got out the tube repair kit and made a quick patch and the inflating resumed. But it got me thinking. How many plastic kiddie pools are thrown out in our community each year? Likely hundreds. All that vinyl, headed to the landfill because someone didn’t have a patch kit or couldn’t deal with the gross slug slime-n-pine grime.


When you’re done with your pool, hopefully it’s still in working order for you to pass your pool on to another family that will frolic freely in their BuyNothing-ed frog pool. Or, if you have a hard plastic kid pool, donate it to your nearest animal rescue center for use by aquatic birds, fowl, and domestic animals escaping summer heat.

You might want to hang on to it, however, when you discover some of the upcycle options for that prized pool.

Hard Plastic Kiddie Pools:

1) Turn your pool and a few others into a raised bed garden. Wandering Chopsticks has a simple tutorial for you to follow for adding some green (and veggies) to your backyard.

Wandering Chopsticks’ Kiddie Pool Raised Bed Garden, Photo by Wandering Chopsticks.

2) If you have a party coming up and need to keep a lot of food cold while serving, Thrifty Fun’s wading pool cool food server might be just what you’re looking for.

3-6) Here are 4 more great ways to reuse your hard plastic kiddie pool, presented by Hint Mama. Among them are a ball pit, a beach playpen, and a toy bin.

Inflatable Kiddie Pools:


7) Turn your deflated pool into a slippy slide! Just turn it upside down on a little slope and add a trickle of water.

8) Then add a few drops of environmentally-safe liquid soap and watch the fun and bubbles explode!

Our kids are now older and I can proudly say that we never had to take a kiddie pool to the landfill. The reuses were too good and then the pools were passed on to others. Do you have a reuse we haven’t mentioned here?

50 Garden Hacks From Your Trash

screen-shot-2013-03-12-at-1-21-45-am

There may be items in your trash that could help you with your gardening. Check out this list and see if any of these great ideas resonate with you, helping you pull a couple things out of your trash and, well, into your garden to green up your world. If you don’t have these items in your trash, ask for them on your local Buy Nothing group. I’ve categorized the ideas by item, and each one links to a unique reuse. Enjoy!

Plastic Bottles:

1) Plastic Bottle Mosquito Trap: This one is a trick using yeast and a cut bottle glued together. Read on and try it.

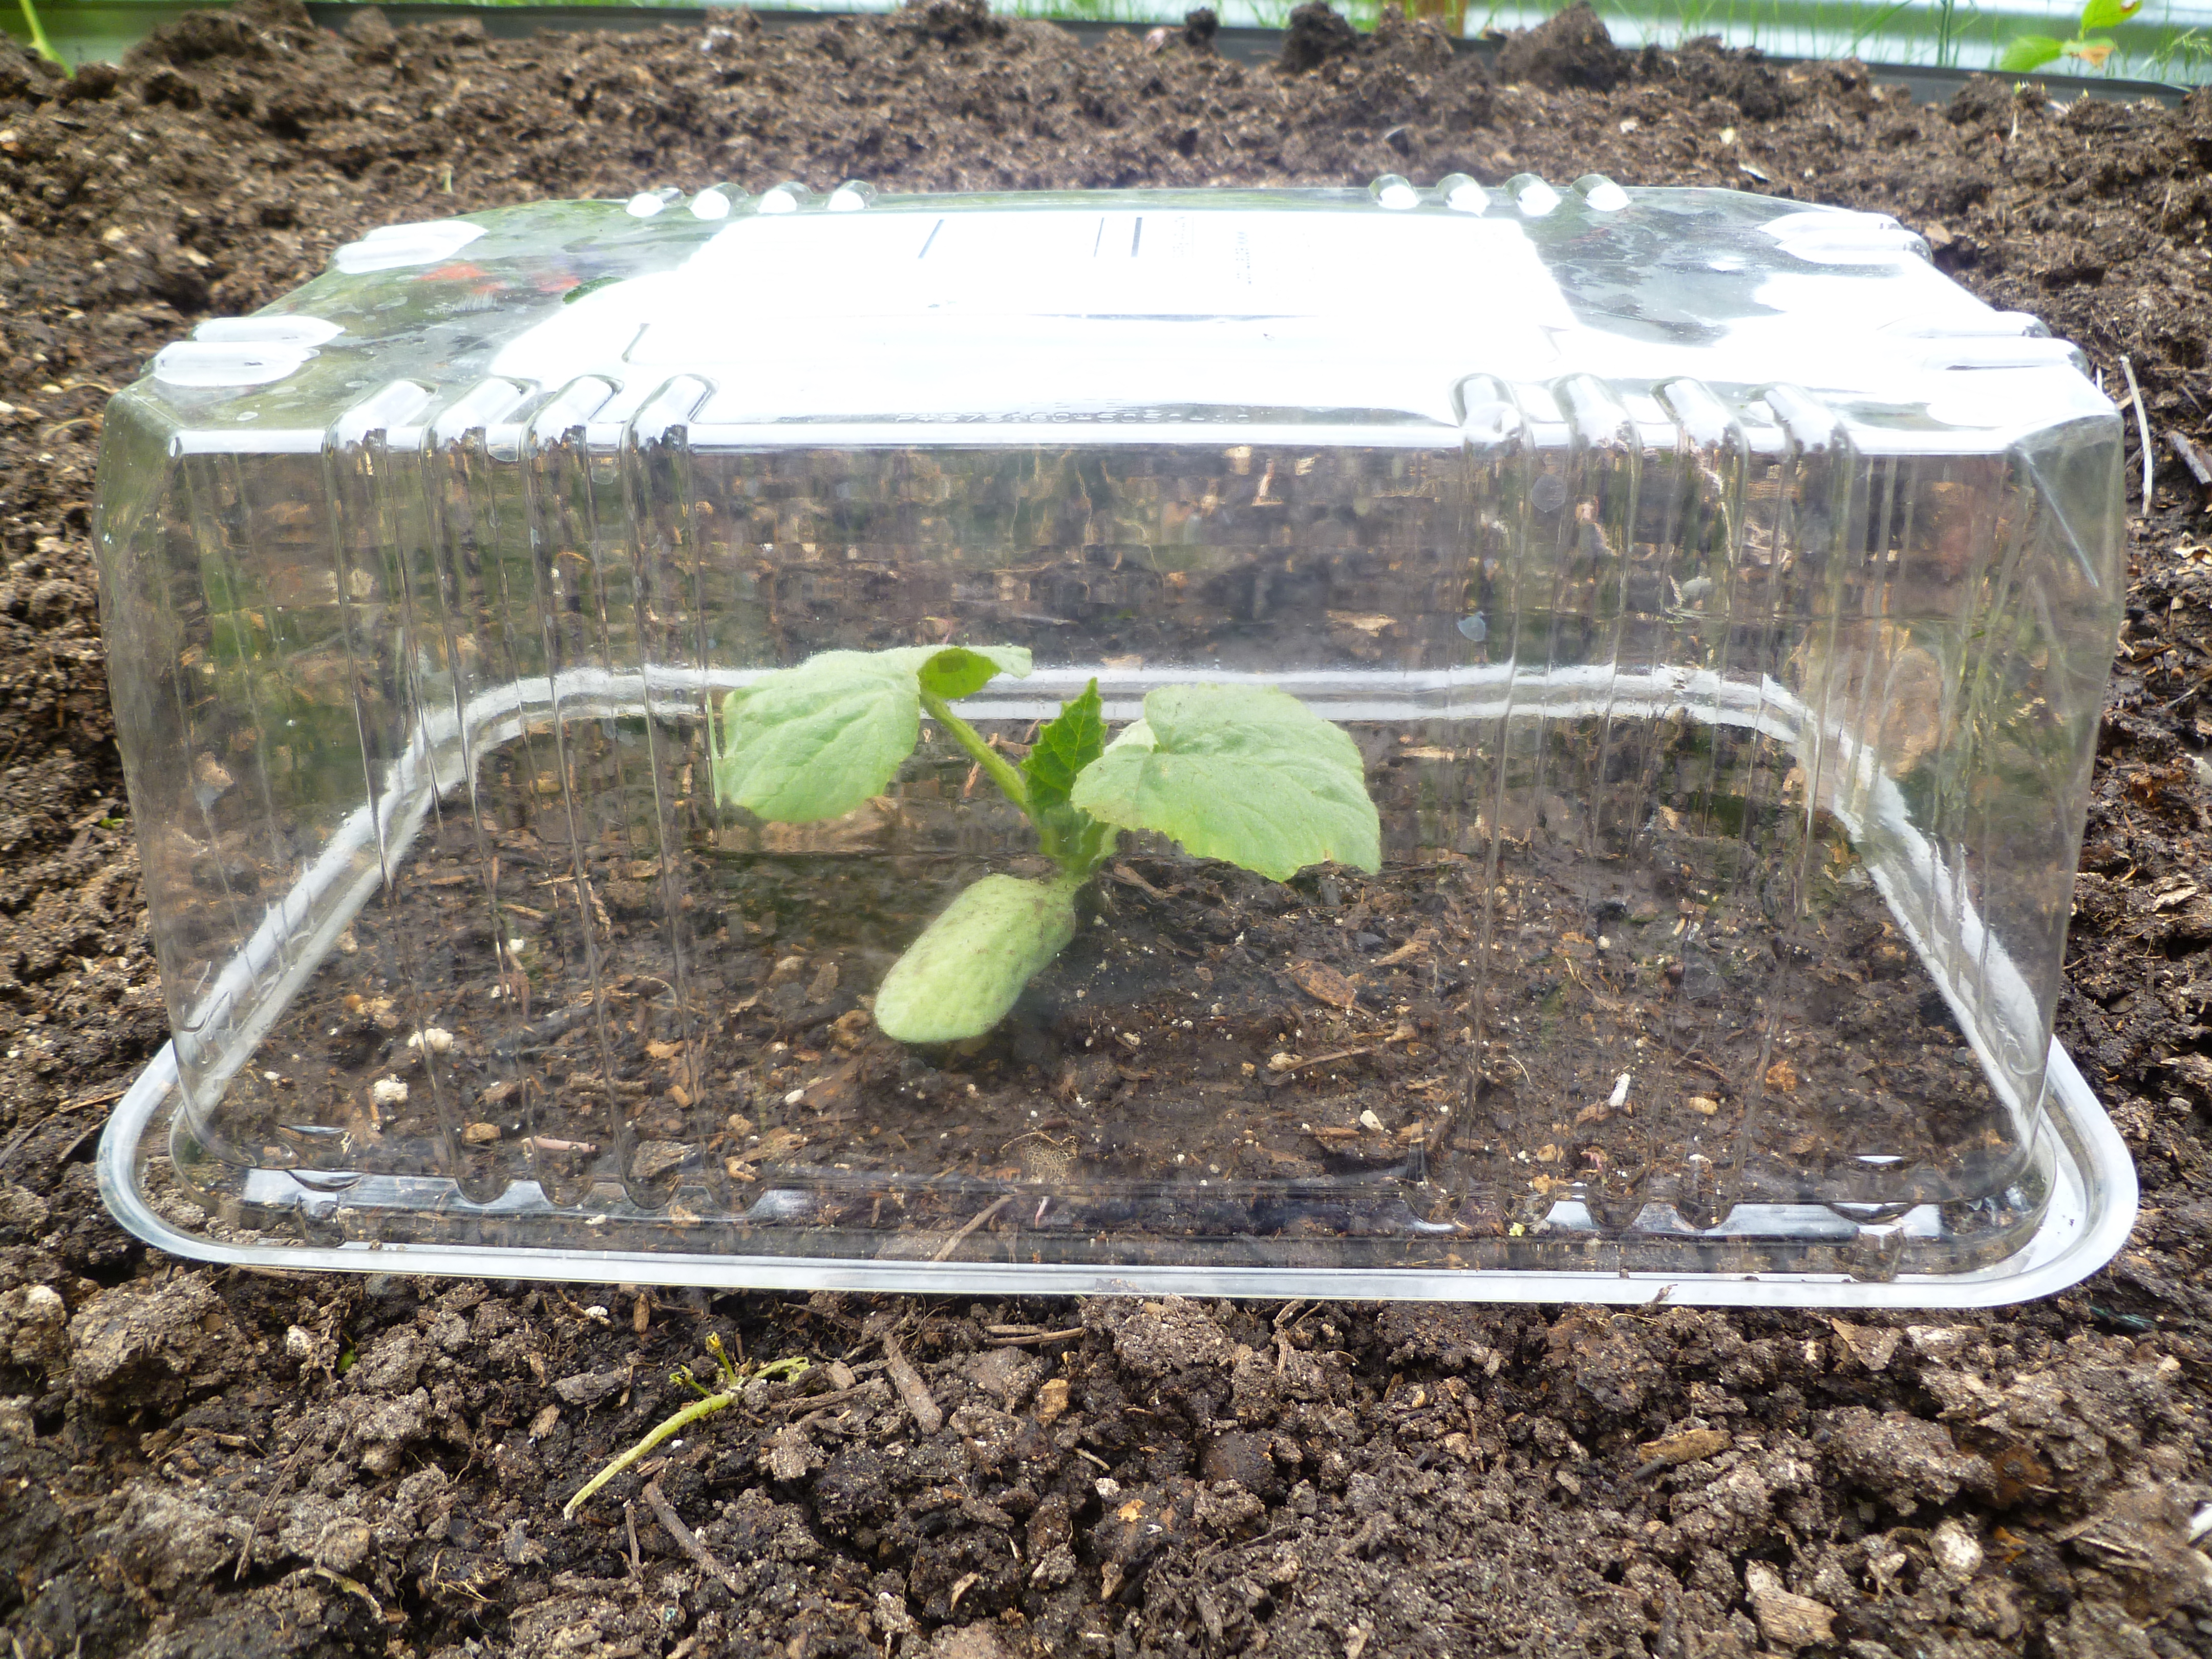
2) Plastic Bottle Cloche: It’s as easy as cutting a plastic bottle in half and sticking it upside down over your seedling or plant.

3) Plastic Bottle Self-Watering Seed Starters: These plastic bottles, cut in half and one inverted inside the other have a wicking system worth checking out.

4) Plastic Bottle Drip Irrigation System: 4 small holes in your 2-liter bottle that’s buried in the ground provide excellent watering for your plants.

5) Plastic Bottle Greenhouse: A greenhouse like this is a true inspiration.

Milk Jugs:

6) Milk Jug Scoop: Milk or OJ jugs make easy scoops.

7) Milk Jug Cloches: Use Milk Jugs to protect your larger plants. Just cut the bottom out of the milk jug, turn it upside down and it’ll protect your plants.

8) Milk Jug Mini Greenhouses: These mini greenhouses in gallon jugs can prove useful.

Clear Plastic Containers:

9) Plastic Container Mini Greenhouse: Just turn it upside down and you have a mini cloche/greenhouse.

Winter Squash Seedling Basking in the Heat of a Lettuce Box, photo by Rebecca Rockefeller

Cereal Boxes & Cracker Boxes:

10) Cardboard Weed Block: Take your cereal boxes and cracker boxes to the garden and use them as weed blocking.

Bike Wheels:

11) Bike Wheel Trellis: Bike wheel trellises are beautiful.

DVDs/CDs:

12) DVD/CD Bird Scaring Trick: Birds don’t like reflective stuff. It scares them off. Put a few around your berries and you’ll keep those peckers away.

Mailboxes:

13) Mailbox Garden Tool Cache: Post an old mailbox up in your garden, and you have a water-proof place to store hand tools, planter markers, and your notes.

Make a garden tool cache out of an old mailbox. Photo © Liesl Clark

Drawers:

14) Drawer Seedling Starter: This one’s easy. Just use an old drawer as a seedling planter box.

OJ Cans:

15) OJ Can Plant Labels: The can tops make pretty labels for marking your rows.

Rain Boots:

16) Rain Boot Planters: Save a few pairs of the kids cute rain boots for whimsical planters.

Plastic Plant Pots:

17) Plastic Plant Pot Flowers: Add a little flair to your outdoor space with these plant pot flowers.

Trash Cans:

18) Trash Can Root Cellar: I’m interested in trying this for storing our potatoes, carrots, daikon radish, turnips and cabbages next year. It simply requires digging a deep hole.

Tupperware Tubs:

19) Tupperware Worm Farm: Make a few holes in your old Tupperware bins, order a few hundred red worms, follow the instructions here and you’ll have a worm farm.

Plastic Bottle Caps:

20) Plastic Bottle Cap Lawn Flowers: Michele Stitzlein creates beautiful blooms from plastic caps. She’s published a couple of books on plastic cap art, too.

Glassware:

21) Glassware Flowers: These bowls and dishes are all the rage.

Garden Hoses:

22) Garden Hose Flowers: If you have space on a wall, you could create flowery art from your old hoses.

Twist Ties:

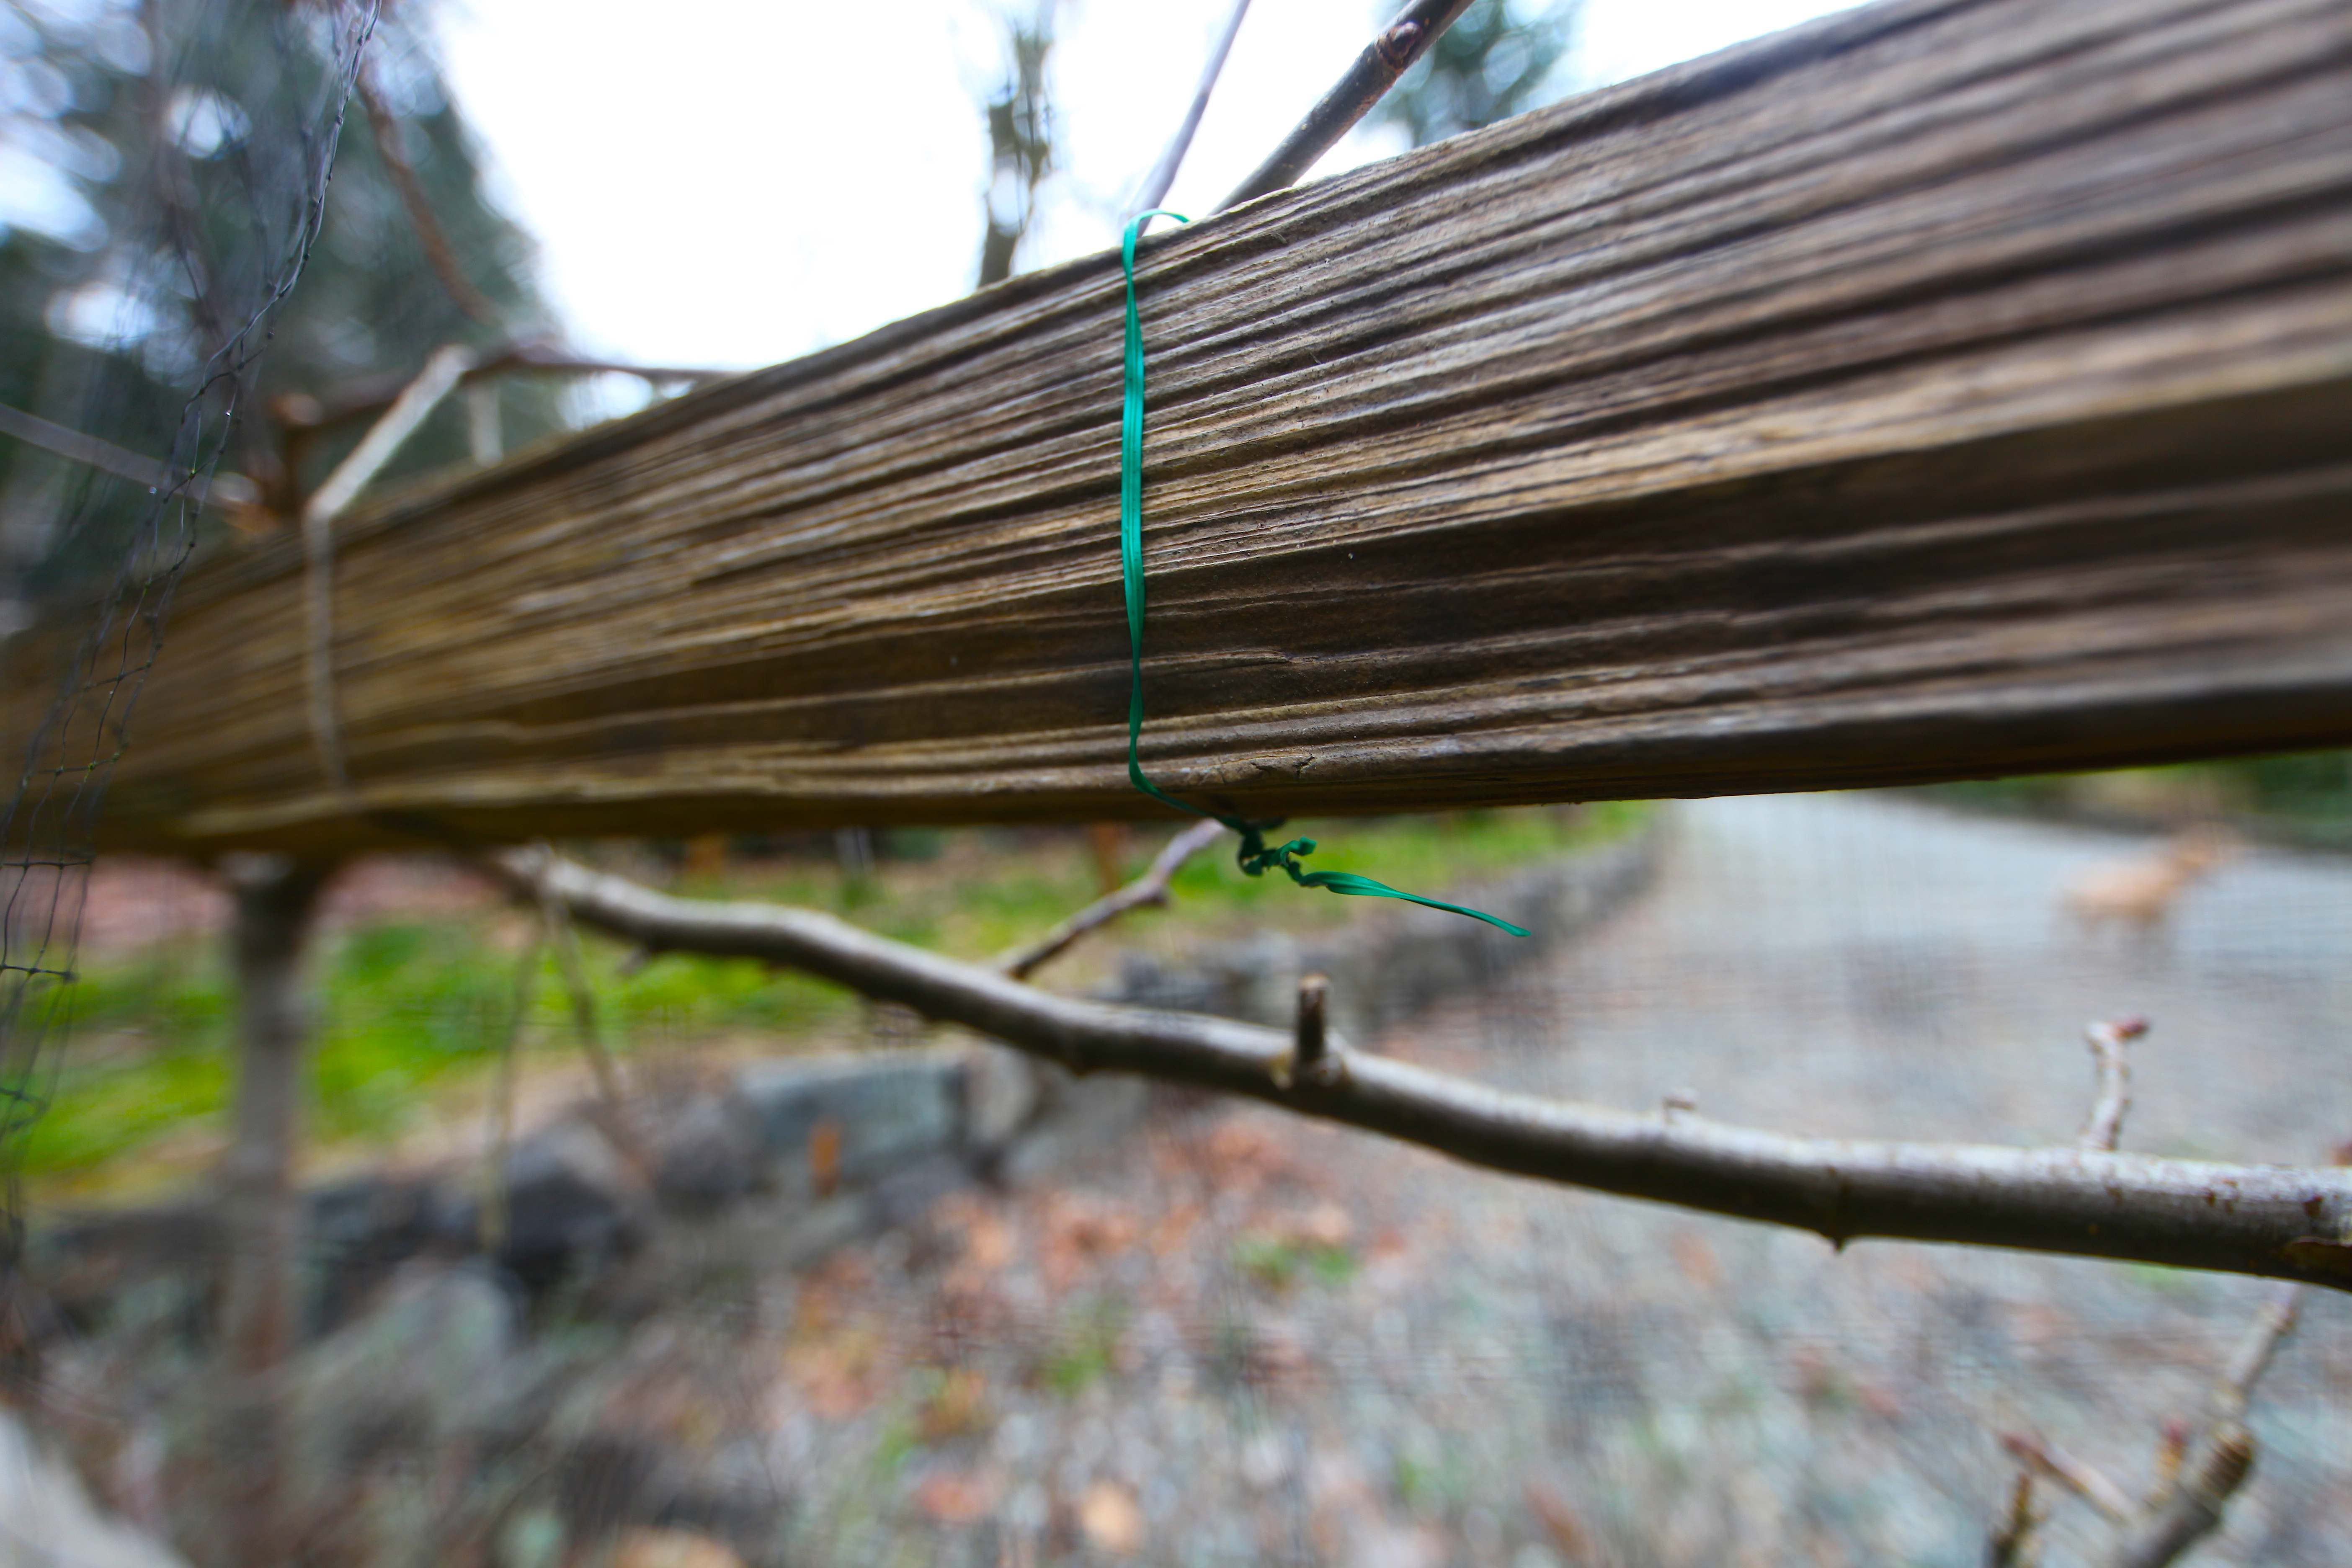
23) Twist Tie Plant Trainers: Save your twist ties to use for training plants to fences and stakes.

We reuse twist ties for training our espalier fruit trees. Photo © Liesl Clark

Soda Cans:

24) Soda Can Planters: In a pinch, soda cans can be used as planters and seed starters.

25) Pop Can Plant Markers: With a little effort, you can make some pretty markers for your garden.

Styrofoam:

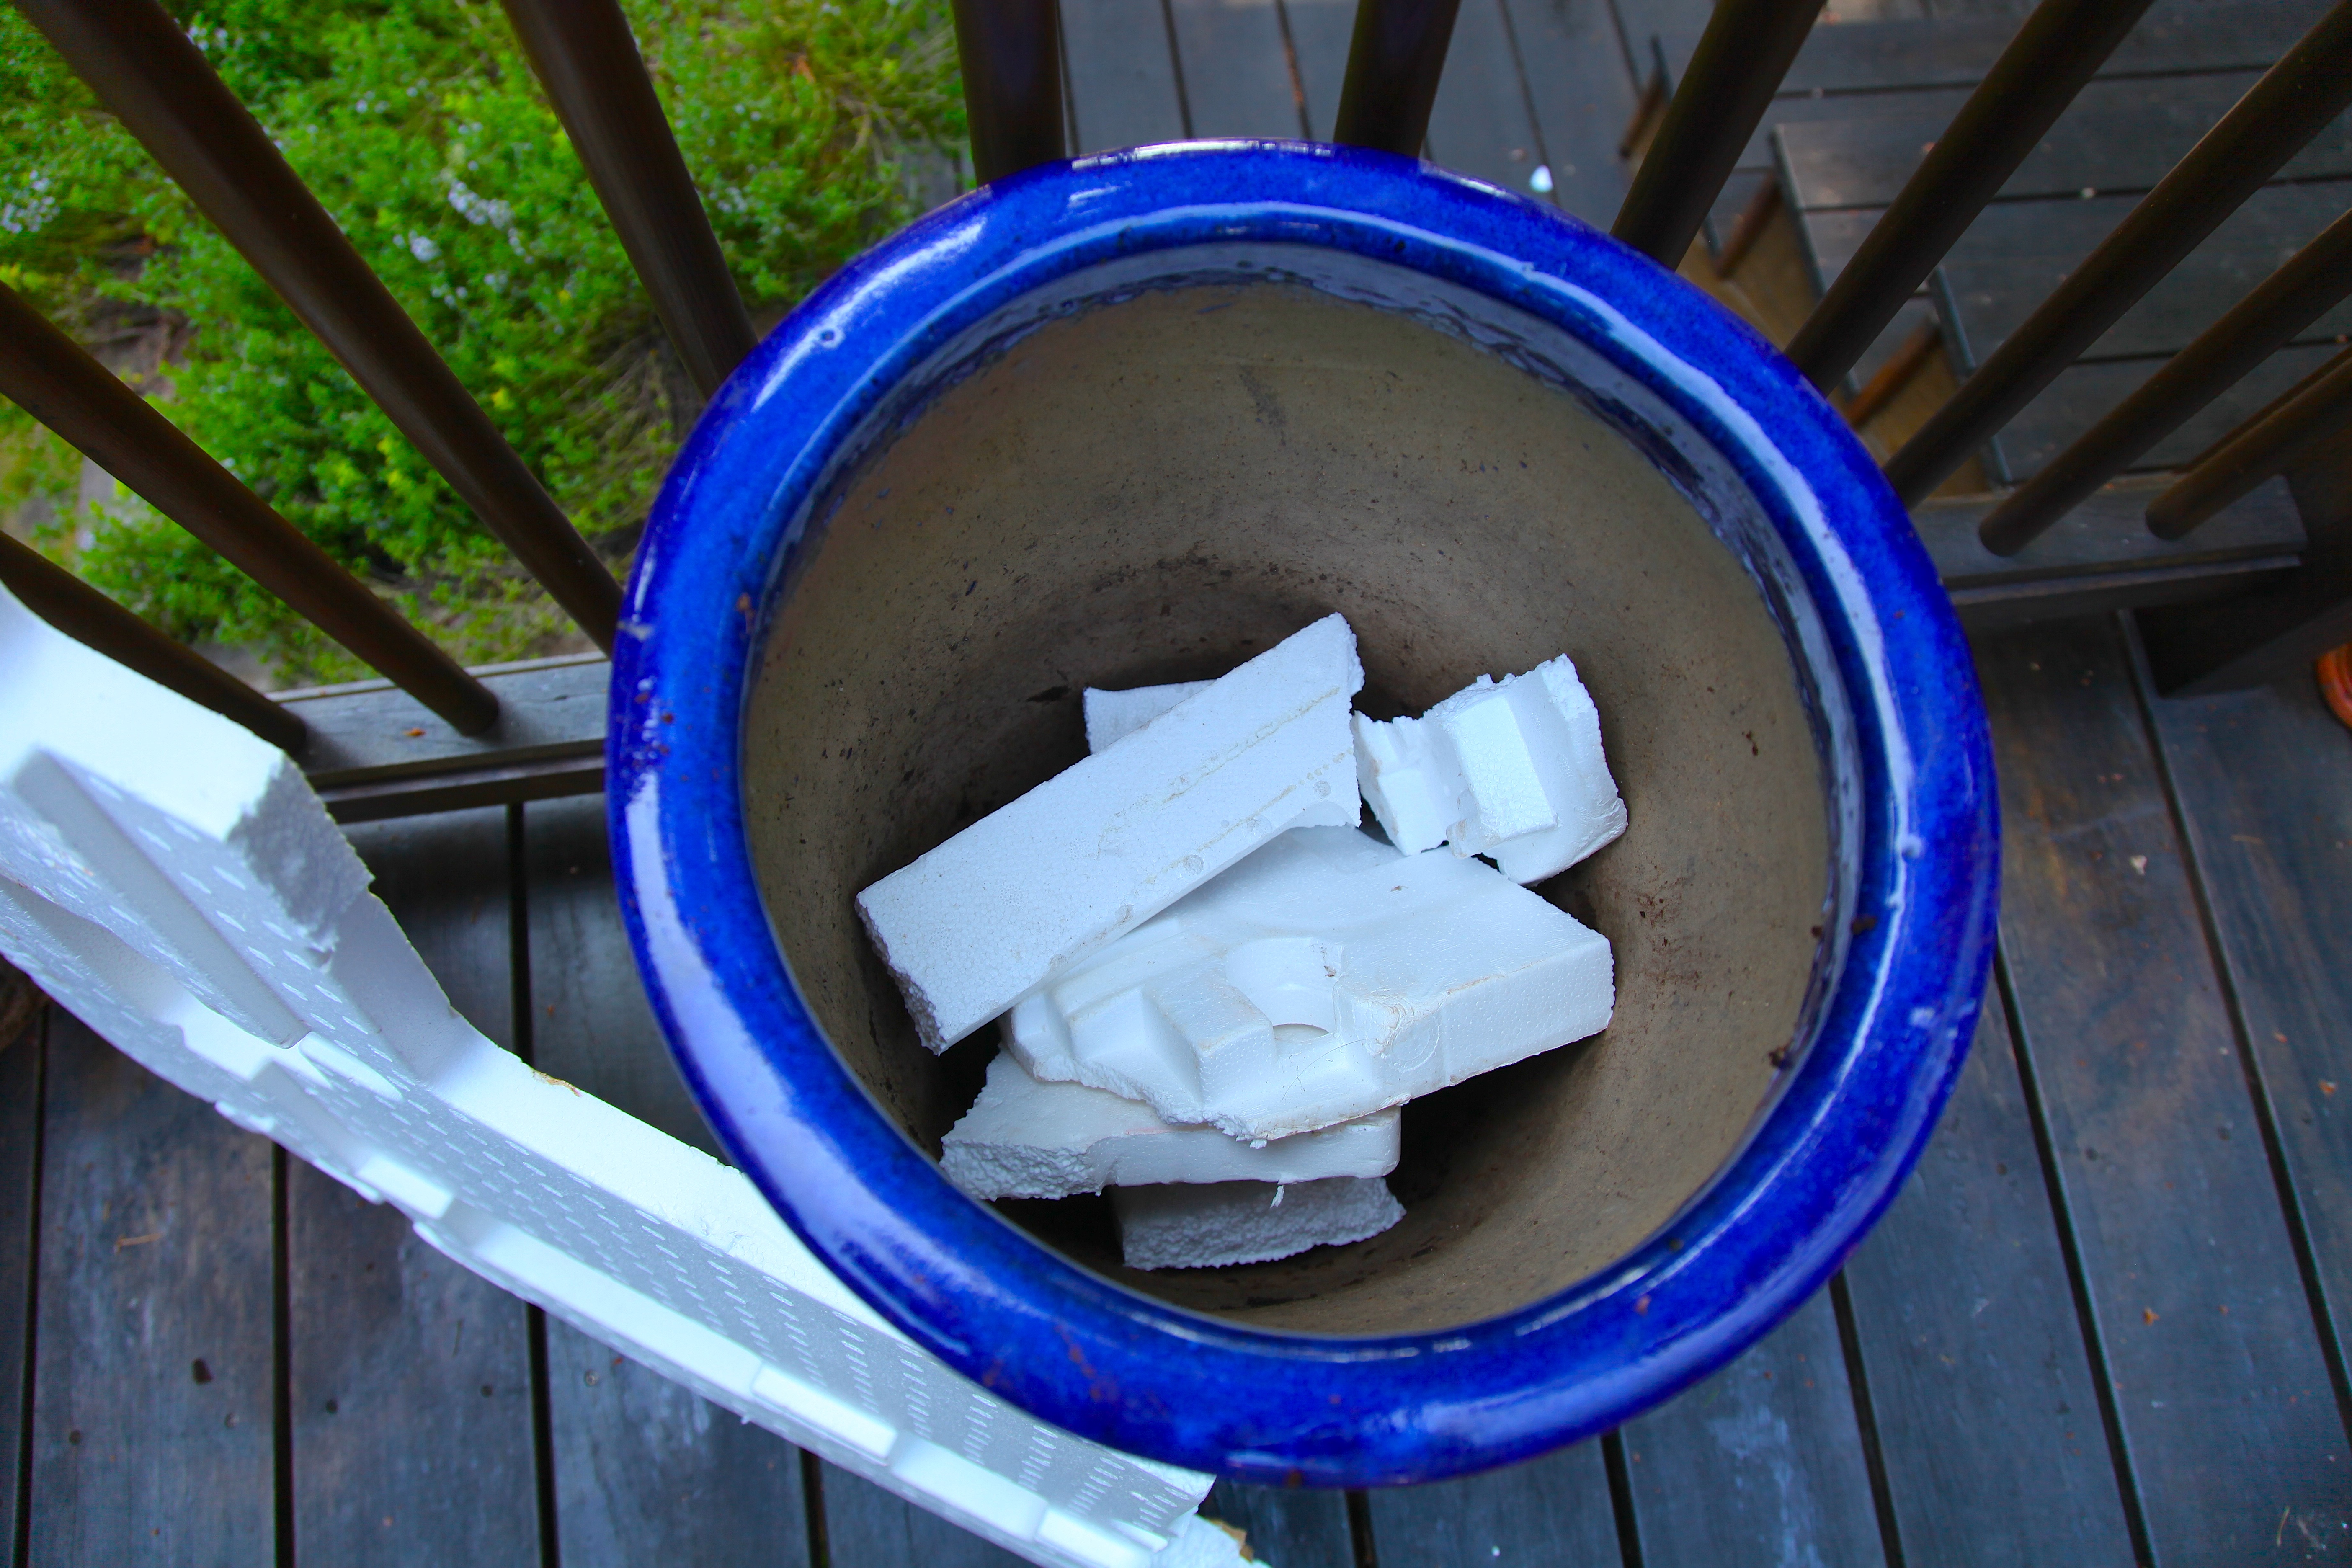
26) Styrofoam Planter Filler: Fill the bottom of your large plant pots with styrofoam so they don’t get too heavy.

Styrofoam Planter Filler, Photo: Liesl Clark

PVC

27) PVC Garden Tower: Drill holes in a PVC tube and you have a strawberry planter

Coaxial Cables:

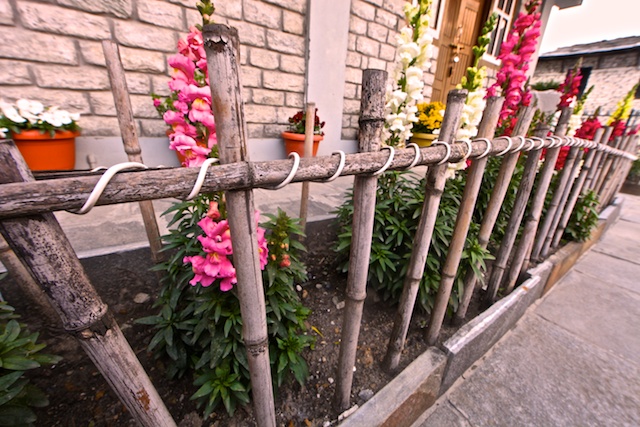
28) Coaxial Cable Fence: Who knew that a coaxial cable could look so pretty with bamboo?

Tie a Bamboo Fence Together with Coaxial Cable

Wine Bottles:

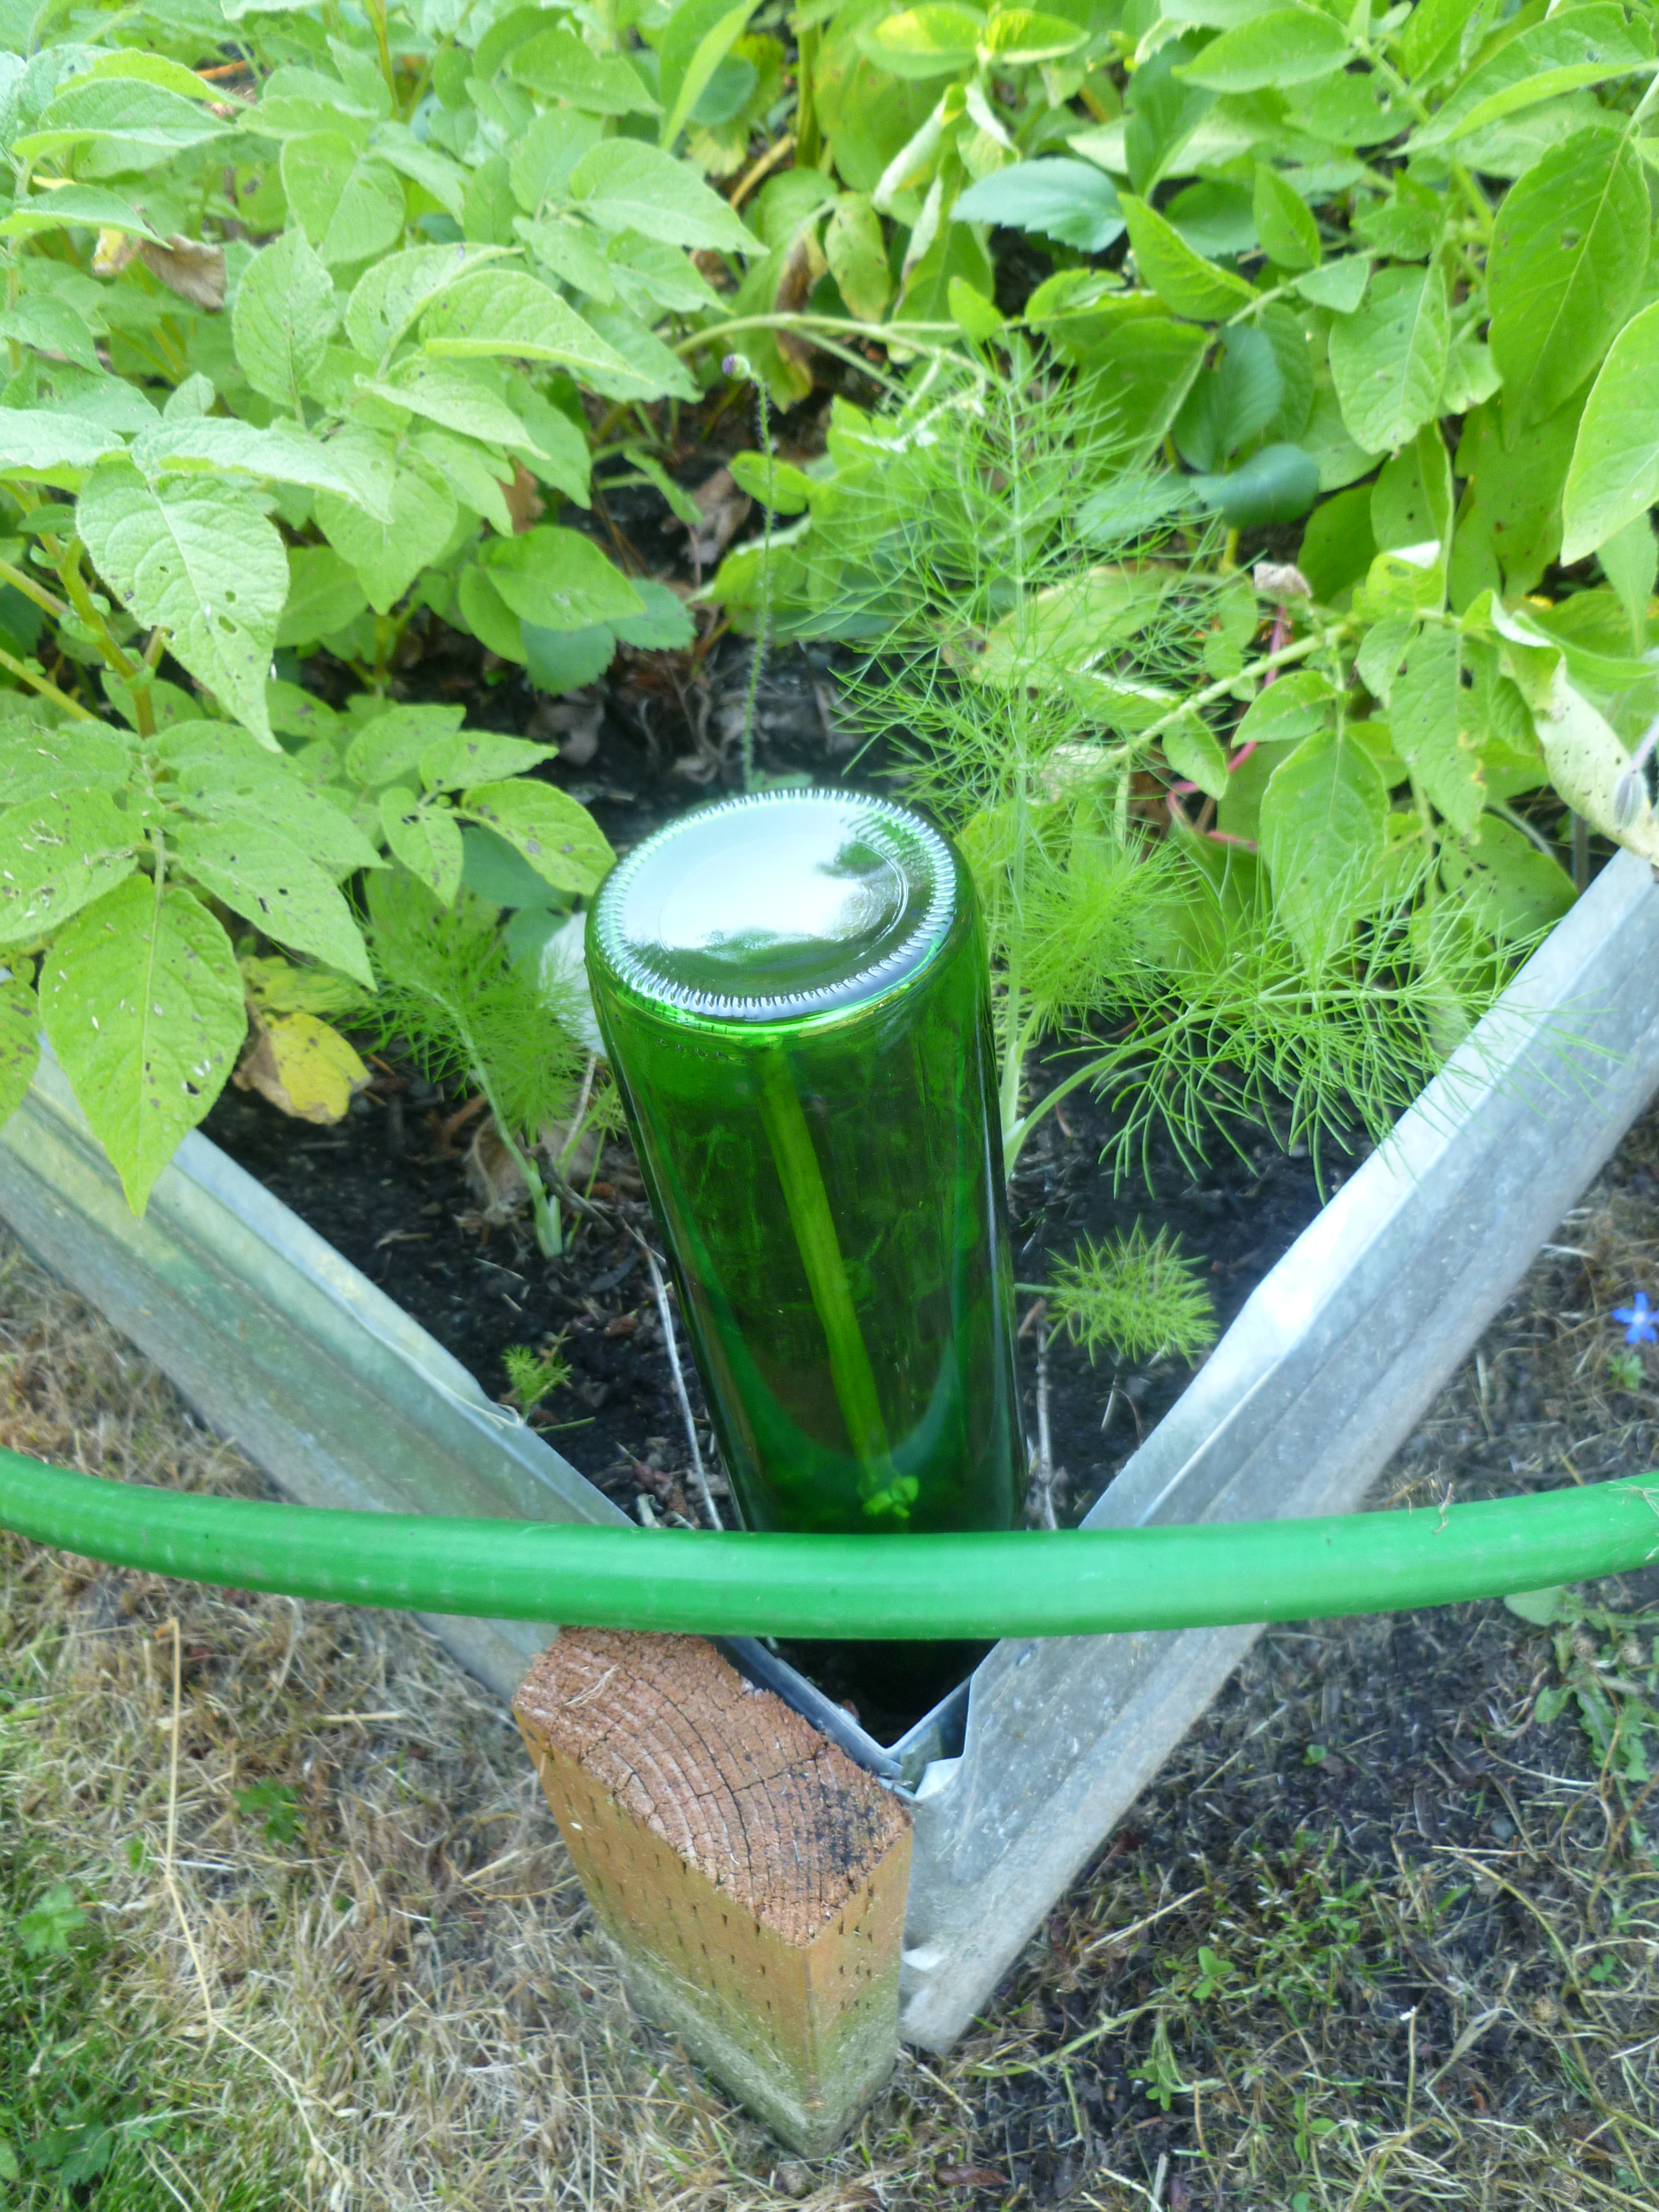
29) Wine Bottle Waterer: Turn your empties upside down (with H2O in them) in your plant pots and go on vacation!

30) Wine Bottle Garden Edging: Wine bottles can make colorful garden edging.

31) Wine Bottle Hose Guard: A wine bottle and a stick are all that’s needed to keep your hose out of your garden beds.

Empty Bottle Hose Guard Hard at Work photo: Rebecca Rockefeller

Clementine Boxes:

32) Clementine Box Planters: Clementine boxes make excellent seedling starter boxes or planters for forced bulbs.

Blue Jeans:

33) Blue Jeans Garden Apron: Sew yourself a simple garden apron from an old pair of jeans that can hold your garden tools.

Plastic Mesh Produce Basket:

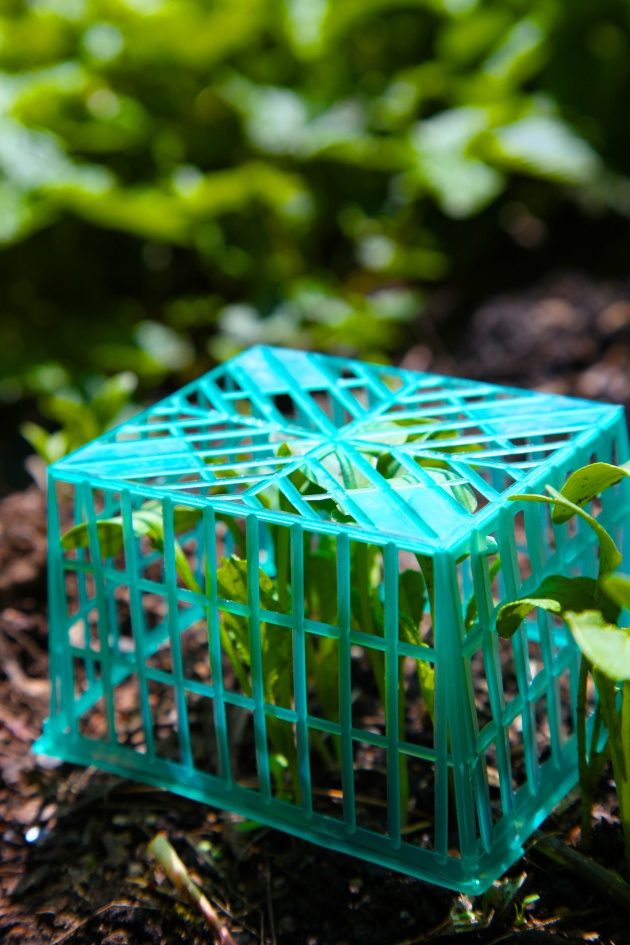
34) Plastic Mesh Seedling Saver: We use these baskets to prevent slugs and birds from destroying our seedlings.

Turn your trash backwards: Place mesh produce baskets over seedlings to protect from birds, frost, and really big slugs.

Windows:

35) Windows Greenhouse: This is a simple design for a small greenhouse made from windows.

36) Window Frame Trellis: An old window frame with mullions makes a pretty trellis.

Broken Ceramics:

37) Broken Ceramics Pot Drainage: Put your broken ceramic pieces in the bottom of plant pots for added drainage.

38) Plant Your Broken Dishes: Plant your favorite broken dishes in the garden and enjoy them throughout the growing season.

Carafe and Pitcher under the Bean Trellis photo by Rebecca Rockefeller

Broken Pot Planter: When our ceramic pots break, I plant them in our garden along with something planted to look as if it’s spilling out of the pot, having grown there over time.

IMG_2266

Paint Cans:

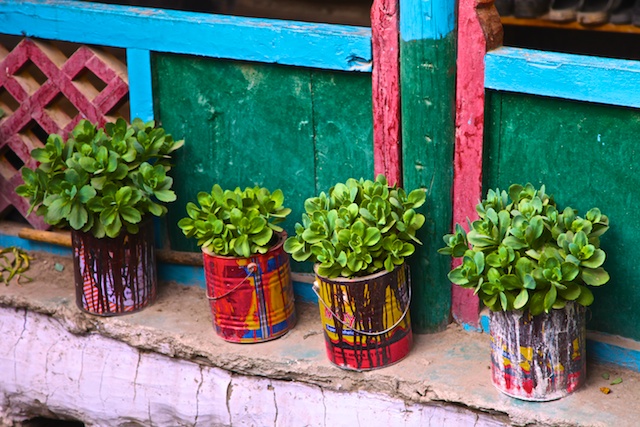
39) Paint Can Planters: I love these paint cans turned planters at my friend Maya’s house in Tsarang, Upper Mustang, Nepal.

Even Paint Cans Add Flowery Color to a Household, Photo: Liesl Clark

Laundry Hampers:

40) Laundry Hamper Potato Planter: I planted potatoes inside an old laundry hamper and the harvest was easy.

Potato Leaves Begin to Poke Out, Photo©Liesl Clark

Skis:

41) Ski Fence: If anyone lives in the Seattle area and wants to make one of these, please contact us as we have several hundred skis at the end of our Rotary Auction.

Window Blinds:

42) Mini Blind Plant Markers: These look really easy to make.

Panty Hose:

43) Panty Hose Deer Repellant: If you place a bar of soap inside the foot of old panty hose and hang it from your apple tree, it should deter the deer from nibbling on your tree. You can also use a single child’s mitten for this, as it looks cute and either put the perfumed soap inside or human hair (they don’t like the smell of humans.)

Headboards:

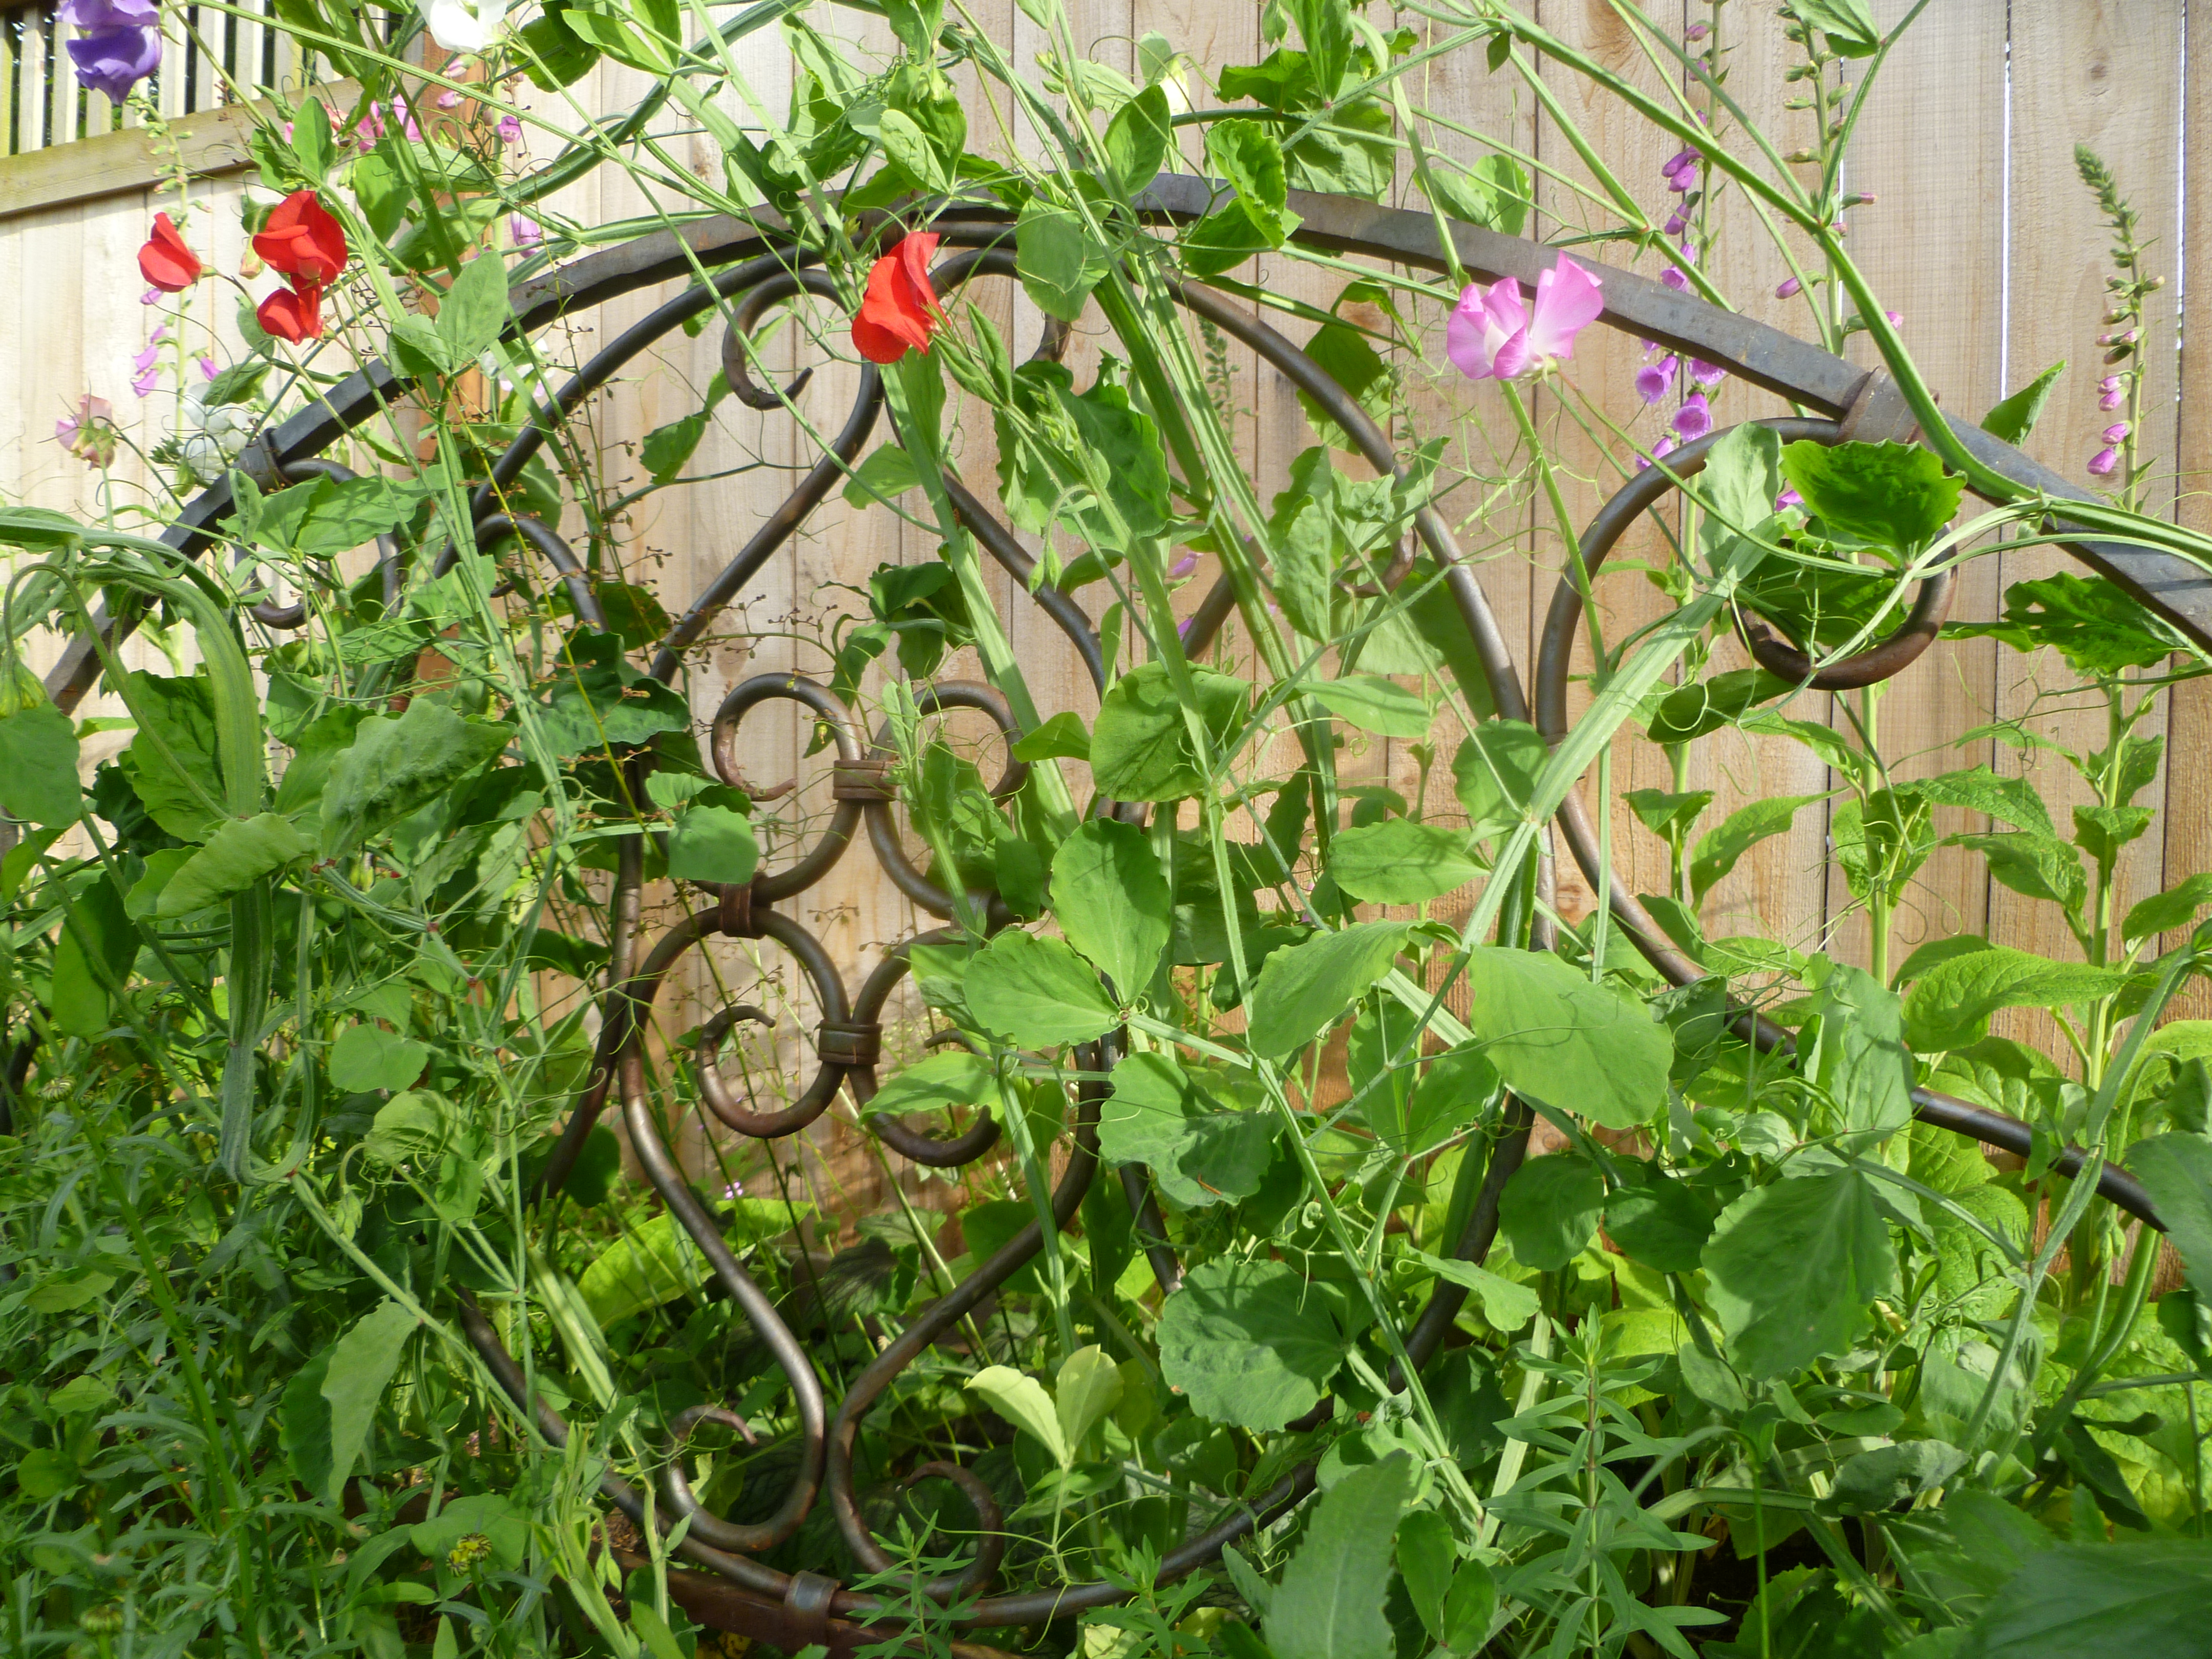
44) Headboard Trellis: A headboard makes a beautiful pea trellis.

An Old Headboard from Freecycle Makes a Perfect Garden Trellis, photo by Rebecca Rockefeller

Newspaper:

45) Newspaper Garden Uses: There are many reuses for newspaper in the garden.

Cassette Tapes:

46) Cassette Tape Bird Deterrent: Pull the tape out of your cassette and string it over your garden. Birds hate the reflective quality of the tape.

Pet Food Bags:

47) Feed Bag Tarp: Sew your plastic woven pet food bags together into a tarp for garden needs.

Toilet Paper Tubes:

48) TP Tube Seedling Starters: Start your seeds in a tube filled with soil.

Sponges:

49) Sponges in Plant Pots: Cut up your old sponges and place them in the bottom of plant pots. They’ll hold moisture for a long time.

Kiddie Pools:

50) Kiddie Pool Raised Bed Garden: Hard plastic kiddie pools make excellent raised bed gardens.

What do you reuse in your garden? Help me add to the list.

Random Acts of Reuse In The Kingdom of Mustang

In Upper Mustang, Nepal, there is an ethic of reuse that has changed my ways. Few things are consumed and then simply thrown away, except for candy wrappers, plastic packaging like biscuit wrappers, ramen noodle packets, and plastic bags holding washing powder. These, sadly, are found underfoot in nearly every village.

Plastic Packaging Used for Irrigation:

But most plastics in Mustang are put to use in innovative ways. Take the plastic lining for water diversion in irrigation ditches. Rather than using jute sacks filled with sand, a readily available material is plastic packaging and bags layered with mud, unwanted clothing and textiles to create an impermeable dam for irrigation ditches. The plastics, unfortunately, often break free and are carried downstream into the Kali Gandaki River where all water flows.

Potato Sack Turned Horse Feed-Bucket:

One of the most innovative Mustang-style trash hacks is the method by which local horses are fed their grain. Potato sacks made of woven plastic are sewn into a configuration that fits easily around a horse’s muzzle, with long string handles that hang over the horses’ ears. Corn is measured out and put in the potato-sack-turned-feed-bag, the chaff blown by hand from the corn to prevent the horse from inhaling it in the bag, and the bag is hung from the horse’s ears: a muzzle feeder that’s a brilliant light-weight way to feed one’s horses while traveling. No need for heavy buckets. Whether on-the-go or at home, these muzzle feed bags are the preferred feeding bucket for Mustang equines.

When one becomes worn out and a hole develops, they’re quickly patched up, as this one was mended by a talented tailor friend in the village of Samdzong, utilizing his son’s worn out sweat pants.

I grew up with horses and we went through plenty of buckets, some made of PVC and plastic which when broken became yet another hefty item in the landfill. The potato/rice sacks turned into horse feed bags are one of the best reuses I’ve ever seen in a remote part of the world that could easily be adopted world-wide!

Planted Pots in Buckets, Paint Cans and Tins:

Anything that is a receptacle is used in Mustang until it can no longer hold anything, disintegrated by sun and wind to the point of uselessness. In the topmost photo of planters, below, you’ll see a plastic bucket that developed a crack and was then sewn back together with plastic twine. Potted flowering succulents are such a valuable addition of organic color to a household, taking the time to repair that heavy-duty plastic pot is clearly worth the effort. If we treated our own plastic pots and buckets the same way, there’d be a significant reduction in the production of these plastics in the first place, and a renewed ethic which the Lobas, the people of Upper Mustang, haven’t lost, of repairing everything again and again until its useful life is truly over. Now that’s reuse!

Put Plastic Berry Baskets To Work

What are we to do about the plastic berry basket? You know which berry containers I’m talking about: The plastic mesh variety, pint-size and usually green in color that our cherry tomatoes and strawberries come in. They come under the following names: Berry baskets, berry boxes, strawberry baskets, pint berry containers, plastic strawberry baskets, plastic cherry tomato boxes…the list goes on.

Why do we need to surround our beautiful fruits and veggies in plastic? It’s not the grocery stores that are packaging your lovely berries. Farmers choose the packaging, but many grocery stores will give feedback to farmers if their customers just don’t want their fresh produce packaged in plastic berry baskets.

If you want to avoid accumulating these baskets, simply buy your strawberries and cherry tomatoes only when they’re available in cardboard baskets and if your grocery store only carries plastic ones, give them your instant feedback by not purchasing them and get proactive in letting the store know you’ll start buying berries again when they can provide waste-free packaging. It’s grocery store strawberry season here and I cannot find a single one that’s plastic-free. Ours are packaged in clear clamshell packaging, aka styrofoam, and that stuff is a known carcinogen. No strawberries for us until they ripen in our garden or are offered at the Farmer’s Market or our local garden produce-share group.

What to do with your plastic berry baskets if you have to buy produce in them? Check to see if your local farmers can reuse berry baskets, if they’re clean. Save them and then pass them along, or collect enough of them to post them on your Buy Nothing group, and you might find a craft group or teacher who could use them.

Otherwise, here are 9 ideas to get you reusing the pint berry baskets you might have.

1) Turn them into candy boxes or gift boxes by weaving pretty ribbons through them.

2) Use them as a doll playpen.

3) Let your child’s teddy bear wear one as a space helmet for galactic journeys.

4) Start your cucumber, melon, and other starts in them by lining them with newspaper, adding potting soil and keeping in a sunny warm space. Then transplant the whole thing, basket and all, into the garden. Roots will grow through the plastic mesh and there will be no transplant shock for your seedlings. Remember to retrieve the plastic basket from your garden at the end of the season for reuse.

5) Place them upside down over your seedlings in your garden to protect them from birds.

6) Make an Easter Basket.

7) Line them with paper and use as a container for little things in your everything drawer or child’s playroom.

8) Use one as an earring holder/display.

9) Reuse them for your own berry picking.

I’m just going to refuse them from now on, and maybe you will, too. If we just stop buying them, maybe the farmers will find better baskets for their berries.

Styrofoam Filler For Planters

Have a large pot you’d like to plant cucumbers or flowers in? Don’t fill it up with planting soil! Save your soil and fill the base with Styrofoam first. The foam will reduce the overall weight of your planter, enabling you to move it around for best sun exposure. It also acts as good drainage for water.

Styrofoam Planter Filler, Photo: Liesl Clark

We found some big chunks of styrofoam washed up on our local beach, so I knew that we wouldn’t be able to recycle it. If you don’t have a readily-available source on your beach, save a few styro-blocks to stuff into your large planters. If you’re concerned about the carcinogenic qualities of polystyrene, make sure you place the foam on the very bottom of the planter so the roots don’t touch it. Then, fill with good planting soil, ensuring you’ve filled in all the in-between spaces so your plants’ roots don’t dry out.

Studies aren’t conclusive whether there are any known effects of styrofoam or plastics in our soil upon our foods. If so, we’re in trouble. Almost all commercial compost has polystyrene and hard plastics throughout.

Most of our styrofoam gets recycled around Earth Day when a local feed store drives our styrofoam to a recycler on the other side of Puget Sound.

What do you think? Have you got your own reuse for Styrofoam? We’d love to hear from you.

12 Twist Tie Reuses

OK, I have thirteen twist tie reuses, but it sounded better with the number twelve.

I have a lot of twist ties. Organic farmers tend to package some of their lettuces and produce in twist ties. I’ve vowed today to avoid those items because the twist tie waste is getting overwhelming in our house. Also, when we get bulk items at our supermarket we accumulate quite a few twisties. Over the course of a year, they add up, and my everything drawer is looking like a twist tie nightmare. But before getting rid of ’em, I thought I’d write down some obvious reuses for the little twisters to see if I might want to save a few:

Everything Drawer Turned Twist Tie Drawer. Photo © Liesl Clark

1) Take them back to the store for your bulk needs and reuse them. I try to remember to bring a stash of twist ties inside my reusable bags for my grocery shopping. If you’re really organized you’ll even have the bulk bin numbers figured out so you can simply reuse the same one over and over again. I discovered an ingenious way to decode the bulk bin numbers by….writing the name of the bulk item on the twist ties too! Duh!

Twist Tie Trash Hack: Write the Name of Your Bulk Item Along with the Bin Number For Reuse. Photo © Liesl Clark

2) Tie up plants and vines in the garden with your twist ties.

We reuse twist ties for training our espalier fruit trees. Photo © Liesl Clark

3) Corral your extra electrical cordage with a twist tie to avoid tripping over them and causing a domestic electronic disaster.

4) Make twist tie stick people. Ok, that was pretty bad. If you want to check out a true master at the craft of twist tying, check out the Twist Tie Guy.

Twist Tie Person? Sort of.

5) Use them to secure ornaments to your Christmas tree.

Twist Tie Ornament

6) Hold your ear buds together with a twist tie so they don’t get all discombobulated in your backpack or briefcase.

7) Make an obvious key ring heart to identify your favorite house key.

Key Ring Heart. Photo © Liesl Clark

8) Reuse twist ties to cinch together plastic bags storing produce, etc. (That was an obvious one.)

9) Make a 4th of July Centerpiece.

10) Give them away on your Buy Nothing group. I was able to BuyNothing a few of my long pink ones for a local textile recycling project. They’re used to tie up trash bags filled with clothing for Goodwill. Yeehaw!

11) Use one to hold all your, um, twist ties together.

A Twist Tie Twist Tie Holder. Photo © Liesl Clark

12) Make a set of “Garbage Gods.” They’re more rad than Legos.

13) Recycle them! If you’ve saved up enough of them, I guess you could strip the paper from the paper ones, put the paper in your paper recycling and put the metal in your scrap metal bin.

But wait, twist ties may be toxic!? According to some reports the metals used in twist ties are often unknown and could have lead in them. But…many store-bought vegetables like kale and Romaine lettuce are held together by metal and paper twist ties. My local supermarket even uses twist ties to indicate something is organic!

What reuses do you practice with your twist ties?

DIY Wool Dryer Balls Reduce Dryer Time

The title of this blog post were the words I used for a Google search yesterday, as a question, and the answer from over 10 bloggers was resoundingly “yes.”

I had to find this out for myself.

IMG_2644

So, I went to my yarn basket and found a few balls of 100% wool yarn that we hadn’t used for years and wound a few contrasting colors of yarn around them. If you’re not sure if your yarn is wool or acrylic, check out this article that’ll help you determine what’s what.

IMG_4300

I also took some old knitting projects the kids had done (half-finished scarves and finger knitting garlands), balled them up, wound more wool yarn around them to make them into tennis ball and soft ball size.

IMG_8397

IMG_2240

IMG_2229

I then grabbed a few oddball socks out of my single socks box (yes, we have hundreds) and placed one wool ball inside one sock and tied off the end.

IMG_2726

I did this for each of the balls, until I had 6 balls-in-socks, ready for the washing machine.

IMG_6114

I put the cycle on high and threw in a few towels and T-shirts. I did the cycle twice, just to be sure that the wool balls were felting up. The wet wash then went into the dryer for a high heat cycle.

The outer tied-off socks were easy to untie and I rescued the now-felted-wool balls from their sock prisons. Each one felted up pretty nicely!

IMG_2291

Experts at this have suggested putting a few drops of your favorite essential oil on the wool balls about every 4th load you dry, so I found some rosemary (so my son won’t feel that he smells too flowery and to also keep buggies off of us (they don’t like rosemary.))

IMG_2321

Now, the true test was upon me: If I ran a load of laundry with wet towels through the dryer, would 6 wool dryer balls reduce the dry time? The answer is resoundingly yes. Typically, we have to run our towels through our high heat normal dryer cycle twice. This time, with 6 dryer balls, I only had to run them once! So, that’s a win. I figure this will save our family on dryer time (i.e lower our electricity bill) during the winter months when we can’t put our laundry out to dry in the sun.

IMG_2309

Oh, and the wool dryer balls also are a replacement for fabric softener (we’ve never used it anyway) and dryer sheets (ditto) as they remove static cling, soften your fabrics and add a lovely scent via your essential oil!

IMG_2325IMG_4251

20 DIY Crafts Not Plastic

A Case For Exposing Your Children to Traditional Arts Using Natural Materials. Photo © Liesl Clark

When my children reached elementary school age and we enrolled them in programs that had art classes, we were amazed at how few natural materials were used for art supplies and just how much of it was plastic: glitter glue, colorful plastics for mosaics, acrylic-coated feathers, various items to be “recycled” through art like yogurt cups and plastic straws. The myriad cut-and-paste-style art projects they did were primarily made of art supply store plastics. All too often schools and art classes are cutting corners and can only afford cheaper plastic materials for art supplies.

Hand-crafted tiles or buttons, made by a young Nepali stone-carver. Photo © Liesl Clark

I would’ve preferred sticks, stones, leaves, sea glass, natural feathers and wood over the pre-fabricated plastic materials my son and daughter were exposed to. These plastics were simply mimicking what’s found readily in nature. I also believe the color palette children are exposed to in those early years, through day-glo style plastics, can affect their color choices later in life. Gone might be an appreciation for natural greens, browns, blues and purples found regularly in the environment. We started to opt out of the popular kinder art projects in preference to doing our own art, making an effort to learn from traditional artists who work with stone, wood, glass, wool, and ceramics. These experiences, for our children, were enriching as they learned quickly that they could create things of beauty from resources found in the natural world, as people have done for millennia.

A Young Nepali Artist Carving Prayers Onto a Mani Stone. Photo © Liesl Clark

A coupling of leaves, feathers, and flowers could become a miniature nest or fairy’s bed from a 7-year-old’s imagination.

A Fairy Bed, Made From Leaves, a Pod, Feathers and a Flower. Photo © Liesl Clark

Or a piece of wood might be whittled into a boat, a stone carved into a work of art. Exposing children to traditional folk art from around the world is a great way to teach them how natural materials that are readily available can be turned into works of beauty.

Azurite Is One of The Pigments Used in Traditional Himalayan Art. Photo © Liesl Clark

On a recent trip through South Korea while we were in transit, we took part in a program at the airport in Seoul that teaches traditional art forms. Every time we pass through this airport our children learn a new form of art made from a surprising material. They’ve worked with rice paper to make stone carving prints onto them, they’ve made paper lanterns, they’ve hand painted fans, and they made a tapestry necklace. This time, they learned the Na-Jeon art form, working with mother of pearl-colored shells and shellac from the lac tree.

Learning the Na-Jeon Art Form in Korea. Photo © Liesl Clark

This highly sophisticated ancient Korean craft utilizes iridescent abalone and conch shells in contrast to a lacquered black wood background, creating a sense of balance and harmony in this mariage of opposites.

A Hand Mirror Made in the Korean Na-Jeon Style © Liesl Clark

The children were given hand mirrors to decorate in the Na (which means “pearl”) Jeon (which means “decorate”) style. The focus and concentration the craft required was mesmerizing for us to watch. And the mirrors will be treasured for years to come in our family.

IMG_5929 © Liesl Clark

If you’re looking for some ideas for arts and crafts less plastic, we came up with a list of 20 traditional crafts from natural materials found in and around your home that are easy to try. Copy this list or share the link with your art teacher at school. No need for spending money on cheap plastic art supplies when there are supplies we can contribute from our own homes and backyards: scrap fabric, acorns, sticks, scrap paper, wool sweaters, leaves and sea shells are just a few. Incorporate information about the cultures that started the folk art form you’ll practice so your children appreciate the history behind their craft and how interconnected we all are through our art forms:

1) Doll-Making: Fabric Scrap Dolls have been made for the children of many cultures for centuries.

DIY Tiny Dolls Wear Fabric Scraps in Style

2) Vegetable Stamps: My favorite veggie to use for stamps is okra. But you can also carve stamps from a potato with excellent results. And the celery rose stamp is absolutely beautiful.

3) Fabric Scrap Mosaic: Reusing fabrics is an art unto itself and certainly has been passed down for generations. Try making a pretty mosaic from your leftover scraps.

4) Embroidery: Try your hand at embroidery. You can even embellish a tired old lampshade to create color in a room.

5) Twig Basket: Collect some long green twigs and make a freeform basket out of them.

6) Origami Tea Bag Folding: Learn the traditional art of origami paper folding using the paper the covers tea bags! If families saved up their tea bag covers, a school art program would have plenty of paper to work with and couldn’t complain about budget constraints.

7) Scrap Paper Flowers: Art classes should save all scrap paper to make these beautiful flowers. Or toilet paper rolls are all you need to make these flowers.


Toilet Paper Roll Flowers. Photo © Kelly Munson

8) Fallen Leaf Art: There are many beautiful artistic creations you can craft from leaves.

9) Scrap Paper Tree: This pretty craft utilizes tiny pieces of your favorite scrap paper as well as sticks collected from outdoors.

10) Seashell Arts: We’ve made mobiles from sea shells and endless mosaics. These seashell koalas would make any child happy.

11) Tin Topiary: Use pie tins to make these beautiful tin flowers.

12) Knitting: With some saved-up chopsticks, you can teach anyone how to knit.

Knit with Old Chopsticks photo © Rebecca Rockefeller

13) Felting: Learn how to felt your wool sweaters.

14) Rubbings: Make rubbings for things natural or extraordinary.

15) Weaving: DIY weaving is easy and a great craft to do with scrap yarn and fabric strips. You can even make your own loom.

16) Phone Book Paper Painting Meditation: Teach the kids meditation by doing phone book paper art.

17) Sock Crafting: If you’re in need of a stuffed animal, try making one from a sock.

Sock + Rubber Bands + Bits & Bobs = Sock Hippo. Photo © Liesl Clark

18) Hand-Made Valentines: Valentines are an original folk art scrap hack.

Handmade Paper Valentines, An Original Folk Art. Photo © Liesl Clark

19) Stencils: You can make stencils from food boxes and use beets as your ink dye.

20) Driftwood Sculptures: If you collect enough of a variety, driftwood lends itself to creative art from their smooth appealing shapes.

What crafts from materials readily-available can you add? We love to make things from what’s abundant around us!