This Homemade Citrus Power Cleaner Works

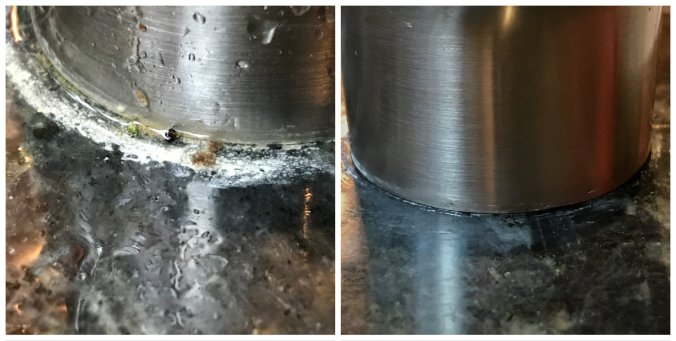
We have hard water in these parts, which means that whenever it sits around, like at the base of a water faucet, you get calcium/mineral buildup. Here’s what ours looked like a few hours ago. Ew!

IMG_6194

Thanks to some homemade citrus vinegar that I made last month, I now have a power cleaner that’ll cut through the boilerplate mineral deposits found around our sinks, shower, and bathtub.

IMG_3967

This mineral deposit is hard and sticks like glue.

First, to make the citrus cleaner, just throw your orange peels into a mason jar and pour in some distilled white vinegar to cover the orange rind. Keep adding orange peels until the jar is filled, adding vinegar to totally cover over the peels.

IMG_3687

Screw a lid on the jar, and let it sit for a month with all of the peels totally submerged. Remove the orange peels and the remaining liquid is your all-purpose citrus cleaner that’ll work wonders in your home.

IMG_4499

I dilute it with water 1:1 into a spray bottle and use it wherever I’m cleaning: countertops, windows, ovens and stoves, bathrooms. But the kitchen sink faucet was where I hit paydirt. This stuff cut through that mineral deposit and enabled me to get my faucet back to looking like new.

hardwater before after

Just spray the 1:1 solution on your affected area and let it set for a few minutes and rub off.

closeup before and after

I had to repeat this several times, but it eventually removed the white caked-on material.IMG_4494

IMG_5979

So the next time you eat an orange, just save those peels, stuff them into a jar and cover with white vinegar, adding more peels and vinegar until the jar is full. After a month, you’ll have a citrus cleaner ready for your toughest jobs.

How To Do A Classroom Waste Audit

By Liesl Clark and Rebecca Rockefeller

Conducting a classroom waste audit is a hands-on way for kids to learn how to reduce their waste at school. Whether kindergarteners or highschoolers, waste audits resonate with students of all ages because everyone handles trash on a daily basis. Zero waste in schools takes commitment from both teachers and students and we’d like to be your hub for learning the process and obtaining the tools necessary to make your waste audits a success. This simple guide is an easy resource to get you started with waste audits in your classrooms or schools in your community. If you have any questions or need any further resources, don’t hesitate to contact us at Trash Backwards, and the following video is to inspire you to get into classrooms, have fun, and teach students these simple steps to school waste reduction!

If you’re not a teacher, you’ll first need to obtain permission from the school to do your audit. Meet with the school’s principal or director and pitch the idea. If you have to get permission for a larger body, like a school board, here’s a sample letter you can edit to make the formalities easy for you.

Materials Needed:

1 Tarp for the floor or plastic table cloths to cover tables

1 Scale

2 Buckets with the tare weight written on their sides

Paper and Sharpies for making 2 charts

Small signs for “compost,” “recycling,” “reuse,” and “landfill.”

10 Simple Steps

1) Save 1 days’-worth of classroom trash, including food waste.

2) Tell your personal story about why you’ve discovered how important it is to reduce waste. You can do  a slideshow, showing the students pictures of their landfill, how a landfill (or incinerator) works, how far away it is, and how trash is transported there. We have a movie about how our children discovered plastics washing up on their beaches that you can download or play off the web here as a teaching tool, showing how kids can take action, learn where the ocean plastics are coming from, and what they can do about it.

3) Weigh your recyclables and trash separately.

4) Spread it all out on a tarp.

5) Have the students separate all items into discreet piles next to their appropriate signs: “Compost,” “recycling,” “reuse,” and “landfill.”

6) Teach recycling: Discuss what goes into your local recycling and help the students identify those items.

7) Start a composter, vermicomposter, or chicken bucket. Some classrooms or schools have composters or vermicomposters outside. If not, find a volunteer family that will take the organics home to their chickens or compost bin.

8) Teach reuse: Save items like Ziploc bags, rubber bands or paper clips that were in the trash but can be reused.

9) Weigh your newly separated piles of trash, compost, reuse and recycling.

10) Celebrate your results by making a graph so the students can see the change in landfill trash versus recycling and compost. The decrease in landfill trash will be surprising.

Follow-up activities include having the classroom write a manifesto for changes in behavior to create less waste. Suggestions might include some of the following:

1) Place pictures of recyclables on the recycling bins as a reminder to students.

2) Move a recycling bin near the paper towel dispenser (wet, clean paper towels can be recycled).

3) Start a compost bin, worm bin or a chicken bucket.

4) Start a reuse box as a place to put items that can be reused.

5) Start other recycling streams that don’t go in the recycling bin but can be taken to other recycling facilities, like plastic bags (local supermarket) and juice boxes (a local Terracycle brigade).

Please feel free to contact us with questions or needs. We hope to be your go-to school waste audit resource! And if you’ve conducted a waste audit yourself, do send us a note to let us know how it went.

DIY Taco Seasoning in Bulk

Buying taco seasoning is pricey and when you have the ingredients in your own home, why not just make a batch that’ll last you days. Your own seasoning is also lower in salt content. Here’s our family recipe that we’ve used for the past year, and sometimes the amounts of each ingredient change a little, based on just how much we have in the spice rack. We buy our spices in bulk, too, to save money, have a zero waste kitchen, and so we don’t accumulate a lot of those little plastic bottles.

IMG_3576

Taco Seasoning (makes about 1 2/3 Cups)

  • ½ Cup chili powder (we sometimes use speciality chili powders we find in Mexico. Go with your favorite!)
  • 1/3 Cup cumin
  • 3 teaspoons garlic powder
  • 3 teaspoons onion powder
  • 1 Tablespoon coarsely ground pepper
  • 2-3 Tablespoons ground coriander seeds
  • 2 Tablespoons paprika (sometimes we add smoked paprika)
  • 1 1/2 Tablespoons salt (feel free to add more if you like your seasoning salty)
  • 2 teaspoons red pepper flakes
  • 2 teaspoons oregano (we like Mexican oregano)FullSizeRender 83Enjoy!

Paper Bag Cast Iron Skillet Cleaner

We stopped buying paper towels years ago. Never really needed them.

And since we were eating mostly vegetarian meals, we rarely had the dilemma of what to do with a greasy cast iron skillet. Now that we eat bacon occasionally, because we’ve reintroduced a little locally-produced organic meat now and then, we have to contend with the leftover grease. We’ve used a few rags on the grease and just wash the rags, but that isn’t the best use for the rag.

And then, one day a week or so ago, I posted a dozen lunch-bag size bags to give away in my local Buy Nothing group. (I save these little bags whenever they somehow make their way into our house, and the kids use them when they go on school field trips.) A member immediately posted a comment explaining that he uses those thin lunch bags to sop up his bacon grease. It was an “aha” moment for me.

IMG_3974

Here’s what he wrote:

“If you have a new, or not-so-well-seasoned pan, a thicker bag will leave little micro fragments of paper. So generally, the smoother the pan and the finer quality of the bag, the better it works. Newspaper is completely unworkable because it’s such lo’grade.”

I decided to keep the bags, and now I have a small stash of little brown bags I can use to clean out my cast iron skillet when it gets a little too greasy. The thin bag is pretty darn absorbent.

IMG_3984

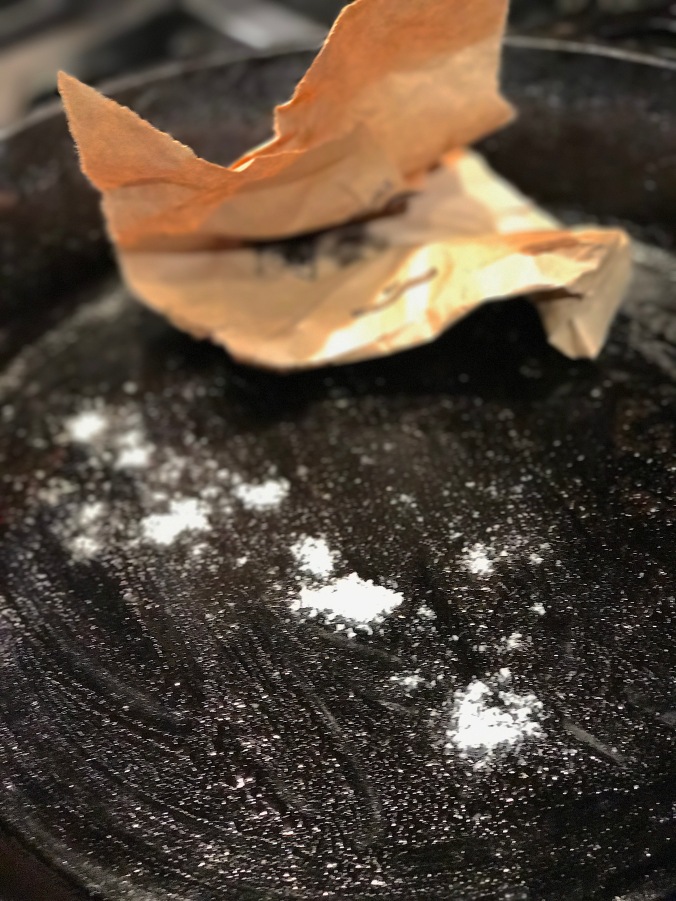
I throw in a little Celtic sea salt to scrub the bottom of the pan with the crumpled up bag, and the salt acts as a perfect scrubbing agent.

IMG_3986

No need to run soap and water over the well-seasoned skillet. And the pan is ready for its next job.

IMG_4001

The greasy bag goes into our next fire as fire-starter or we just toss it in our compost.

IMG_3996

Save those little bags for jobs like this!

Use Crayons For Dry Erase Boards

We ran out of dry erase markers and made a discovery. You don’t need to buy more of those plastic markers! Large crayons work just fine on dry erase boards. Simply use a soft cloth to wipe it off, with a little extra elbow grease.


Crayon going onto a whiteboard…..And crayon coming off the same whiteboard with an old sock eraser. This really does work, and it does wipe clean! Just sayin’.

How To Reduce And Reuse Chip Bags

Potato chip bags are something we’ve all handled and then thrown into the trash.

If your conscience has you wondering if there are alternatives to sending that bag into the landfill, you’ve come to the right place.

If you simply want to try to reduce your chip bag footprint, just make your own easy microwave chips using Rock Farmer’s simple method. If you want an oil-free recipe with a few more steps, give this one from the Kitchn a try.

Reuse and Repurpose:

1) If you’re not able to resist purchasing snacks in crinkly bags, then use your bags as gift bags! It’s easy to do: Turn your chip bag inside out, wash it with dish soap to get rid of any grease. Dry it out. Then reuse the silvery or white side as a mylar-style gift bag. We do this all the time and reuse them over and over. We just attach some pretty ribbon like these pictured here which we found on the beach (no kidding) hanging beneath a deflated helium balloon all twisted up in seaweed. These ribbons last forever, they’re made of plastic, and look as good as new even after years of floating in the open sea. I’ve picked up so many of them on the beach, I’ve had occasion to give a bag of them away on my local Buy Nothing group, with the caveat that the person agrees to keep the ribbons on indoor gifts and not set them free with a helium balloon. When you’ve seen them wrapped around the necks of baby seals and sea turtles, you can’t help reconsider why we risk sending them into our seas via floating balloons in the first place. But I digress.

2) Make a shoulder bag. Some chip bags have a cool vintage look to them and could make a great shoulder bag.

3) Make a gum wrapper-style chain bracelet. Remember making paper chains from gum-wrappers? If you employ the same method with chip bags and candy wrappers, you can craft some amazing things. First step is making a bracelet.

4) And when you’ve mastered the gum wrapper-style bracelet, you’re ready to move on to the purse.

5) Craftbits has a tutorial for a nice clutch.

6) Make a potato chip bag mini scrap book. At making-mini-scrapbooks.com, you’ll learn how to make your own cool books that would also make excellent gifts for friends.

Mini Potato Chip Bag Scrapbook, Photo © making-mini-scrapbooks.com

7) Instructables has a tutorial for a chip bag wallet.

8) Craft a baby crinkly square to appeal to baby’s need for tactile and aural stimulation. We think a snack bag would make some good crinkly sounds for your little one.

Baby Crinkly Squares Can Be Made With Potato Chip Bags, Photo © Joy’sHope.com

Remember the Sunchip compostable bags and how loud they were (95 db)? Maybe stay away from those. They’ve been discontinued, apparently, but consumers certainly had fun with the deafening chip bags. Even a Facebook group was started, called SORRY, BUT I CAN’T HEAR YOU OVER THIS SUNCHIPS BAG. We were excited to see that compostable snack bags were being tested on the market, yet when we did our own compost test of the Sunchip bags in a commercial composter for a month, the bags, surprisingly, were still intact — no decomposition visible.

9) Make an adorable robot from the silvery side of your bag.

10) Yet another Instructable. This time it’s a pencil case. Who needs Terracycle when you can upcycle your own stuff?

11) Cover over an old bracelet with delightful snack bag colors to make a new one!

12) Make party tassels!

I figure that’s enough to keep you busy with your snack bags, but let’s face it, all of this will end up being tossed in the landfill eventually. Although my kids love to occasionally have a junk food fix of chips, we’re continuing to do our best to stop buying foods that come in unrecyclable bags. Until chips can be sold in something a little more sustainable, we’ll do our best to just say no, or make our own.

How Toxic Is Your Garden Hose?

Think Twice About Your Garden Hoses And How Toxic They Might Be. Photo © Liesl Clark

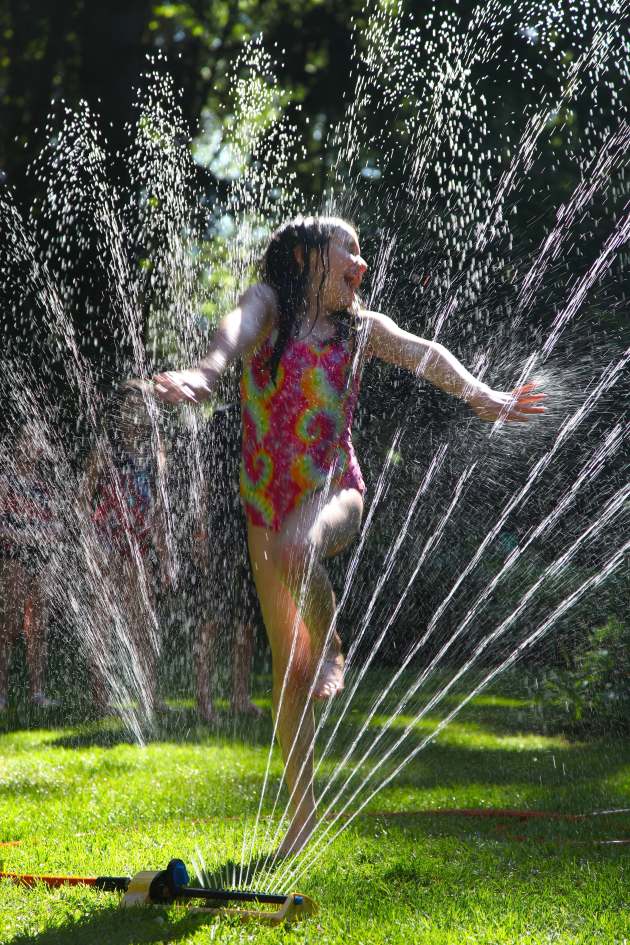
One of the cheapest, happiest forms of warm weather play for children is a garden hose with a sprinkler hooked up to it. For our children, it means hours of joyous play.

Sprinkler Fun. Photo © Liesl Clark

The challenge for us is the knowledge that most hoses are made of toxic chemicals and hence are full of pthalates and Bisphenol A. Both are known endocrine disruptors and if children drink from a hose their BPA levels will rise significantly.

Be Sure to Play in a BPA-Free Garden Hose Spray. Photo © Liesl Clark

Lead has also been detected in most garden hoses. It’s unknown what the effects are to the soil and plants, but what’s clear is that the next time we buy a hose we should be aware of studies on the chemicals hoses can leach and which hoses are safest. Here’s a 2016 study on the toxicity of hoses done by the Ecology Center.

Photo © Liesl Clark

We do have one PVC-free hose and that’s the one we use for kid water-play. In fact, we use it as often as possible, as we phase out our other old hoses. An irrigation project we’re longing to do is a hose-free drain system from our pond to the vegetable garden so we can skip the hose quotient altogether. No wonder our waters are full of estrogen-mimicking chemicals that are affecting indicator species like fish.

Photo © Liesl Clark

If you’re interested in phasing out your old hoses or reusing one that’s broken, we’ve seen them sliced lengthwise in small sections to be used as blade protectors for hand-saws, or used on the side of a garden shed for wall-art, or woven on an old chair to create some cool outdoor furniture.

But, for the purposes of watering our garden or for kid-play, from now on we’ll be seeking out BPA and lead-free hoses.

8 Plastic Kiddie Pool Reuses

After years of summer aquatic fun in 6 inches of baby pool magic with toddlers, my conscience took over and had issues with the unsustainable reality of the kiddie pool: Most inflatables get holes in them and whether they’re air-filled or hard plastic they’re made of PVC and laden with Bisphenol A, a toxic cocktail for earthlings just starting out on the planet.

We recently found a kiddie pool under our guesthouse deck, left behind by our renter, a mass of vinyl, pine needles, and hidden slugs. We cleaned it up with some high powered squirts from the garden hose and some serious scrubbing. I started inflating the thing by mouth in that way that Moms, Dads, and loved ones dedicated to preserving summer bliss can do, only to find that there was a small leak. Summer bliss had hit a road block.

Repairing inflatables is as simple as fixing a bike tire tube or Thermarest for camping. We got out the tube repair kit and made a quick patch and the inflating resumed. But it got me thinking. How many plastic kiddie pools are thrown out in our community each year? Likely hundreds. All that vinyl, headed to the landfill because someone didn’t have a patch kit or couldn’t deal with the gross slug slime-n-pine grime.


When you’re done with your pool, hopefully it’s still in working order for you to pass your pool on to another family that will frolic freely in their BuyNothing-ed frog pool. Or, if you have a hard plastic kid pool, donate it to your nearest animal rescue center for use by aquatic birds, fowl, and domestic animals escaping summer heat.

You might want to hang on to it, however, when you discover some of the upcycle options for that prized pool.

Hard Plastic Kiddie Pools:

1) Turn your pool and a few others into a raised bed garden. Wandering Chopsticks has a simple tutorial for you to follow for adding some green (and veggies) to your backyard.

Wandering Chopsticks’ Kiddie Pool Raised Bed Garden, Photo by Wandering Chopsticks.

2) If you have a party coming up and need to keep a lot of food cold while serving, Thrifty Fun’s wading pool cool food server might be just what you’re looking for.

3-6) Here are 4 more great ways to reuse your hard plastic kiddie pool, presented by Hint Mama. Among them are a ball pit, a beach playpen, and a toy bin.

Inflatable Kiddie Pools:


7) Turn your deflated pool into a slippy slide! Just turn it upside down on a little slope and add a trickle of water.

8) Then add a few drops of environmentally-safe liquid soap and watch the fun and bubbles explode!

Our kids are now older and I can proudly say that we never had to take a kiddie pool to the landfill. The reuses were too good and then the pools were passed on to others. Do you have a reuse we haven’t mentioned here?

50 Garden Hacks From Your Trash

screen-shot-2013-03-12-at-1-21-45-am

There may be items in your trash that could help you with your gardening. Check out this list and see if any of these great ideas resonate with you, helping you pull a couple things out of your trash and, well, into your garden to green up your world. If you don’t have these items in your trash, ask for them on your local Buy Nothing group. I’ve categorized the ideas by item, and each one links to a unique reuse. Enjoy!

Plastic Bottles:

1) Plastic Bottle Mosquito Trap: This one is a trick using yeast and a cut bottle glued together. Read on and try it.

2) Plastic Bottle Cloche: It’s as easy as cutting a plastic bottle in half and sticking it upside down over your seedling or plant.

3) Plastic Bottle Self-Watering Seed Starters: These plastic bottles, cut in half and one inverted inside the other have a wicking system worth checking out.

4) Plastic Bottle Drip Irrigation System: 4 small holes in your 2-liter bottle that’s buried in the ground provide excellent watering for your plants.

5) Plastic Bottle Greenhouse: A greenhouse like this is a true inspiration.

Milk Jugs:

6) Milk Jug Scoop: Milk or OJ jugs make easy scoops.

7) Milk Jug Cloches: Use Milk Jugs to protect your larger plants. Just cut the bottom out of the milk jug, turn it upside down and it’ll protect your plants.

8) Milk Jug Mini Greenhouses: These mini greenhouses in gallon jugs can prove useful.

Clear Plastic Containers:

9) Plastic Container Mini Greenhouse: Just turn it upside down and you have a mini cloche/greenhouse.
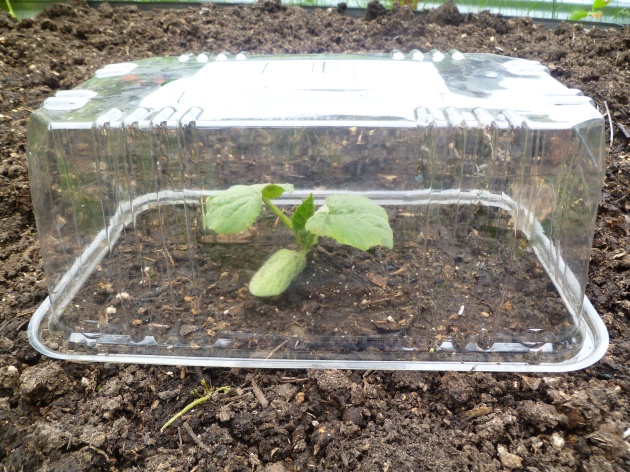
Winter Squash Seedling Basking in the Heat of a Lettuce Box, photo by Rebecca Rockefeller

Cereal Boxes & Cracker Boxes:

10) Cardboard Weed Block: Take your cereal boxes and cracker boxes to the garden and use them as weed blocking.

Bike Wheels:

11) Bike Wheel Trellis: Bike wheel trellises are beautiful.

DVDs/CDs:

12) DVD/CD Bird Scaring Trick: Birds don’t like reflective stuff. It scares them off. Put a few around your berries and you’ll keep those peckers away.

Mailboxes:

13) Mailbox Garden Tool Cache: Post an old mailbox up in your garden, and you have a water-proof place to store hand tools, planter markers, and your notes.

Make a garden tool cache out of an old mailbox. Photo © Liesl Clark

Drawers:

14) Drawer Seedling Starter: This one’s easy. Just use an old drawer as a seedling planter box.

OJ Cans:

15) OJ Can Plant Labels: The can tops make pretty labels for marking your rows.

Rain Boots:

16) Rain Boot Planters: Save a few pairs of the kids cute rain boots for whimsical planters.

Plastic Plant Pots:

17) Plastic Plant Pot Flowers: Add a little flair to your outdoor space with these plant pot flowers.

Trash Cans:

18) Trash Can Root Cellar: I’m interested in trying this for storing our potatoes, carrots, daikon radish, turnips and cabbages next year. It simply requires digging a deep hole.

Tupperware Tubs:

19) Tupperware Worm Farm: Make a few holes in your old Tupperware bins, order a few hundred red worms, follow the instructions here and you’ll have a worm farm.

Plastic Bottle Caps:

20) Plastic Bottle Cap Lawn Flowers: Michele Stitzlein creates beautiful blooms from plastic caps. She’s published a couple of books on plastic cap art, too.

Glassware:

21) Glassware Flowers: These bowls and dishes are all the rage.

Garden Hoses:

22) Garden Hose Flowers: If you have space on a wall, you could create flowery art from your old hoses.

Twist Ties:

23) Twist Tie Plant Trainers: Save your twist ties to use for training plants to fences and stakes.

We reuse twist ties for training our espalier fruit trees. Photo © Liesl Clark

Soda Cans:

24) Soda Can Planters: In a pinch, soda cans can be used as planters and seed starters.

25) Pop Can Plant Markers: With a little effort, you can make some pretty markers for your garden.

Styrofoam:

26) Styrofoam Planter Filler: Fill the bottom of your large plant pots with styrofoam so they don’t get too heavy.

Styrofoam Planter Filler, Photo: Liesl Clark

PVC

27) PVC Garden Tower: Drill holes in a PVC tube and you have a strawberry planter

Coaxial Cables:

28) Coaxial Cable Fence: Who knew that a coaxial cable could look so pretty with bamboo?

Tie a Bamboo Fence Together with Coaxial Cable

Wine Bottles:

29) Wine Bottle Waterer: Turn your empties upside down (with H2O in them) in your plant pots and go on vacation!

30) Wine Bottle Garden Edging: Wine bottles can make colorful garden edging.

31) Wine Bottle Hose Guard: A wine bottle and a stick are all that’s needed to keep your hose out of your garden beds.

Empty Bottle Hose Guard Hard at Work photo: Rebecca Rockefeller

Clementine Boxes:

32) Clementine Box Planters: Clementine boxes make excellent seedling starter boxes or planters for forced bulbs.

Blue Jeans:

33) Blue Jeans Garden Apron: Sew yourself a simple garden apron from an old pair of jeans that can hold your garden tools.

Plastic Mesh Produce Basket:

34) Plastic Mesh Seedling Saver: We use these baskets to prevent slugs and birds from destroying our seedlings.
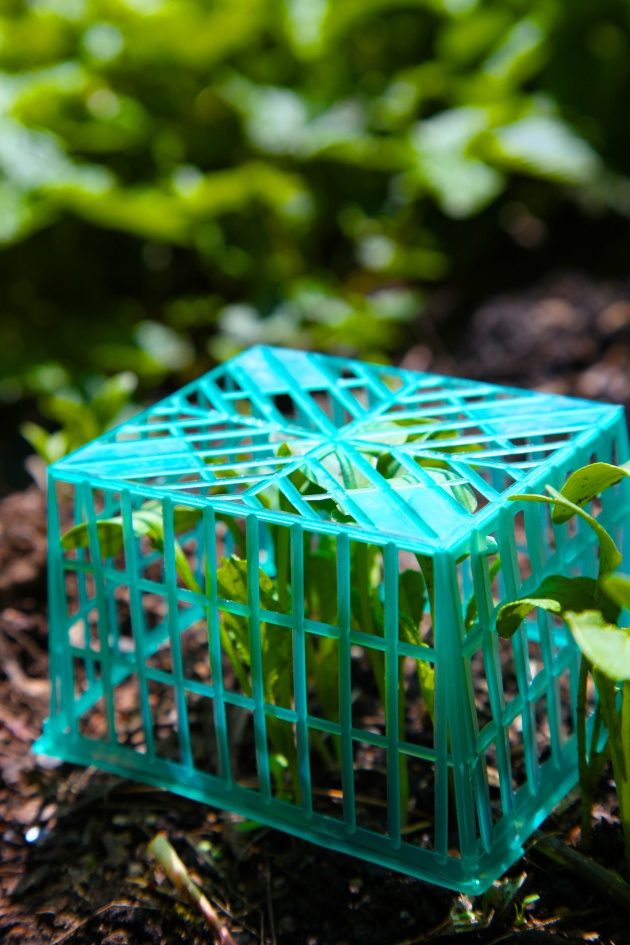
Turn your trash backwards: Place mesh produce baskets over seedlings to protect from birds, frost, and really big slugs.

Windows:

35) Windows Greenhouse: This is a simple design for a small greenhouse made from windows.

36) Window Frame Trellis: An old window frame with mullions makes a pretty trellis.

Broken Ceramics:

37) Broken Ceramics Pot Drainage: Put your broken ceramic pieces in the bottom of plant pots for added drainage.

38) Plant Your Broken Dishes: Plant your favorite broken dishes in the garden and enjoy them throughout the growing season.
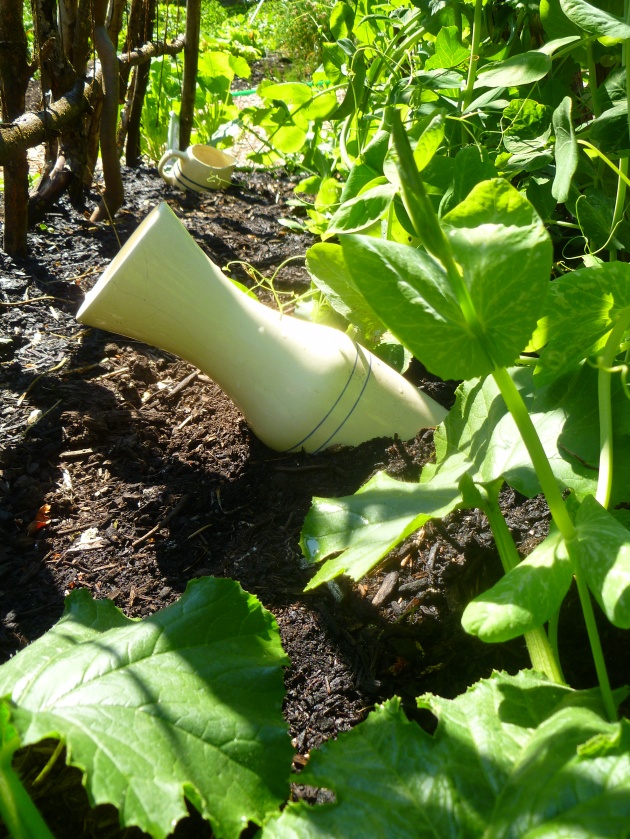
Carafe and Pitcher under the Bean Trellis photo by Rebecca Rockefeller

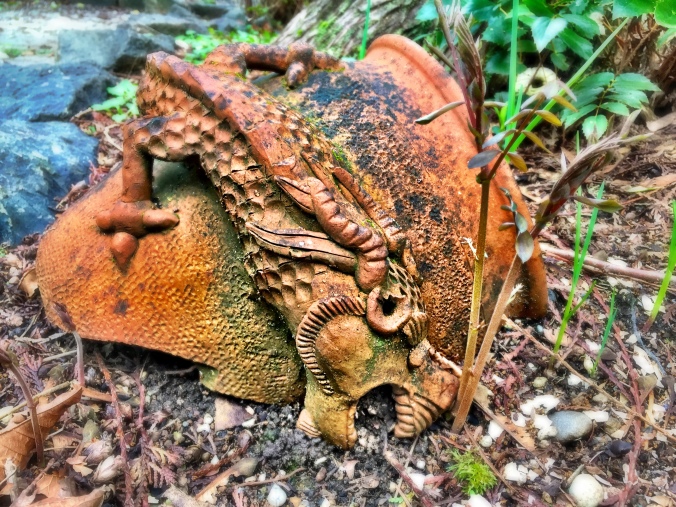
Broken Pot Planter: When our ceramic pots break, I plant them in our garden along with something planted to look as if it’s spilling out of the pot, having grown there over time.
IMG_2266

Paint Cans:

39) Paint Can Planters: I love these paint cans turned planters at my friend Maya’s house in Tsarang, Upper Mustang, Nepal.

Even Paint Cans Add Flowery Color to a Household, Photo: Liesl Clark

Laundry Hampers:

40) Laundry Hamper Potato Planter: I planted potatoes inside an old laundry hamper and the harvest was easy.

Potato Leaves Begin to Poke Out, Photo©Liesl Clark

Skis:

41) Ski Fence: If anyone lives in the Seattle area and wants to make one of these, please contact us as we have several hundred skis at the end of our Rotary Auction.

Window Blinds:

42) Mini Blind Plant Markers: These look really easy to make.

Panty Hose:

43) Panty Hose Deer Repellant: If you place a bar of soap inside the foot of old panty hose and hang it from your apple tree, it should deter the deer from nibbling on your tree. You can also use a single child’s mitten for this, as it looks cute and either put the perfumed soap inside or human hair (they don’t like the smell of humans.)

Headboards:

44) Headboard Trellis: A headboard makes a beautiful pea trellis.
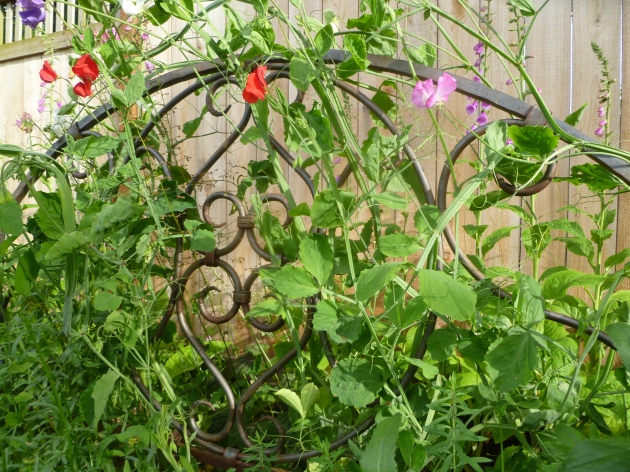
An Old Headboard from Freecycle Makes a Perfect Garden Trellis, photo by Rebecca Rockefeller

Newspaper:

45) Newspaper Garden Uses: There are many reuses for newspaper in the garden.

Cassette Tapes:

46) Cassette Tape Bird Deterrent: Pull the tape out of your cassette and string it over your garden. Birds hate the reflective quality of the tape.

Pet Food Bags:

47) Feed Bag Tarp: Sew your plastic woven pet food bags together into a tarp for garden needs.

Toilet Paper Tubes:

48) TP Tube Seedling Starters: Start your seeds in a tube filled with soil.

Sponges:

49) Sponges in Plant Pots: Cut up your old sponges and place them in the bottom of plant pots. They’ll hold moisture for a long time.

Kiddie Pools:

50) Kiddie Pool Raised Bed Garden: Hard plastic kiddie pools make excellent raised bed gardens.

What do you reuse in your garden? Help me add to the list.

Random Acts of Reuse In The Kingdom of Mustang

In Upper Mustang, Nepal, there is an ethic of reuse that has changed my ways. Few things are consumed and then simply thrown away, except for candy wrappers, plastic packaging like biscuit wrappers, ramen noodle packets, and plastic bags holding washing powder. These, sadly, are found underfoot in nearly every village.

Plastic Packaging Used for Irrigation:

But most plastics in Mustang are put to use in innovative ways. Take the plastic lining for water diversion in irrigation ditches. Rather than using jute sacks filled with sand, a readily available material is plastic packaging and bags layered with mud, unwanted clothing and textiles to create an impermeable dam for irrigation ditches. The plastics, unfortunately, often break free and are carried downstream into the Kali Gandaki River where all water flows.

Potato Sack Turned Horse Feed-Bucket:

One of the most innovative Mustang-style trash hacks is the method by which local horses are fed their grain. Potato sacks made of woven plastic are sewn into a configuration that fits easily around a horse’s muzzle, with long string handles that hang over the horses’ ears. Corn is measured out and put in the potato-sack-turned-feed-bag, the chaff blown by hand from the corn to prevent the horse from inhaling it in the bag, and the bag is hung from the horse’s ears: a muzzle feeder that’s a brilliant light-weight way to feed one’s horses while traveling. No need for heavy buckets. Whether on-the-go or at home, these muzzle feed bags are the preferred feeding bucket for Mustang equines.

When one becomes worn out and a hole develops, they’re quickly patched up, as this one was mended by a talented tailor friend in the village of Samdzong, utilizing his son’s worn out sweat pants.

I grew up with horses and we went through plenty of buckets, some made of PVC and plastic which when broken became yet another hefty item in the landfill. The potato/rice sacks turned into horse feed bags are one of the best reuses I’ve ever seen in a remote part of the world that could easily be adopted world-wide!

Planted Pots in Buckets, Paint Cans and Tins:

Anything that is a receptacle is used in Mustang until it can no longer hold anything, disintegrated by sun and wind to the point of uselessness. In the topmost photo of planters, below, you’ll see a plastic bucket that developed a crack and was then sewn back together with plastic twine. Potted flowering succulents are such a valuable addition of organic color to a household, taking the time to repair that heavy-duty plastic pot is clearly worth the effort. If we treated our own plastic pots and buckets the same way, there’d be a significant reduction in the production of these plastics in the first place, and a renewed ethic which the Lobas, the people of Upper Mustang, haven’t lost, of repairing everything again and again until its useful life is truly over. Now that’s reuse!